Process-Based App with AI

This topic explains how to create a process-based app with GenAI in the Modern Add an App Experience.

Background and Setup

Examples

Prerequisites

Good to Know

  • You can use an image file as a template for your form. The image file must meet these requirements:
    • Supported file types are .png, .jpg, and .jpeg.
    • The file cannot be larger than 10 MB.
    • Regardless of the file height, only one form is generated.
    • Any other content is ignored, including images, icons, or descriptive text.
  • You can use a PDF file as a template for your form. The PDF file must meet these requirements:
    • The file cannot be larger than 10 MB.
    • The PDF cannot be more than 5 pages.
    • Regardless of the number of pages, only one form is generated.
    • Any other content is ignored, including images, icons, or descriptive text.
  • You can use a Microsoft Excel file as a template for your form. The Excel file must meet these requirements:
    • The file cannot be larger than 10 MB.
    • Only the first sheet is considered.
    • The first row is considered the field name.
  • Once configured, the primary data source in a data source bound app cannot be deleted. Deleting the primary data source can lead to unexpected behavior or errors in your app because it is the main source of data for the app.

How to Start

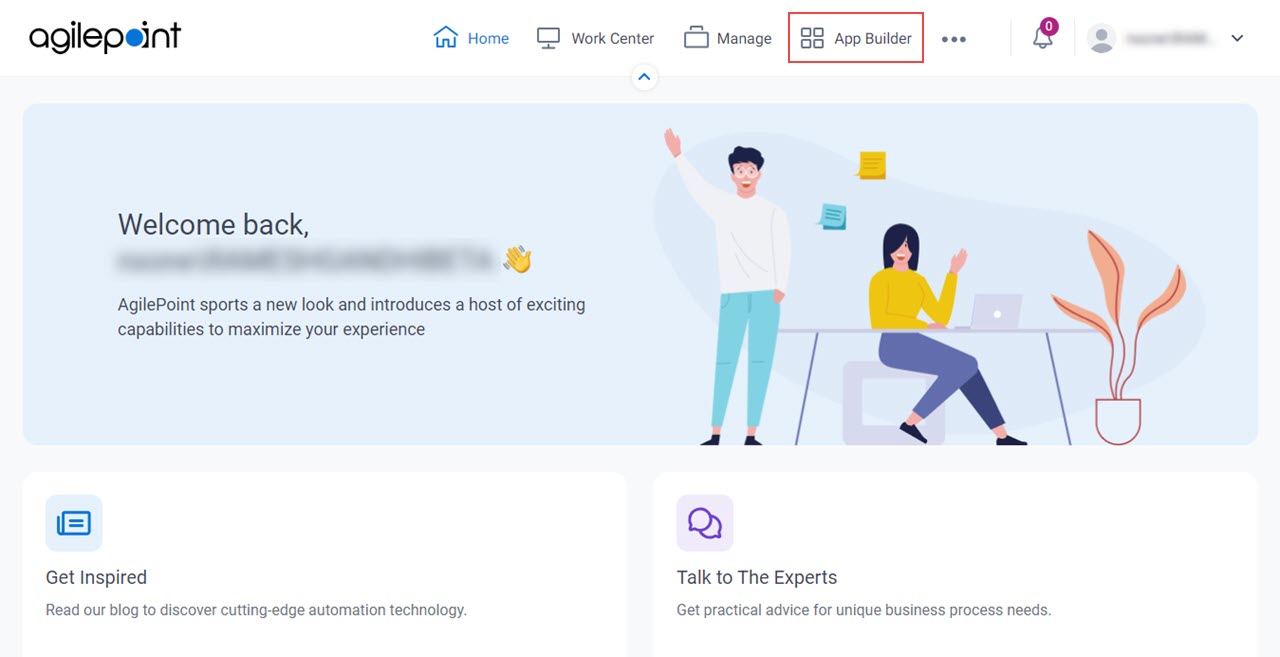
  1. Click App Builder.

    Click App Builder
  2. On the App Builder Home screen, click Add App.
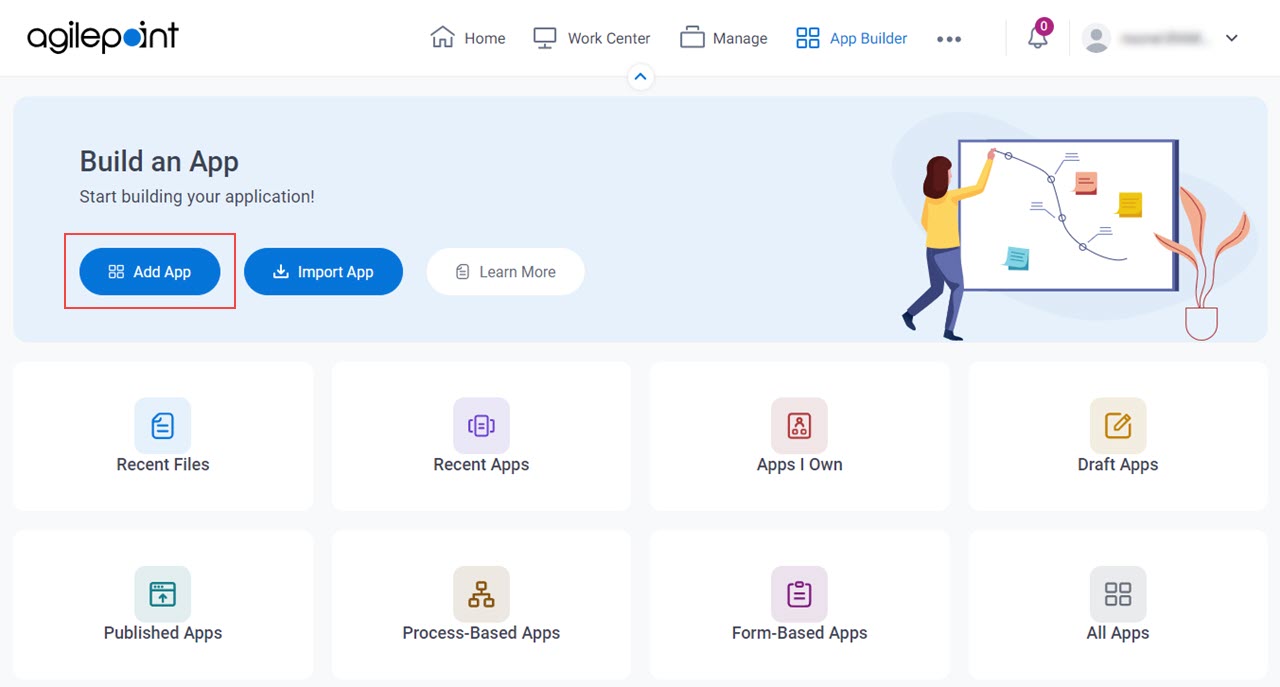
    Click Add App
  3. On the What type of app would you like to build? screen, click Process-Based App.

What type of app would you like to build? screen

Configures the type of app to create.
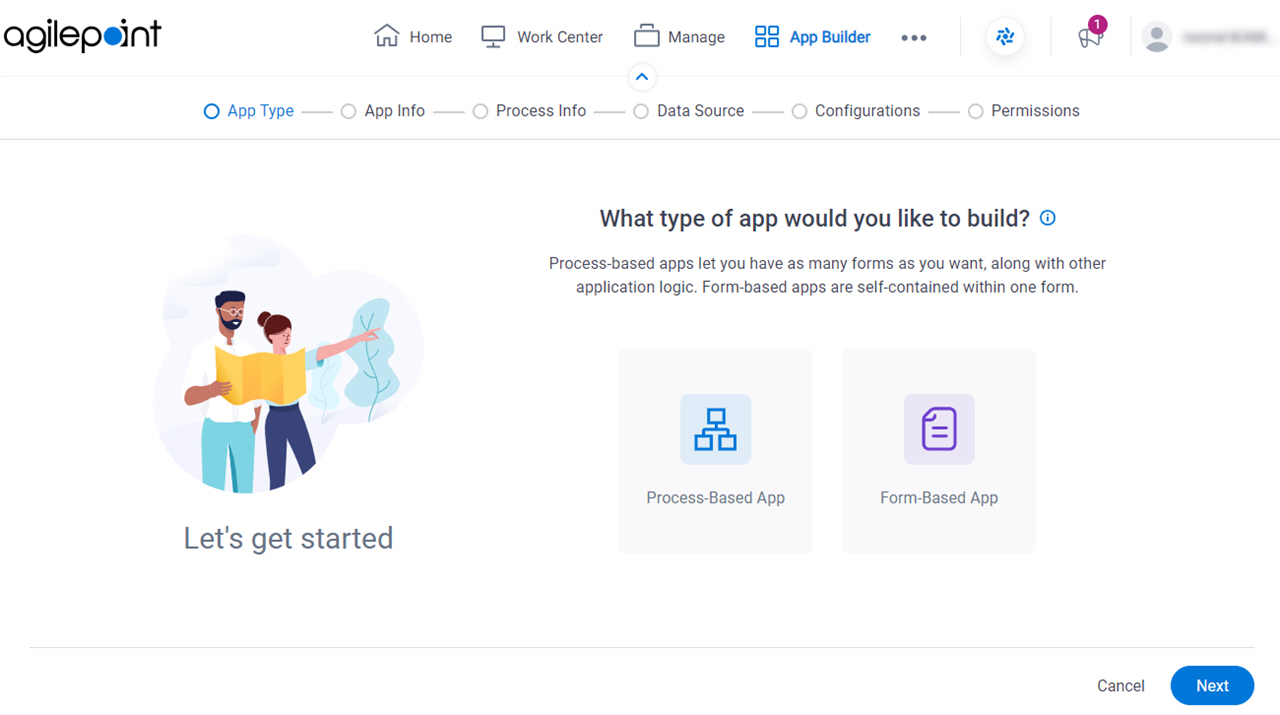
Figure: What type of app would you like to build? screen

What type of app would you like to build screen

Fields

Field NameDefinition

App Type

Description:
Specifies the type of app to create.
Allowed Values:
Default Value:
Process-Based App

How will people identify your app? screen

Configures the basic information for your app.
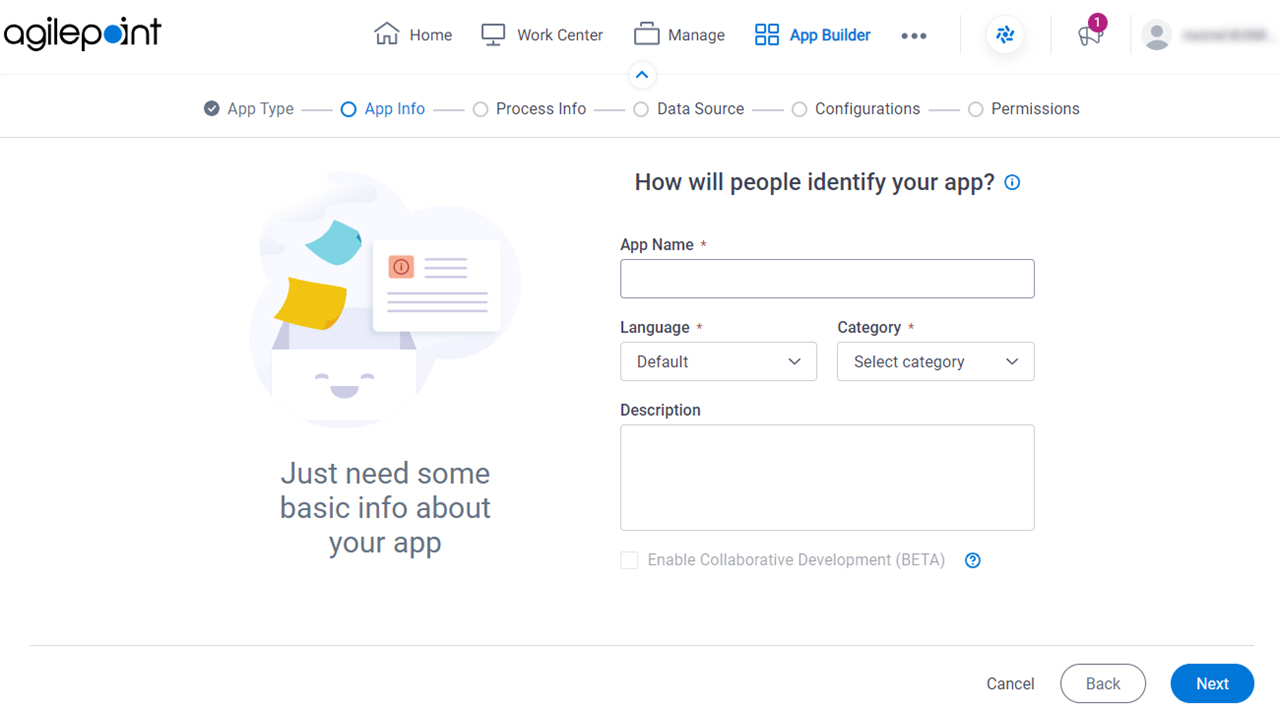
Figure: How will people identify your app? screen

How will people identify your app screen

Fields

Field NameDefinition

App Name

Description:
Specifies a name for your app.
Allowed Values:
One line of text (a string).

Accepted:

  • Letters
  • Numbers
  • Spaces
Default Value:
None

Language

Description:
Specifies the language for your app.
Allowed Values:
A language from the list.
Default Value:
None
Accepts Variables:
No

Category

Description:
Specifies a category for your app.
Allowed Values:
A category from the list.

The category list comes from Tenant Settings > Categories tab.

Default Value:
None

Description

Description:
An optional description for your app.
Allowed Values:
More than one line of text.
Default Value:
None

Enable Collaborative Development

Description:
Specifies whether app designers can use collaborative development to work on the app.
Allowed Values:
  • Selected - App designers can use collaborative development to work on the app.
  • Deselected - Collaborative development is not enabled for the app. Only one user at a time can check out the files for the app.
Default Value:
Deselected
Example:
Refer to:
Limitations:

How do you want to set up your process? screen

Configures the basic information for your process.
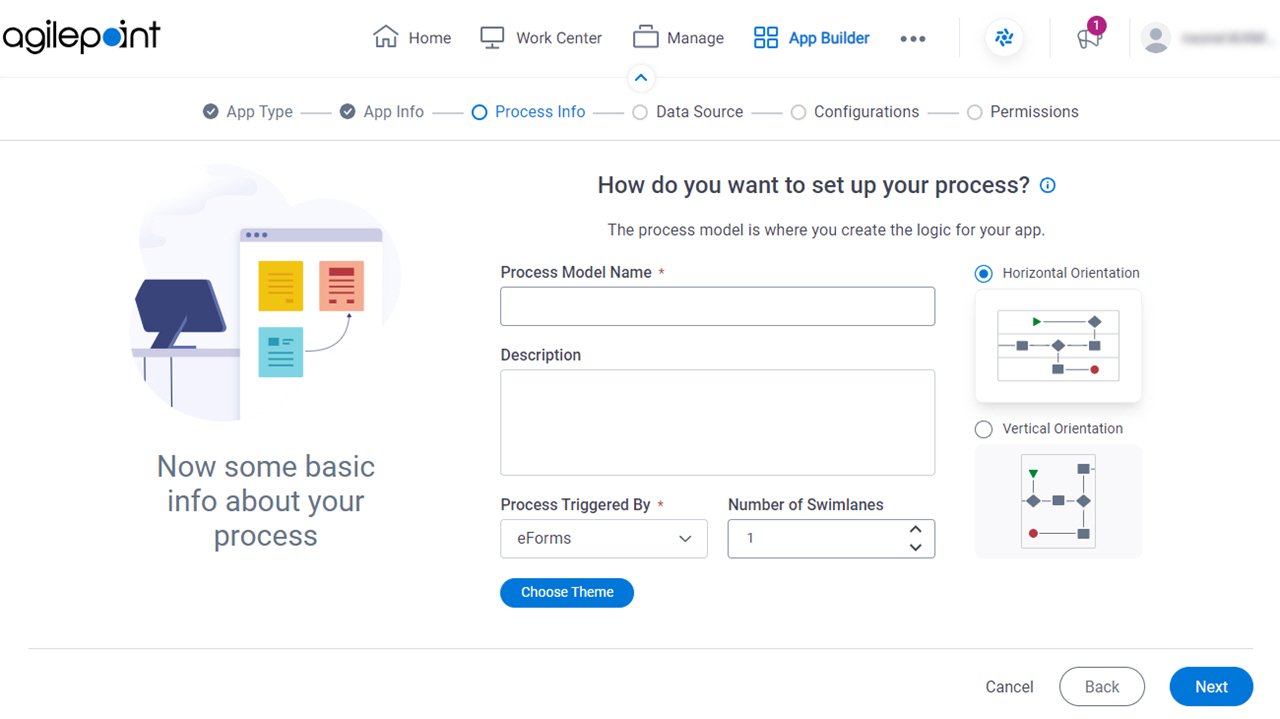
Figure: How do you want to set up your process? screen

How do you want to set up your process screen

Fields

Field NameDefinition

Process Model Name

Description:
Specifies a name for your process.
Allowed Values:
One line of text (a string).

Accepted:

  • Letters
  • Numbers
  • Spaces
Default Value:
None
Accepts Variables:
No

Description

Description:
A description for your process.
Allowed Values:
More than one line of text.
Default Value:
None
Accepts Variables:
No

Process Triggered By

Description:
Specifies what causes the process to start.
Allowed Values:
  • eForms - The process starts when a user submits a form made with eForm
  • External Forms - The process starts when a user submits a form that is made with a form technology other than eForms, such as Java or ASP.NET.
  • Message/Event - The process starts when an email account receives an e-mail, a specified event occurs.
  • System Integration - A specified event happens in an external system, such as Salesforce or a database.
  • Parent Process - The process is the child, or subprocess, to another process.

    If you create a process model in a process-based app that already has a process models, this is the only option.

    The limit of one parent process model in a process-based app was enforced in AgilePoint NX OnPremises v7.0 Software Update 1. In earlier releases, this was a limit according to the license, but the options in this list allowed more than one parent process.

  • SharePoint - A specified event happens in SharePoint. For example, a user creates a list or list item.
  • InfoPath Form Services - A specified event happens in SharePoint On Premises. For example, a user submits a form.
  • Salesforce - A specified event happens in Salesforce. For example, a user creates an entity.
Default Value:
eForms

Number of Swimlanes

Description:
Specifies a number of swimlanes to be added to the Process Builder screen to organize the steps in your process.
Allowed Values:
A number from 0 to 20.
Default Value:
1

Swimlanes Orientation

Description:
Specifies the direction for your swimlanes.
Allowed Values:
  • Horizontal - Shows swimlanes from left to right.
  • Vertical - Shows swimlanes from top to bottom.
Default Value:
Horizontal

Choose Theme

Description:
Specifies a process theme to show on the My Apps screen in Work Center.

Do you want AI to create your process? screen
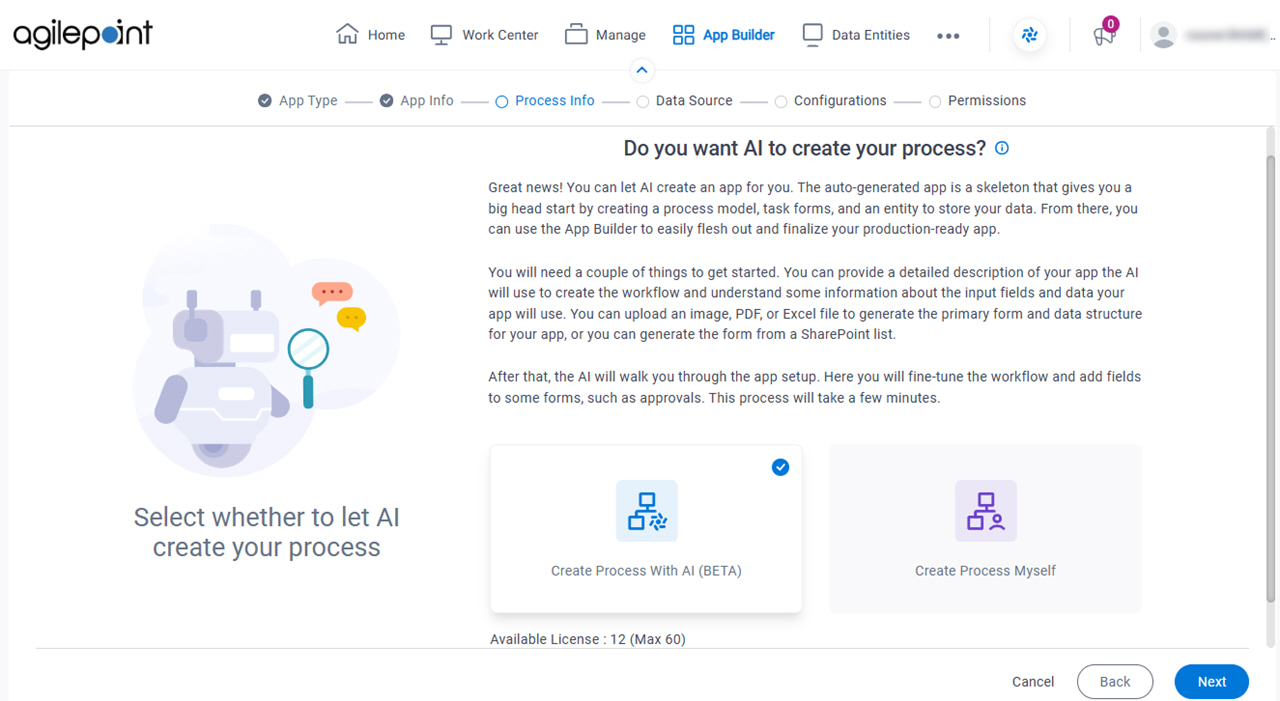
Specifies whether to create the process with GenAI.

Figure: Do you want AI to create your process? screen

Do you want AI to create your process?

Fields

Field NameDefinition

Create Process With AI / Create Process Myself

Description:
Specifies whether to create a process with GenAI.
Allowed Values:
Default Value:
Create Process With AI

What do you want your app to do? screen

Specifies a text prompt to create the app. Describe the purpose of the app with as much detail and as accurately as possible.
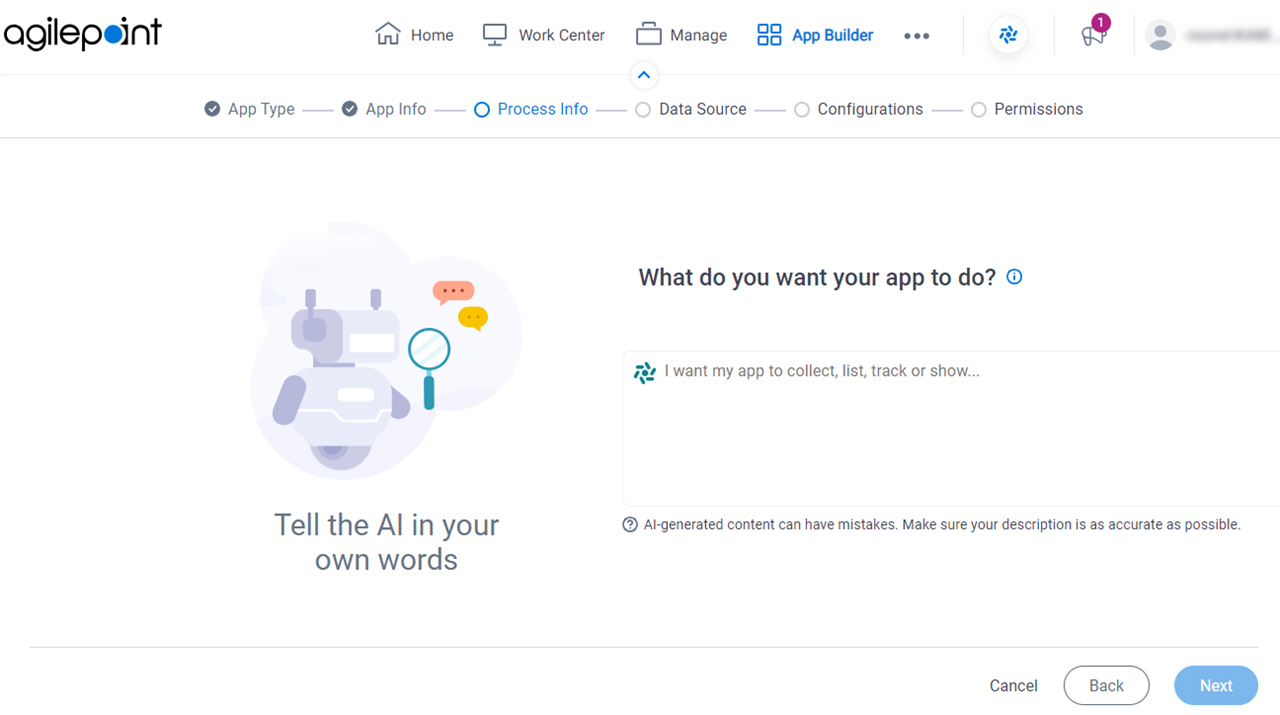
Figure: What do you want your app to do? screen

What do you want your app to do screen

Fields

Field NameDefinition

Process Description

Description:
Specifies a text prompt to create the app. Describe the purpose of the app with as much detail and as accurately as possible.

GenAI creates a process based on the description the app designer enters.

Allowed Values:
More than one line of text.
Default Value:
None

Review the activities for your app screen

Configures the activities for the process.
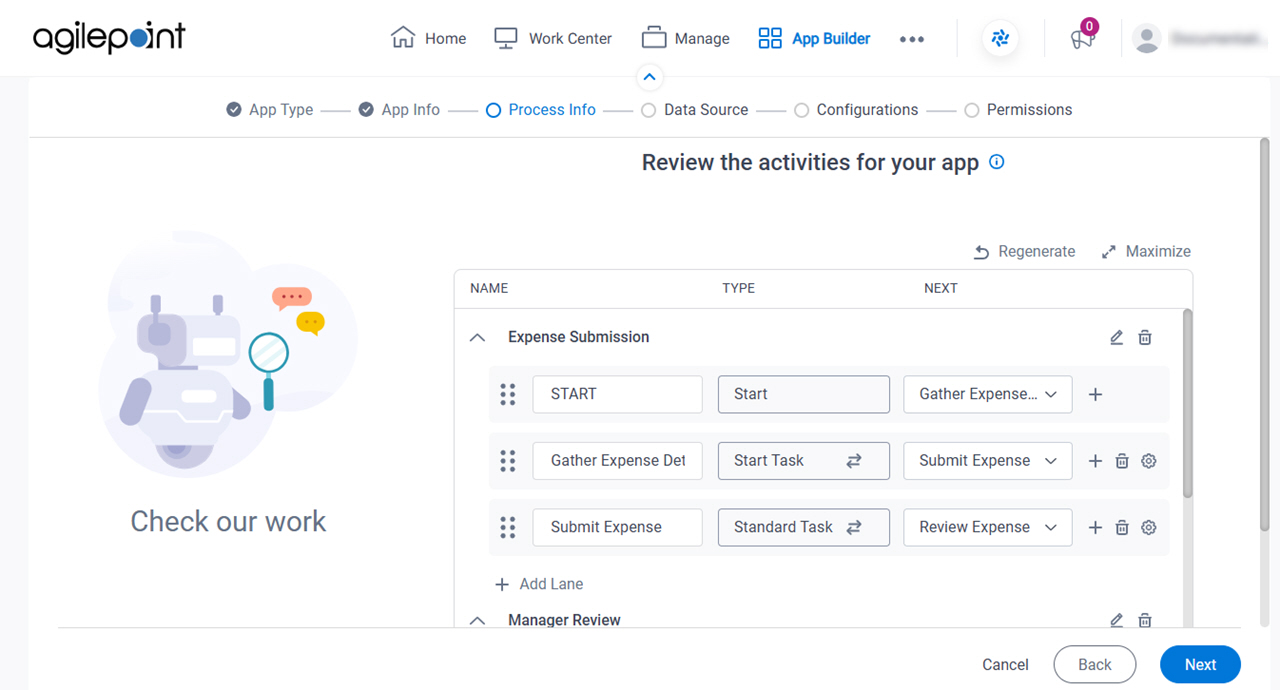
Figure: Review the activities for your app screen

Review the activities for your app screen

Good to Know

  • GenAI creates the process activities based on the process description the app designer enters. You can add, change, and delete process activities based on your business requirements.
  • You can not delete the Start and Stop activities from the process.

Fields

Field NameDefinition

Name

Description:
Specifies the text label for the activity that displays on the process.
Allowed Values:
One line of text (a string).

Accepted:

  • Letters
  • Numbers
  • Spaces
  • Special characters
Default Value:
The activity name specified in the imported file.

Type

Description:
Shows the type of activity used for the process.
Allowed Values:
Read only.

Next

Description:
Specifies the next activity in the process.
Allowed Values:
An activity from the list.
Default Value:
None

Regenerate

Description:
Deletes the changes and restores the default values for the process model.

Edit Lane Name Edit Lane Name icon

Function:
Changes the name for the swimlane.

Maximize

Opens this Screen:
Shows the configuaration section at its maximum size.

Minimize

Opens this Screen:
Shows the configuaration section at its default size.

Edit Lane Name Edit Lane Name icon

Function:
Changes the name for the swimlane.

Delete Lane Delete Lane icon

Function:
Deletes the selected swimlane.

Add Activity Add Activity icon

Function:
Opens the Select Activity screen to add an activity.

Delete Activity Delete Activity icon

Function:
Deletes the selected row from the activities list.

Configure Activity Configure Activity icon

Opens this Screen:
Opens the configuration screen for a human task activity. This option lets the app designer configure basic information, such as a name and description, and assign the participants for the task.

Add Lane

Function:
Adds a swimlane for the process.

Do you want AI to create your form? screen

Specifies whether to create the form with GenAI.
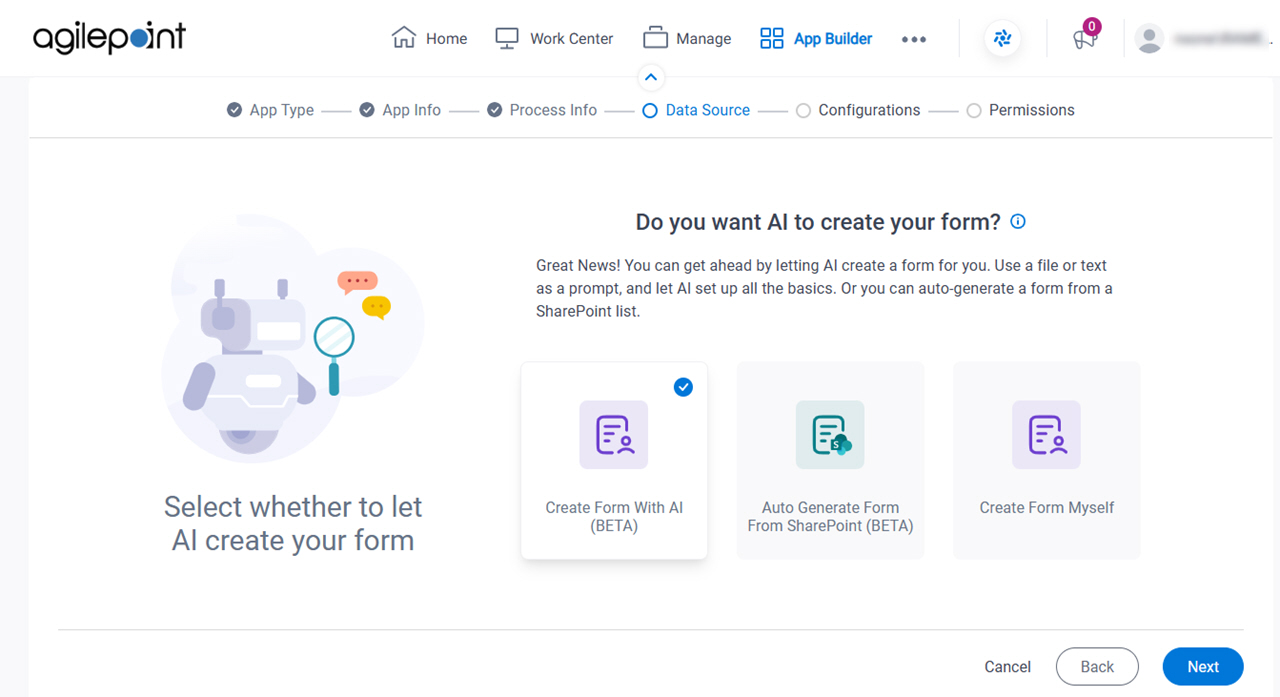
Figure: Do you want AI to create your form? screen

Do you want AI to create your form screen

Fields

Field NameDefinition

Create Form With AI / Auto Generate Form From SharePoint / Create Form Myself

Description:
Specifies whether to create an eForm with GenAI.
Allowed Values:
Default Value:
Create Form With AI

How do you want the AI to create your form? screen
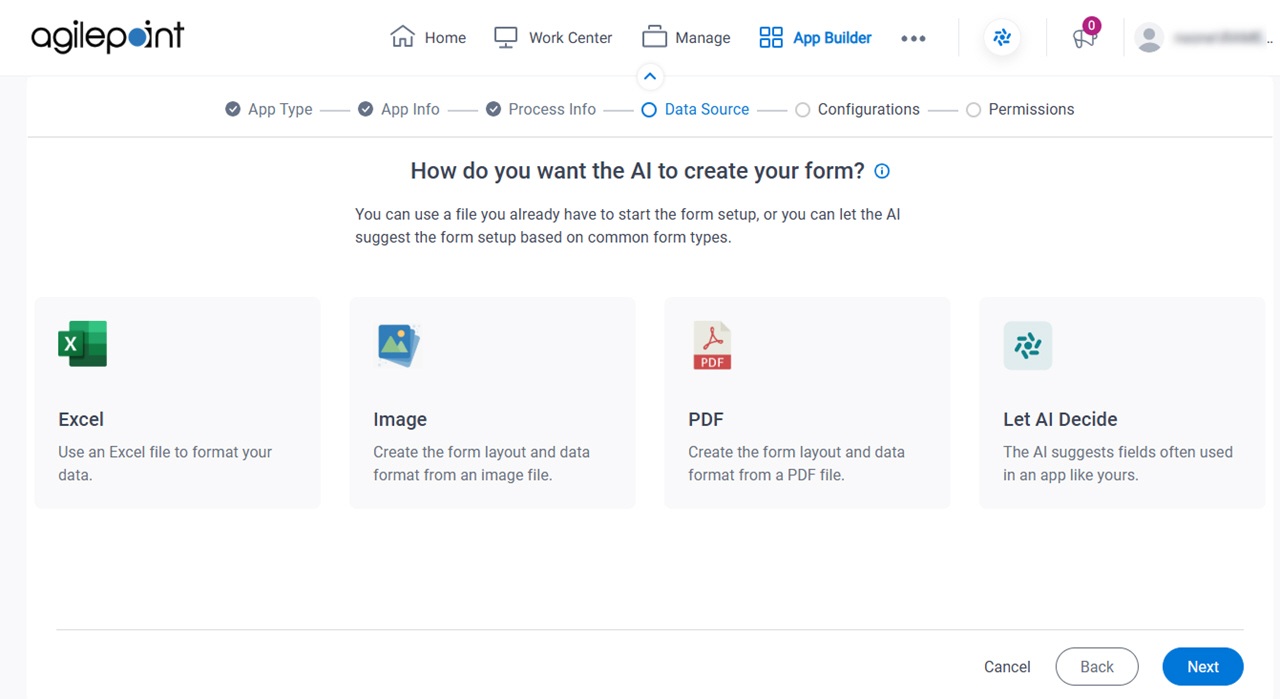
Specifies the type of input for GenAI to create an eForm.

Figure: How do you want the AI to create your form? screen

How do you want the AI to create your form? screen

Good to Know

  • You can use a Microsoft Excel file as a template for your form. The Excel file must meet these requirements:
    • The file cannot be larger than 10 MB.
    • Only the first sheet is considered.
    • The first row is considered the field name.
  • You can use an image file as a template for your form. The image file must meet these requirements:
    • Supported file types are .png, .jpg, and .jpeg.
    • The file cannot be larger than 10 MB.
    • Regardless of the file height, only one form is generated.
    • Any other content is ignored, including images, icons, or descriptive text.
  • You can use a PDF file as a template for your form. The PDF file must meet these requirements:
    • The file cannot be larger than 10 MB.
    • The PDF cannot be more than 5 pages.
    • Regardless of the number of pages, only one form is generated.
    • Any other content is ignored, including images, icons, or descriptive text.

Fields

Field NameDefinition

Excel / PDF / Image / Let AI Decide

Description:
Specifies the type of input for GenAI to create an eForm.
Allowed Values:
  • Excel - Uses an Excel file you upload as the data to create the form.
  • PDF - Uses a PDF file you upload as a template or model to create the form.
  • Image - Uses an image file you upload as a template or model to create the form.
  • Let AI Decide - Provides a text box where you can enter a description of the form as a prompt. GenAI creates a form based on common field types for the form description you enter.
Default Value:
None

Select the repository that contains your form's template screen

Specifies the location of the Microsoft Excel file for your form template.
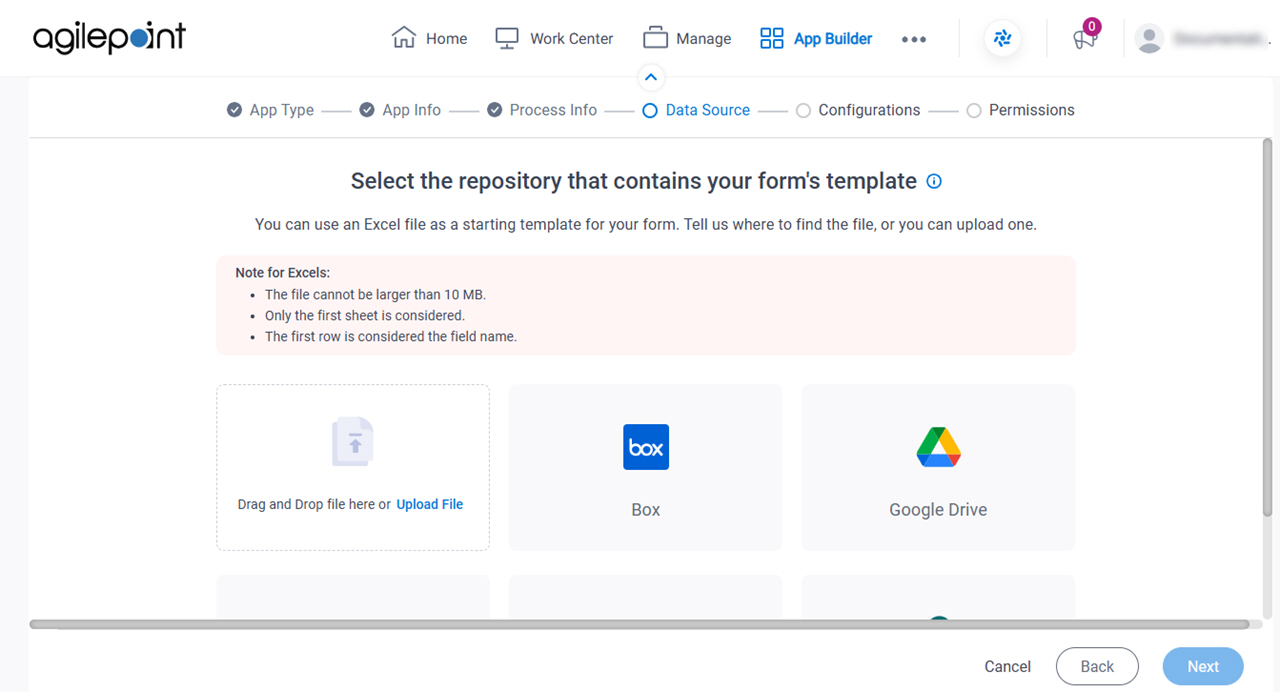
Figure: Select the repository that contains your form's template screen

Select the repository that contains your form's template screen

Prerequisites

Good to Know

  • You can use a Microsoft Excel file as a template for your form. The Excel file must meet these requirements:
    • The file cannot be larger than 10 MB.
    • Only the first sheet is considered.
    • The first row is considered the field name.

Fields

Field NameDefinition

Upload File

Function:
Specifies a Microsoft Excel file that stores the data to create an eForm.

You can drag the Excel file from your local machine.

Allowed Values:
An Excel file where the columns in a table represent input fields for a task form.

Click Upload File to select a file from your local machine.

The file must follow the business rules for GenAI.

Default Value:
None

Box

Opens this Screen:
Document Repository for Box
Function of this Screen:
Specifies the location of your file in Box.

Google Drive

Opens this Screen:
Document Repository for Google Drive
Function of this Screen:
Specifies the location of your file in Google Drive.

OneDrive

Opens this Screen:
Document Repository for OneDrive
Function of this Screen:
Specifies the location of your file in OneDrive.

OneDrive For Business

Opens this Screen:
Document Repository for OneDrive for Business
Function of this Screen:
Specifies the location of your file in OneDrive for Business.

SharePoint

Opens this Screen:
Document Repository for SharePoint
Function of this Screen:
Specifies the location of your file in SharePoint.

Select the repository that contains your form's template screen

Specifies the location of the image file for your form template.
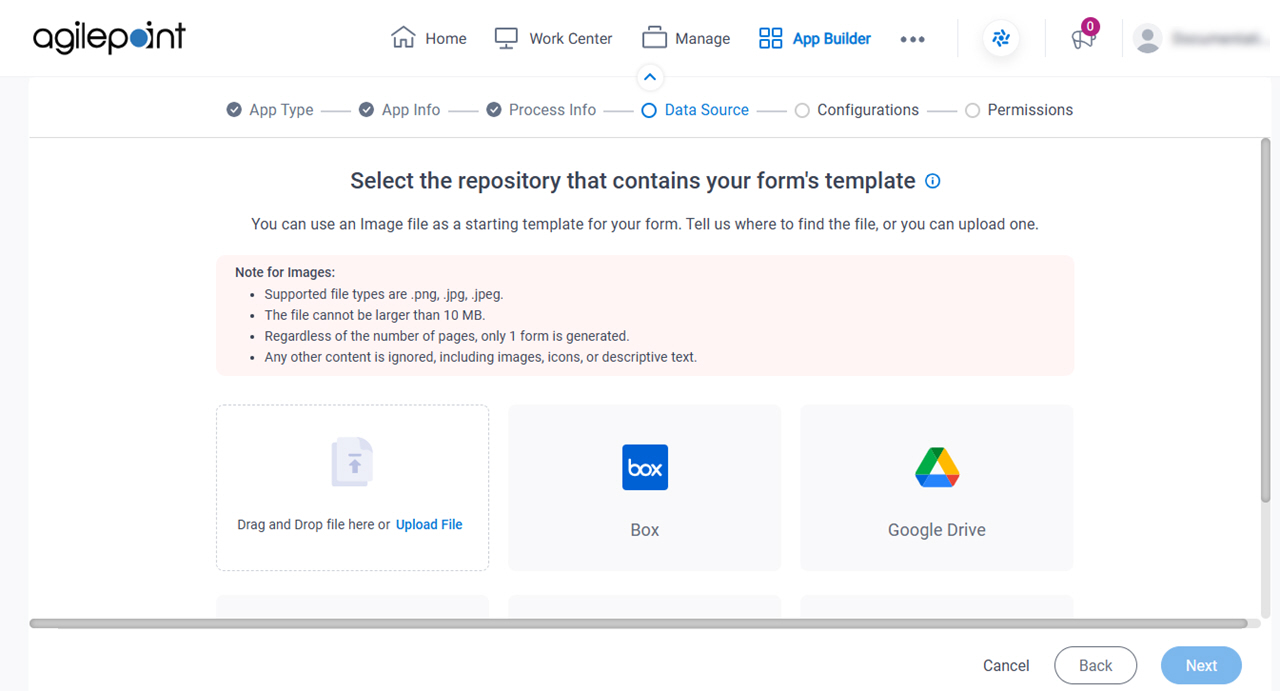
Figure: Select the repository that contains your form's template screen

Select the repository that contains your form's template screen

Prerequisites

Good to Know

  • You can use an image file as a template for your form. The image file must meet these requirements:
    • Supported file types are .png, .jpg, and .jpeg.
    • The file cannot be larger than 10 MB.
    • Regardless of the file height, only one form is generated.
    • Any other content is ignored, including images, icons, or descriptive text.

Fields

Field NameDefinition

Upload File

Function:
Specifies an image file to use to create an eForm.

You can drag the image file from your local machine.

Allowed Values:
An image file that shows a mockup, template, or model for a task form.

Click Upload File to select a file from your local machine.

The file must follow the business rules for GenAI.

Default Value:
None

Box

Opens this Screen:
Document Repository for Box
Function of this Screen:
Specifies the location of your file in Box.

Google Drive

Opens this Screen:
Document Repository for Google Drive
Function of this Screen:
Specifies the location of your file in Google Drive.

OneDrive

Opens this Screen:
Document Repository for OneDrive
Function of this Screen:
Specifies the location of your file in OneDrive.

OneDrive For Business

Opens this Screen:
Document Repository for OneDrive for Business
Function of this Screen:
Specifies the location of your file in OneDrive for Business.

SharePoint

Opens this Screen:
Document Repository for SharePoint
Function of this Screen:
Specifies the location of your file in SharePoint.

Select the repository that contains your form's template screen

Specifies the location of the PDF file for your form template.
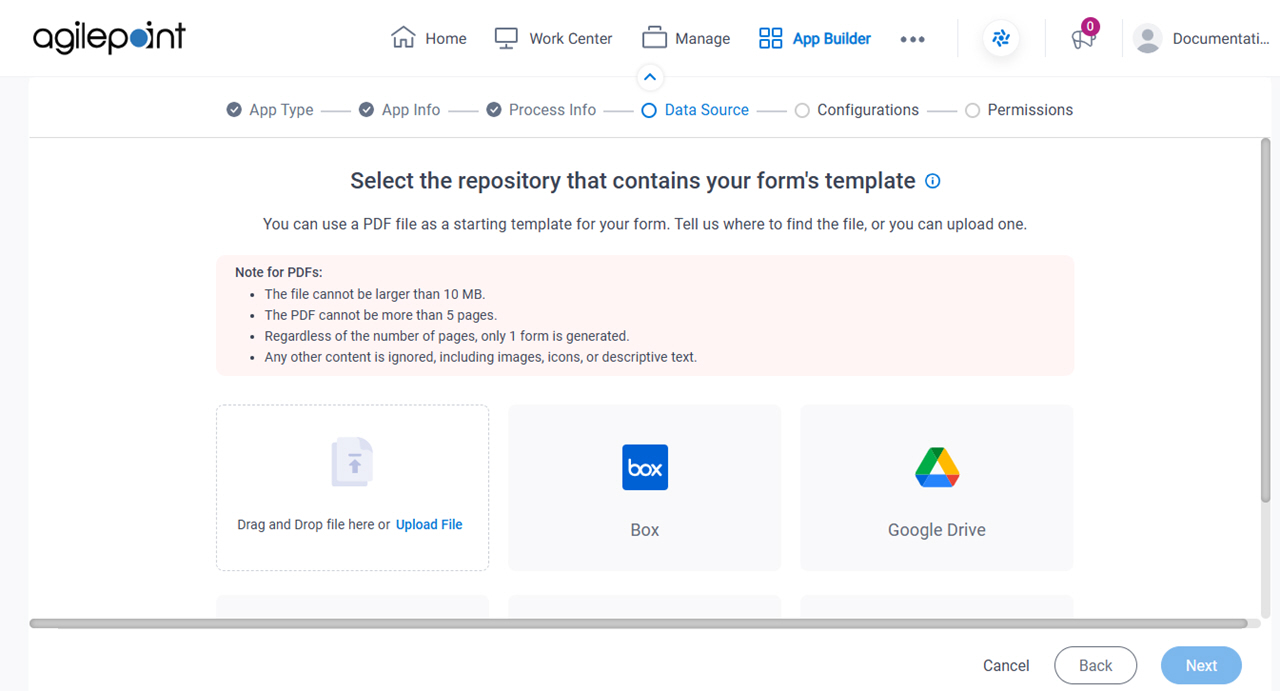
Figure: Select the repository that contains your form's template screen

Select the repository that contains your form's template screen

Prerequisites

Good to Know

  • You can use a PDF file as a template for your form. The PDF file must meet these requirements:
    • The file cannot be larger than 10 MB.
    • The PDF cannot be more than 5 pages.
    • Regardless of the number of pages, only one form is generated.
    • Any other content is ignored, including images, icons, or descriptive text.

Fields

Field NameDefinition

Upload File

Function:
Specifies a PDF file to use to create an eForm.

You can drag the PDF file from your local machine.

Allowed Values:
A PDF file that shows a mockup, template, or model for a task form.

Click Upload File to select a file from your local machine.

The file must follow the business rules for GenAI.

Default Value:
None

Box

Opens this Screen:
Document Repository for Box
Function of this Screen:
Specifies the location of your file in Box.

Google Drive

Opens this Screen:
Document Repository for Google Drive
Function of this Screen:
Specifies the location of your file in Google Drive.

OneDrive

Opens this Screen:
Document Repository for OneDrive
Function of this Screen:
Specifies the location of your file in OneDrive.

OneDrive For Business

Opens this Screen:
Document Repository for OneDrive for Business
Function of this Screen:
Specifies the location of your file in OneDrive for Business.

SharePoint

Opens this Screen:
Document Repository for SharePoint
Function of this Screen:
Specifies the location of your file in SharePoint.

What do you want your app to do? screen

Specifies a text prompt to create the form. Describe the purpose of the form with as much detail and as accurately as possible.
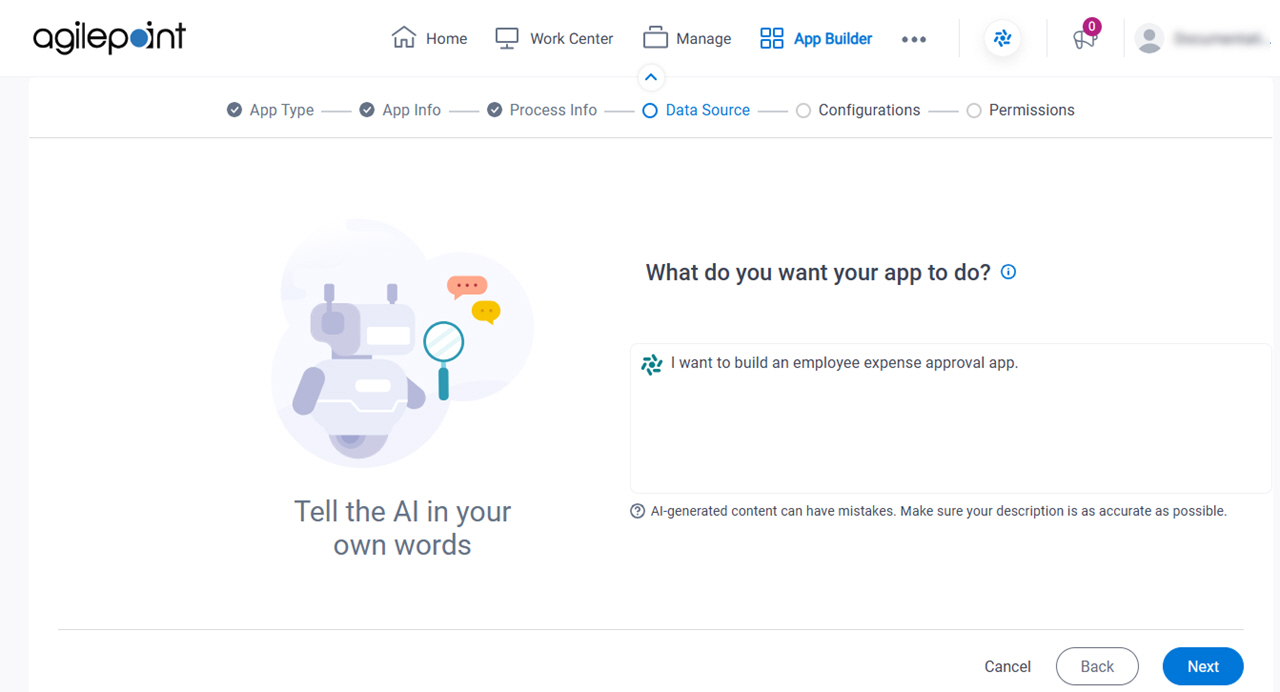
Figure: What do you want your app to do? screen

What do you want your app to do screen

Prerequisites

Fields

Field NameDefinition

Form Description

Description:
Specifies a text prompt to create the form. Describe the purpose of the form with as much detail and as accurately as possible.

GenAI creates a form based on common field types for the type of form you describe.

Allowed Values:
More than one line of text.
Default Value:
None

Review the data fields for your app screen

Configures the fields for your eForm.
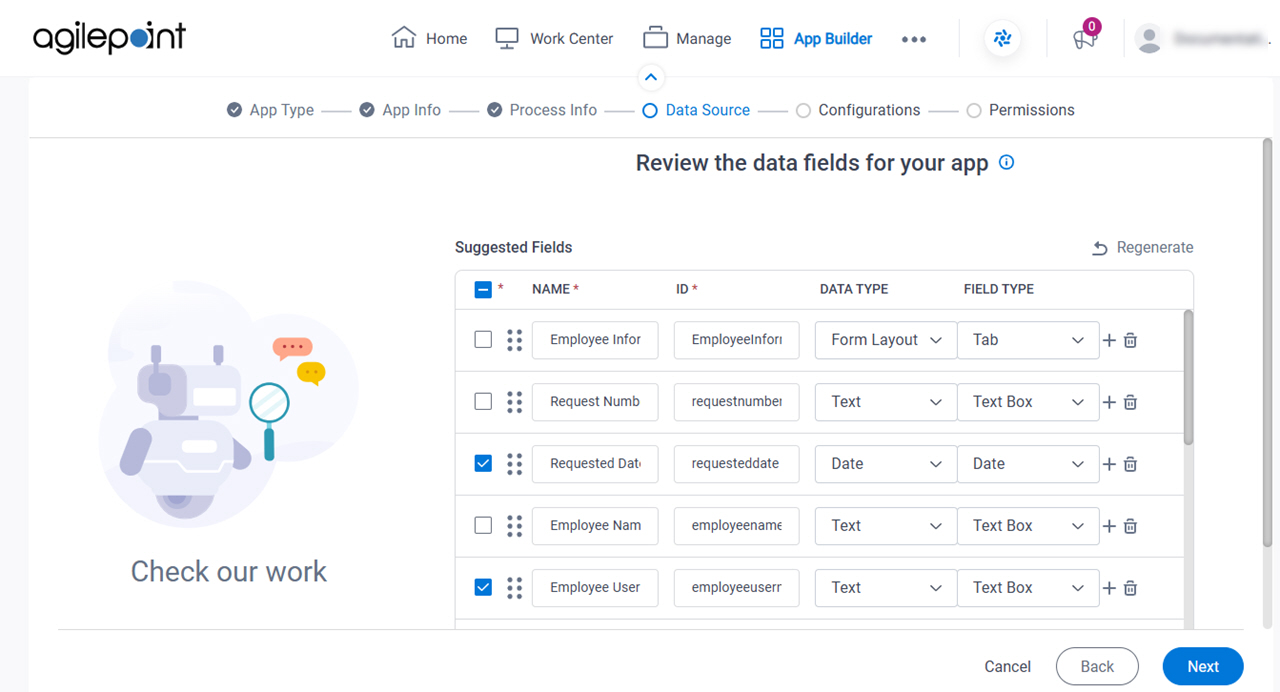
Figure: Review the data fields for your app screen

Review the data fields for your app screen

Good to Know

  • GenAI creates the form fields based on the uploaded file or the form description you entered. You can add, change, and delete fields based on your business requirements.

Fields

Field NameDefinition

Select All

Description:
Selects all the fields.
Allowed Values:
  • Selected - Selects all the form fields.
  • Deselected - Deselects all the form fields.

Name

Description:
Specifies the text label for the field that displays on the form.
Allowed Values:
One line of text (a string).

Accepted:

  • Letters
  • Numbers
  • Spaces
  • Special characters
Default Value:
The field name specified in the imported file.

ID

Description:
Specifies a unique, technical name for the form field.

When you enter the value in the Name field, this field shows the value you entered in the Name field with no spaces.

Allowed Values:
One line of text (a string).

Accepted:

  • Letters
  • Numbers
Default Value:
Shows the value in the Name field with no space.

Data Type

Description:
Specifies the data type used in the form field.
Allowed Values:
A data type from the list.
Default Value:
Shows a data type interpreted for the field from the imported file.

Field Type

Description:
Specifies the type of form control used for the field.
Allowed Values:
A form control from the list.
Default Value:
A form control type that is interpreted from the input.

For example, a field called "Amount" might be assigned a Currency form control.

Regenerate

Description:
Deletes the changes and restores the default values for the form.

Add Field Add Field icon

Function:
Adds a row for a new field.

Delete Field Delete Field icon

Function:
Deletes the selected row from the fields list.

Configure Picklist Configure Picklist icon

Opens this Screen:
Configure Picklist > Generate With AI screen
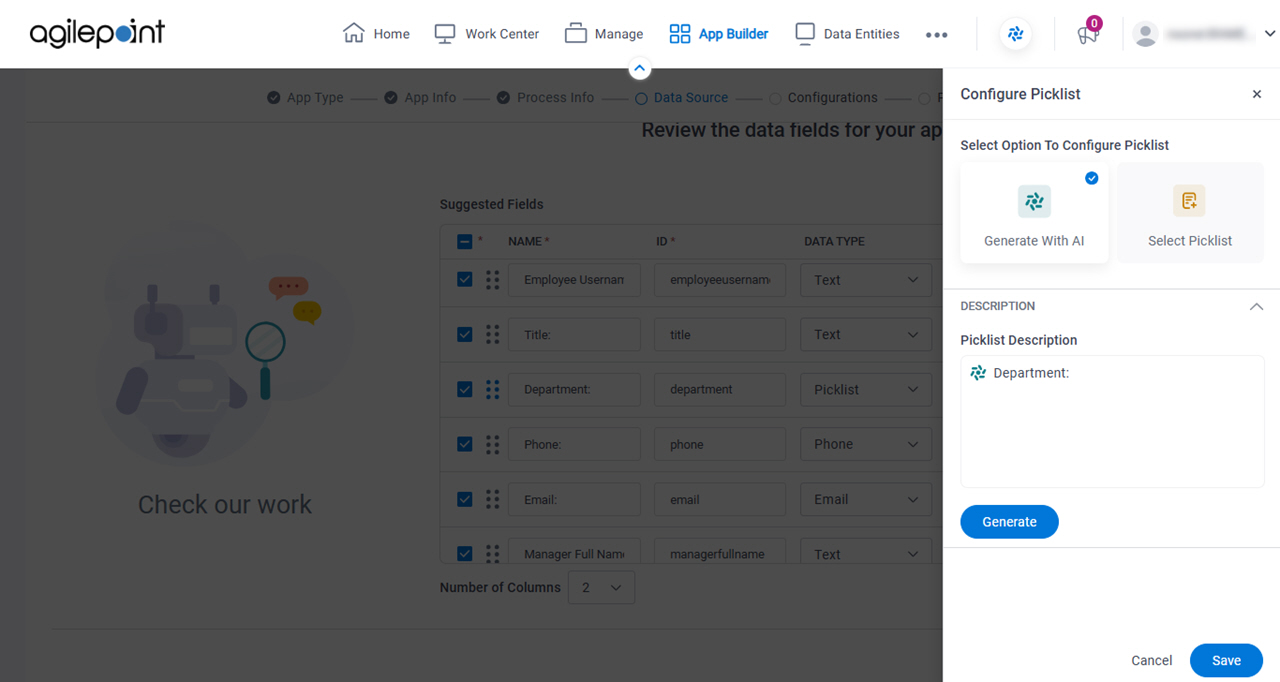
Description:
Configures a picklist with GenAI.
Limitations:
This field shows only if the data type for the field is Picklist.

Configure Child Table Configure Child Table icon

Opens this Screen:
Configure child entity fields screen
Description:
Configures the form fields for fields that are formatted as a table in the uploaded file.
Limitations:
This field shows only if the data type for the field is Table.

Mark as Mandatory

Description:
Specifies whether the form field is required.
Allowed Values:
  • Selected - The field must have a value.
  • Deselected - A value is not required for the field.
Default Value:
The value configured for the field.

Number Of Columns

Description:
Specifies the number of columns to show on the eForm.
Allowed Values:
An integer.

Range:

  • 1-10
Default Value:
2

Show Line Break Fields

Description:
Specifies whether to group the form fields based on the column layout on the form template you upload.
Allowed Values:
  • Selected - Groups the form fields with horizontal line breaks based on the column layout shown in the uploaded file.

    If you create the fields with the Excel or Generate using AI options, the fields are grouped based on the number of columns specified in the Number Of Columns field.

  • Deselected - Groups the form fields in a single list in the order shown in the uploaded file, as it reads left to right.
Default Value:
Deselected

Configure Picklist > Generate With AI screen

Configures a picklist with GenAI.

Figure: Configure Picklist > Generate With AI screen

Configure Picklist screen

Good to Know

How to Start

  1. On the Review the data fields for your app screen, in the Data Type field, select Picklist.

Fields

Field NameDefinition

Select Option To Configure Picklist

Description:
Specifies whether to create a picklist with GenAI.
Allowed Values:
Default Value:
Generate With AI

Picklist Description

Description:
Specifies a text prompt to create a picklist.

Describe the purpose of the picklist with as much detail and as accurately as possible.

Allowed Values:
More than one line of text.
Default Value:
None

Generate

Description:
Creates a picklist.

GenAI creates the picklist based on the picklist description the app designer enters as a prompt.

Display Name

Description:
Specifies the name that shows for the picklist.
To Open this Field:
  1. Click Generate.
Allowed Values:
One line of text (a string).

Accepted:

  • Letters
  • Numbers
  • Spaces
  • Special characters
Default Value:
None

Internal Name

Description:
Specifies a unique, technical name for the picklist.
To Open this Field:
  1. Click Generate.
Allowed Values:
One line of text (a string).

Accepted:

  • Letters
  • Numbers
Default Value:
None

Name

Description:
Specifies the name that shows for the picklist item.
To Open this Field:
  1. Click Generate.
Allowed Values:
One line of text (a string).

Accepted:

  • Letters
  • Numbers
  • Spaces
  • Special characters
Default Value:
None

Value

Description:
Specifies a unique, technical name for the picklist item.
To Open this Field:
  1. Click Generate.
Allowed Values:
One line of text (a string).

Accepted:

  • Letters
  • Numbers
Default Value:
None

Add Field

Function:
Adds a row for the Name and Value fields.

Delete Field Delete Field icon

Description:
Deletes the specified picklist item.

Save

Function:
Saves the configuration for the picklist.

Configure Picklist > Select Picklist screen

Configures the picklist that exists in AgilePoint NX.

Figure: Configure Picklist > Select Picklist screen

Configure Picklist screen

Good to Know

How to Start

  1. On the Review the data fields for your app screen, in the Data Type field, select Picklist.

Fields

Field NameDefinition

Select Option To Configure Picklist

Description:
Specifies whether to create a picklist with GenAI.
Allowed Values:
Default Value:
Generate With AI

Picklist

Description:
Specifies a picklist to configure to a form field.
Allowed Values:
A picklist from the list.
Default Value:
None

Name

Description:
Shows the name for the picklist item.
To Open this Field:
  1. In the Picklist field, select a picklist.
Allowed Values:
Read only.

Value

Description:
Shows the unique, technical name for the picklist item.
To Open this Field:
  1. In the Picklist field, select a picklist.
Allowed Values:
Read only.

Save

Function:
Saves the configuration for the picklist.

Configure child entity fields screen

Configures the form fields for fields that are formatted as a table in the uploaded file.
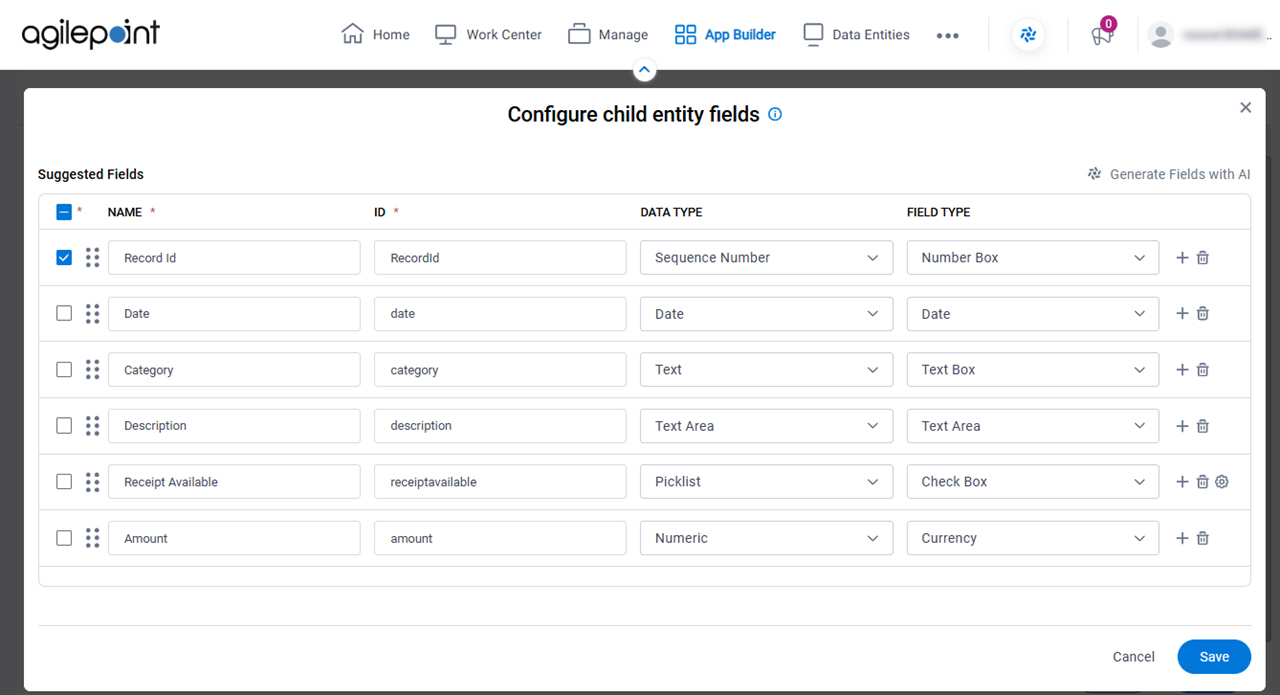
Figure: Configure child entity fields screen

Configure Picklist screen

Good to Know

  • This screen shows only if your eForm has fields formatted as a table.
  • If the uploaded file has a table, GenAI creates a Subform, Data Grid, or Comments form control.

    The control type is specified in the Field Type field on the Review the data fields for your app screen.

How to Start

  1. On the Review the data fields for your app screen, in the Data Type field, select Table.

Fields

Field NameDefinition

Select All

Description:
Selects all the fields.
Allowed Values:
  • Selected - Selects all the form fields.
  • Deselected - Deselects all the form fields.

Name

Description:
Specifies the text label for the field that displays on the form.
Allowed Values:
One line of text (a string).

Accepted:

  • Letters
  • Numbers
  • Spaces
  • Special characters
Default Value:
The field name specified in the imported file.

ID

Description:
Specifies a unique, technical name for the form field.

When you enter the value in the Name field, this field shows the value you entered in the Name field with no spaces.

Allowed Values:
One line of text (a string).

Accepted:

  • Letters
  • Numbers
Default Value:
Shows the value in the Name field with no space.

Data Type

Description:
Specifies the data type used in the form field.
Allowed Values:
A data type from the list.
Default Value:
Shows a data type interpreted for the field from the imported file.

Field Type

Description:
Specifies the type of form control used for the field.
Allowed Values:
A form control from the list.
Default Value:
A form control type that is interpreted from the input.

For example, a field called "Amount" might be assigned a Currency form control.

Add Field Add Field icon

Function:
Adds a row for a new field.

Delete Field Delete Field icon

Function:
Deletes the selected row from the fields list.

Configure Picklist Configure Picklist icon

Opens this Screen:
Configure Picklist > Generate With AI screen
Description:
Configures a picklist with GenAI.
Limitations:
This field shows only if the data type for the field is Picklist.

Mark as Mandatory

Description:
Specifies whether the form field is required.
Allowed Values:
  • Selected - The field must have a value.
  • Deselected - A value is not required for the field.
Default Value:
The value configured for the field.

Generate Fields with AI

Description:
Creates the form fields for the subform with GenAI.

Opens the Generate Child Table Fields screen where you can enter a description of the subform as a prompt in a text box. GenAI creates the form fields based on common field types for the subform description you entered.

Set up your primary entity screen

Configures the primary entity for your app.
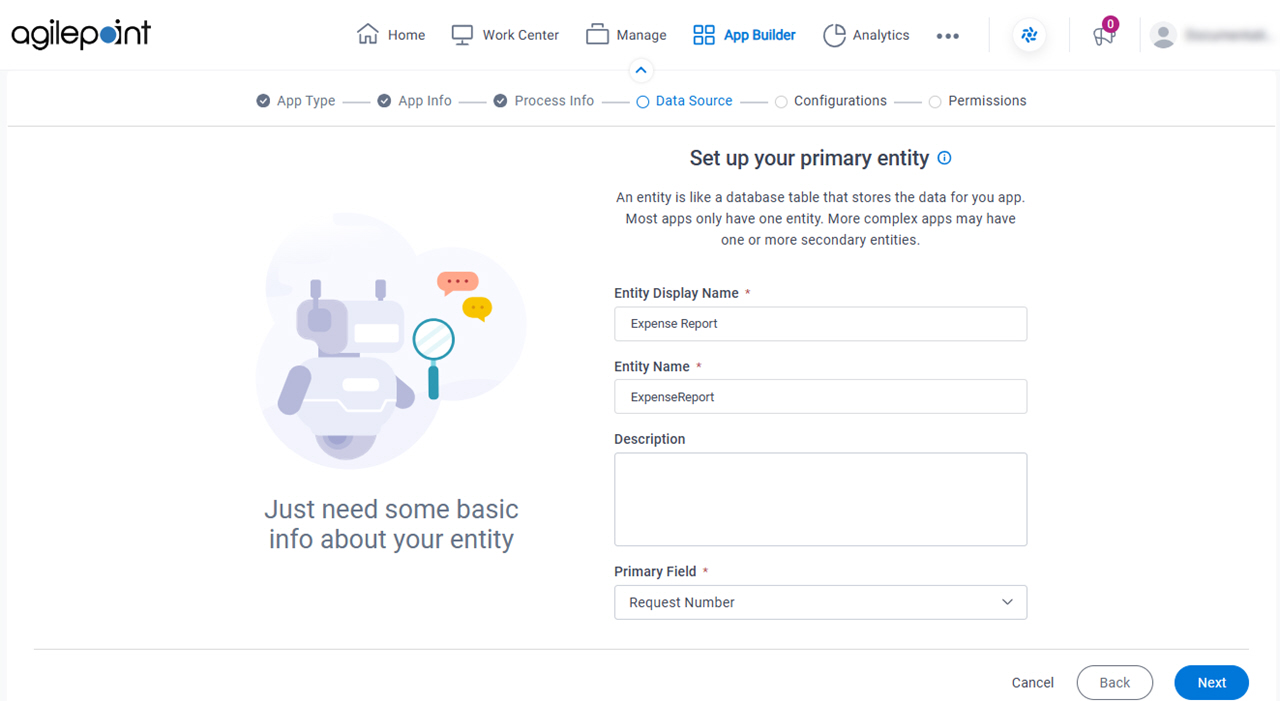
Figure: Set up your primary entity screen

Set up your primary entity screen

Good to Know

  • An entity is like a database table that stores the data for your app. Most apps only have one entity. More complex apps may have one or more secondary entities.

Fields

Field NameDefinition

Entity Display Name

Description:
Specifies the name that shows for the primary entity.
Allowed Values:
One line of text (a string).

Accepted:

  • Letters
  • Numbers
  • Spaces
  • Special characters
Default Value:
None

Entity Name

Description:
Specifies a unique, technical name for the primary entity.

When you enter a value in the Entity Display Name field, the field shows the value specified in the Entity Display Name field with no spaces. After this name is created, it can not be changed.

Allowed Values:
One line of text (a string).

Accepted:

  • Letters
  • Numbers
Default Value:
None

Description

Description:
Specifies an optional text description for the primary entity.
Allowed Values:
More than one line of text.
Default Value:
None

Primary Field

Description:
Specifies the primary field for the primary entity.
Allowed Values:
A form field from the list.
Default Value:
None

Set up secondary entity screen

Configures the related entity for your app.
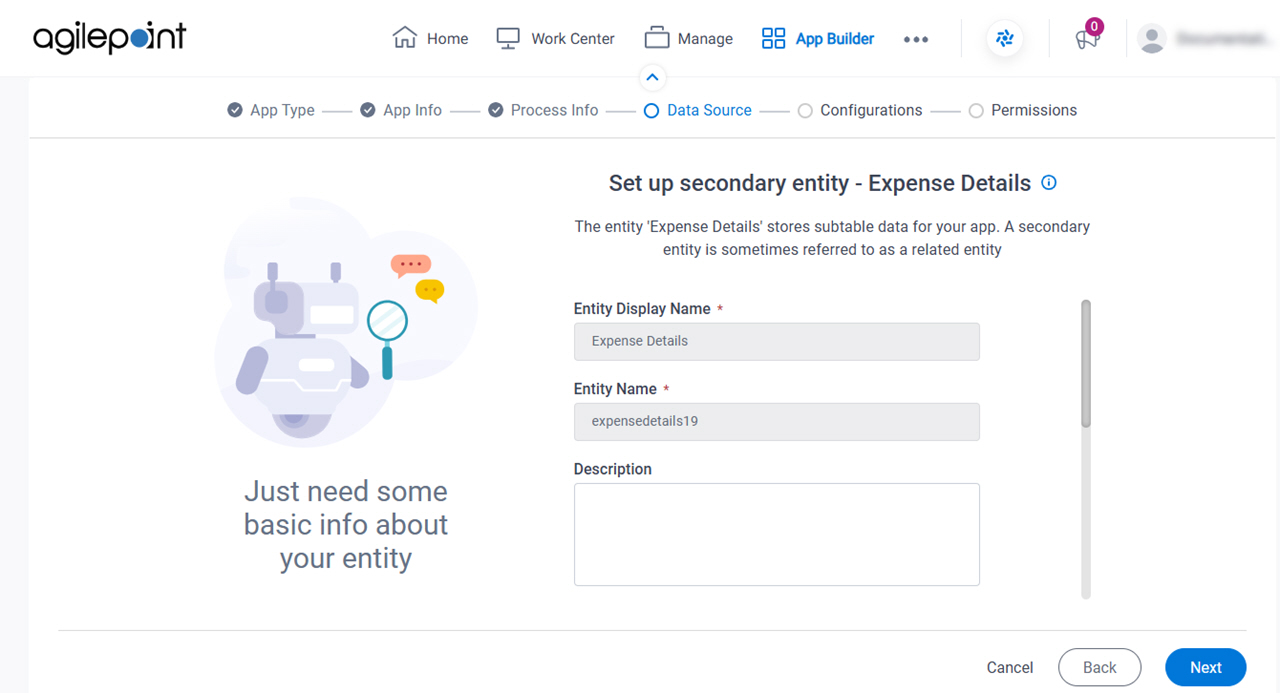
Figure: Set up secondary entity screen

Set up secondary entity screen

Good to Know

  • This screen shows only if your eForm has fields formatted as a table.
  • A secondary entity stores data for form fields that are formatted as a table in the uploaded file. A secondary entity is sometimes referred to as a related entity.

Fields

Field NameDefinition

Entity Display Name

Description:
Shows the name of the related entity that has a relationship with the primary entity.
Allowed Values:
Read only.

Entity Name

Description:
Shows a unique, technical name for the related entity.
Allowed Values:
Read only.

Description

Description:
Specifies an optional text description for the related entity.
Allowed Values:
More than one line of text.
Default Value:
None

Primary Field

Description:
Specifies the primary field for the related entity.
Allowed Values:
A form field from the list.
Default Value:
None

Parent Primary Field

Description:
Specifies the primary field for the primary entity where you want to create a relationship.
Allowed Values:
A form field from the list.
Default Value:
None

Relationship Name

Description:
Specifies the text label that shows for the relationship in the entity.
Allowed Values:
One line of text (a string).

Accepted:

  • Letters
  • Numbers
Default Value:
None

Child Field Display Name

Description:
Specifies the dependent field for an entity that is a child of the related entity.
Allowed Values:
One line of text (a string).

Accepted:

  • Letters
  • Numbers
  • Spaces
  • Special characters
Default Value:
None

Child Field Name

Description:
Specifies a unique, technical name for the dependent field.

When you enter the value in the Child Field Display Name field, this field shows the value you entered in the Child Field Display Name field with no spaces.

Allowed Values:
One line of text (a string).

Accepted:

  • Letters
  • Numbers
Default Value:
None

Select the forms to create for your human tasks screen

Specifies the human task activities for which you want to create eForms.
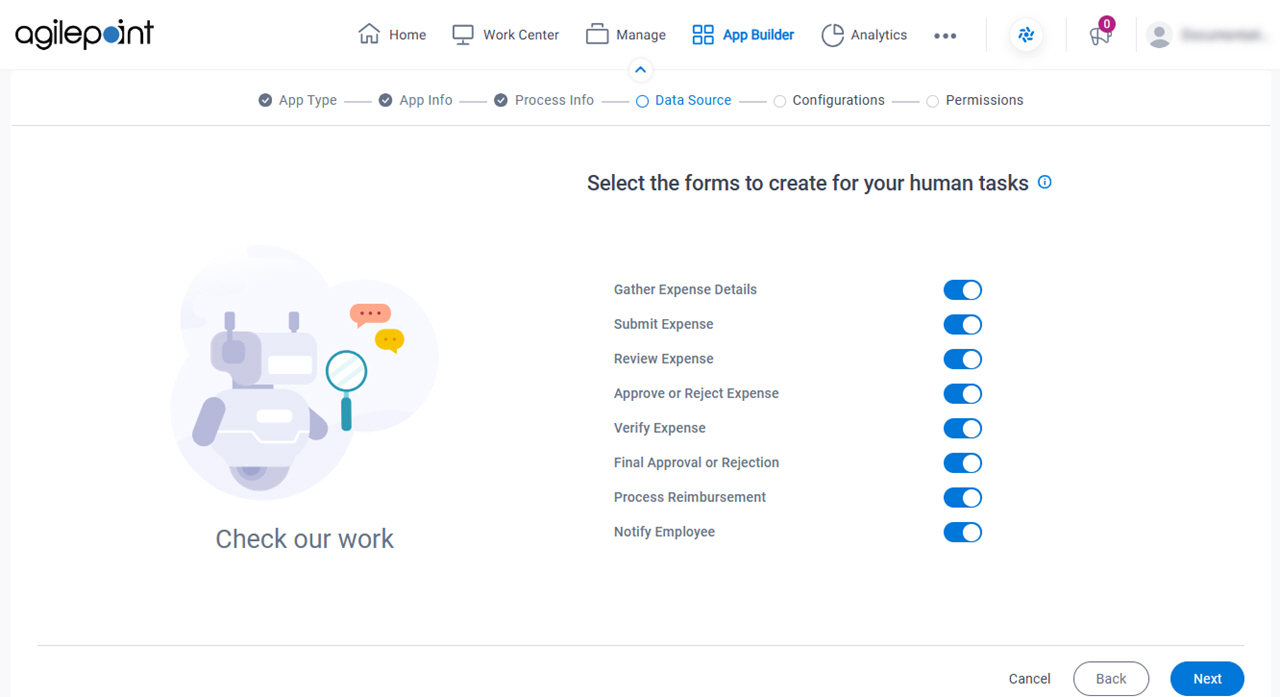
Figure: Select the forms to create for your human tasks screen

Select the forms to create for your human tasks screen

Fields

Field NameDefinition

Human Task Activities

Description:
Shows the list of human task activities configured on the Review the activities for your app screen.
Allowed Values:
Read only.

Create Task Form

Description:
Specifies whether to create an eForm for the human task activity.
Allowed Values:
  • On - Creates an eForm for the human task activity and adds it to the associated activity.
  • Off - Does not create an eForm for the activity. The activity is created with no eForm.
Default Value:
On

Anything else right now? screen

Configures the optional features for your process-based app in the Modern Add an App Experience.
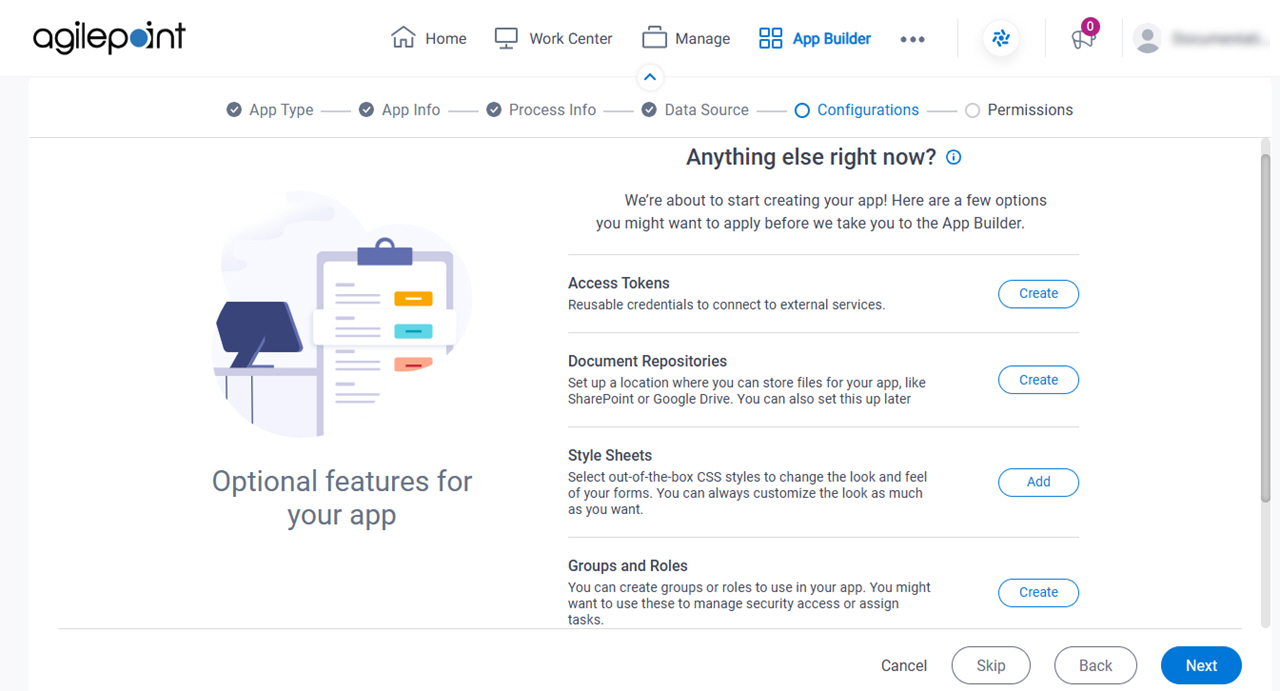
Figure: Anything else right now? screen

Anything else right now screen

Fields

Field NameDefinition

Access Tokens

Opens this Screen:
The configuration screen for your access token. The specific screen that shows depends on your access token type.

For more information, refer to Access Tokens.

Function of this Screen:
Configures an access token.

Document Repositories

Opens this Screen:
The configuration screen for your document repository. The specific screen that shows depends on your document repository type.

For more information, refer to Document Repositories.

Function of this Screen:
Configures your document repository.

Style Sheets

Description:
Uploads CSS files to change the look and feel of your eForms.

Groups and Roles

Description:
Creates groups and roles for the access rights for an app.

Images

Description:
Uploads image files to customize your app.

JavaScript

Description:
Uploads JavaScript files to use in eForms.

Who can access your app? screen

Configures the permission groups for an app.
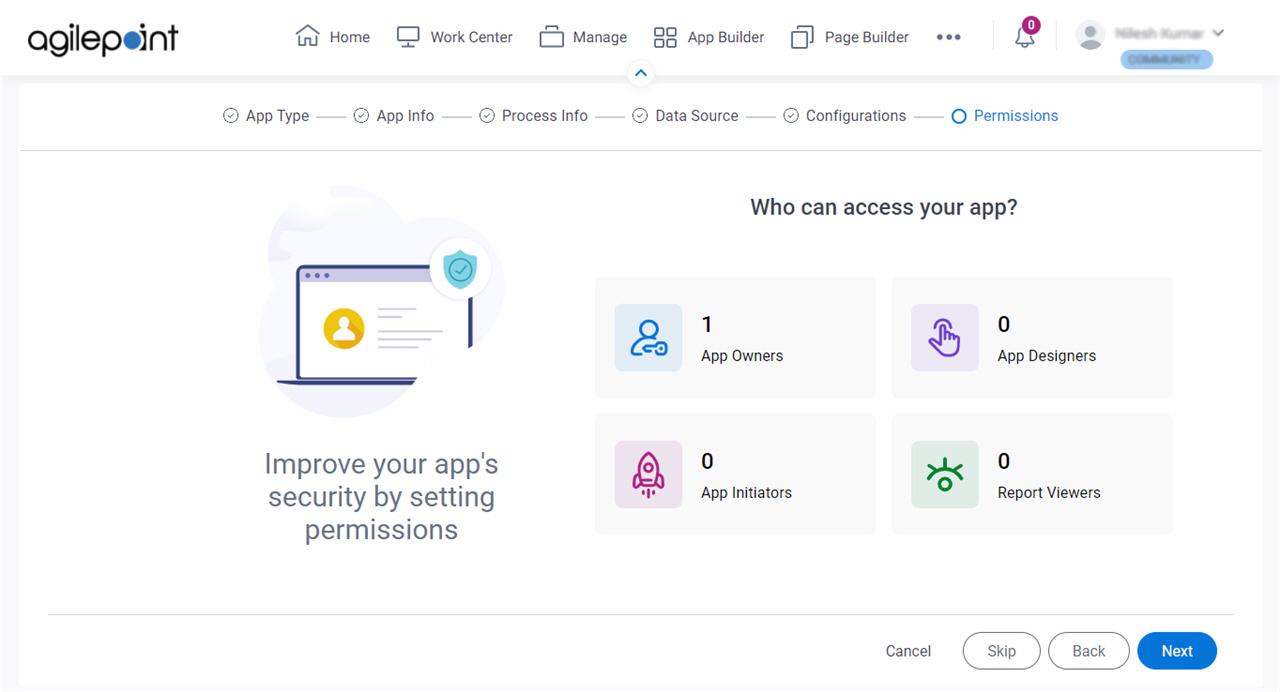
Figure: Who can access your app? screen

Who can access your app screen

Fields

Field NameDefinition

App Owners

Opens this Screen:
App Owners
Function:
Specifies the users and groups who are App Owners.

App Designers

Opens this Screen:
App Designers (permission group)
Function:
Specifies the users and groups who are App Designers.

App Initiators

Opens this Screen:
App Initiators
Description:
Specifies the users and groups who are App Initiators for an app.
Limitations:
Users and groups can only be assigned to the App Initiators permission group after an app is published.

Report Viewers

Opens this Screen:
Report Viewers
Description:
Specifies the users and groups who are Report Viewers for an app.
Limitations:
Users and groups can only be assigned to the Report Viewers permission group for an app after the app is published.