
Create or Change an E-mail Template in the Application Builder
To create or change an e-mail template in the App Builder, do the procedure in this topic.

Video: Add an E-mail Activity
Video: Process-Based Application
Examples
- (Example) Create and Run a Process-Based Application
- (Example) Create an E-mail Template to Notify the Requester if the Leave Hours are Not Available
- (Example) Link to a File from an E-mail
- (Example) Show a Subform in an E-mail Notification
- (Example) Create Zoom Meeting
- Examples - Step-by-step use case examples, information about what types of examples are provided in the AgilePoint NX Product Documentation, and other resources where you can find more examples.
How to Start
- Do one of these:
- On the Application Explorer screen, do one of these:
- In the Process Builder, in the My Application pane, expand
your application, and do one of these:
- Click Notification
- Click E-mails
 .
. - Do one of these:
- To create an e-mail template, click New
 .
.
- To change an e-mail template, click the template, and click Edit
 .
.
- To create an e-mail template, click New
- Click E-mails
- Click Process Model
- Double-click your process.
- Click Notification
 >
E-mail Template .
>
E-mail Template . - On the E-mail Template screen, in the Model Template, click Add
 .
.
- Click Notification
Procedure
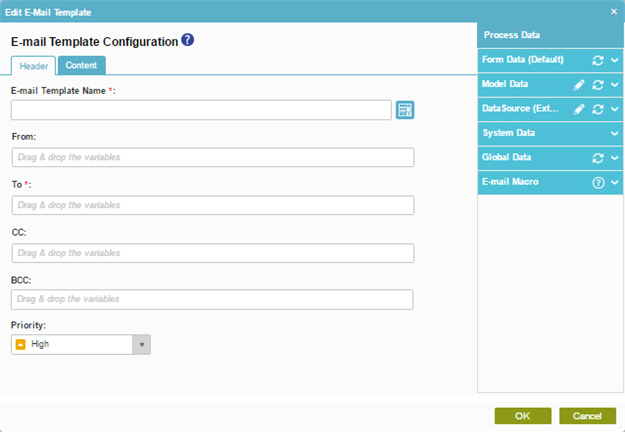
- On the E-mail Configuration screen, click the Header tab.
- On the Header tab, complete these fields
as necessary:
Field Name Definition E-mail Template Name
- Function:
- Specifies the name of your e-mail template.
- Accepted Values:
- One line of text that can have spaces.
- Default Value:
- None
- Example:
- Refer to:
- The videos on this page
- (Example) Create an E-mail Template to Notify the Requester if the Leave Hours are Not Available
- (Example) Configure an E-mail Activity to Notify the Requester for the Leave Approval in the Absence Request Process
- (Example) Configure an E-mail Activity to Notify the Requester for the Leave Rejection in the Absence Request Process
Clone E-mail Template

- Function:
- Specifies your e-mail template from the list.
From
- Function:
- Specifies the senders in the From field of an E-mail Notification.
- Accepted Values:
- A valid e-mail address.
- Default Value:
- None
- Accepts Process Data Variables:
- Yes
- Example:
- me@mydomain.com
To
- Function:
- Specifies the recipients for your e-mail.
- Accepted Values:
-
- A list of valid e-mail addresses, separated by semi-colons (;).
If you use process data variables, domain\username is changed automatically to a valid e-mail format
. - A macro that accepts a process data variable
as parameter.
For more information, refer to Built-In Macros.
- A list of valid e-mail addresses, separated by semi-colons (;).
- Default Value:
- None
- Accepts Process Data Variables:
- Yes
- Example:
-
- me@mydomain.com
- $MANAGER(DOMAIN\john)
- $MANAGER(${/my:myFields/my:username})
Also refer to:
- The videos on this page
- (Example) Create an E-mail Template to Notify the Requester if the Leave Hours are Not Available
- (Example) Configure an E-mail Activity to Notify the Requester for the Leave Approval in the Absence Request Process
- (Example) Configure an E-mail Activity to Notify the Requester for the Leave Rejection in the Absence Request Process
CC
- Function:
- Specifies the recipients to carbon copy on your e-mail.
- Accepted Values:
-
- A list of valid e-mail addresses, separated by semi-colons (;).
If you use process data variables, domain\username is changed automatically to a valid e-mail format
. - A macro that accepts a process data variable
as parameter.
For more information, refer to Built-In Macros.
- A list of valid e-mail addresses, separated by semi-colons (;).
- Default Value:
- None
- Accepts Process Data Variables:
- Yes
- Example:
-
- me@mydomain.com
- $MANAGER(DOMAIN\john)
- $MANAGER(${/my:myFields/my:username})
BCC
- Function:
- Specifies the users to receive a blind carbon copy of your e-mail.
- Accepted Values:
-
- A list of valid e-mail addresses, separated by semi-colons (;).
If you use process data variables, domain\username is changed automatically to a valid e-mail format
. - A macro that accepts a process data variable
as parameter.
For more information, refer to Built-In Macros.
- A list of valid e-mail addresses, separated by semi-colons (;).
- Default Value:
- None
- Accepts Process Data Variables:
- Yes
- Example:
-
- me@mydomain.com
- $MANAGER(DOMAIN\john)
- $MANAGER(${/my:myFields/my:username})
Priority
- Function:
- Specifies the priority setting for an e-mail notification.
- Accepted Values:
-
- High
- Normal
- Low
- Default Value:
- High
- Click the Content tab.
- On the Content tab,
complete these fields
as necessary:
Field Name Definition Subject
- Function:
- Specifies the subject line for your e-mail.
- Accepted Values:
- One line of text that can have spaces.
- Default Value:
- None
- Accepts Process Data Variables:
- Yes
- Example:
- ${ActivityName} in ${ProcessName} is complete
Also refer to:
- The videos on this page
- (Example) Create an E-mail Template to Notify the Requester if the Leave Hours are Not Available
- (Example) Configure an E-mail Activity to Notify the Requester for the Leave Approval in the Absence Request Process
- (Example) Configure an E-mail Activity to Notify the Requester for the Leave Rejection in the Absence Request Process
E-mail Body
- Function:
- Specifies the content of your e-mail.
- Accepted Values:
- More than one line of text, in HTML plain text format.
- Default Value:
- None
- Accepts Process Data Variables:
- Yes
- Example:
- Refer to:
- The videos on this page
- (Example) Create an E-mail Template to Notify the Requester if the Leave Hours are Not Available
- (Example) Configure an E-mail Activity to Notify the Requester for the Leave Approval in the Absence Request Process
- (Example) Configure an E-mail Activity to Notify the Requester for the Leave Rejection in the Absence Request Process
- (Example) Link to a File from an E-mail
- (Example) Show a Subform in an E-mail Notification
- (Example) Create Zoom Meeting
Add Language (+)
- Function:
- Specifies an additional language for which you can define the content of an e-mail.
- Accepted Values:
- A language from the list.
- Default Value:
- English
HTML / TEXT
- Function:
- Specifies the display format for your e-mail.
- Accepted Values:
-
- HTML - Displays the e-mail in HTML format.
- Text - Displays the e-mail in text-only format.
- Default Value:
- HTML
Attachment

- Function:
- Specifies one or more files you want to include in an e-mail.
- Accepted Values:
- The full path and file name for the attachments you want to include.
- Limitations:
-
- The file that you would like to attach must reside on the AgilePoint Server machine
- E-mail attachments are not supported
in AgilePoint NX OnDemand (public cloud).
Instead, AgilePoint recommends you give a link to a file stored in a cloud storage service
in the e-mail body.
For more information, refer to Why Are E-mail Attachments Disabled in AgilePoint NX OnDemand?
- Default Value:
- None
- Accepts Process Data Variables:
- Yes
- Example:
-
- C:\My Documents\sample1.doc
- ${My Files}
Enter Server File Path
- Function:
- Specifies the absolute path of the document you want as an attachment to the e-mail.
- To Open this Field:
-
- On the Content tab, click Attachment .
- On the Content tab, click Attachment
- Accepted Values:
- The absolute path of the document on the repository.
Note: You must click Add to add the URL to the list.
- Default Value:
- None
Add
- Function:
- Includes a file as an attachment in an e-mail.
- To Open this Field:
-
- On the Content tab, click Attachment .
- On the Content tab, click Attachment