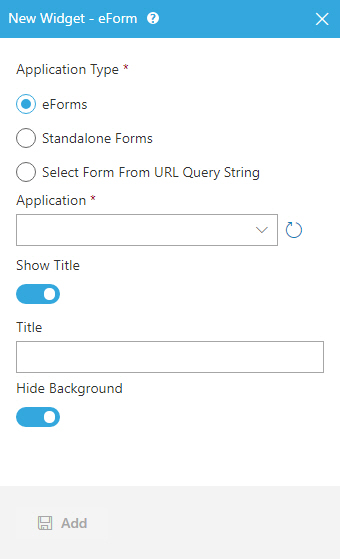
eForm Widget screen

Shows an eForm on a custom page.

Figure: eForm Widget screen

eForm Widget screen

Examples

  • (Example) eForm Widget in Page Builder
  • Examples - Step-by-step use case examples, information about what types of examples are provided in the AgilePoint NX Product Documentation, and other resources where you can find more examples.

Prerequisites

Good to Know

  • You can use more than one eForm on your page.

How to Start

  1. Click Build Pages Build Pages icon.
  2. On the Pages screen, do one of these:
    • Create a Custom Page.
      1. Click Add Row.
    • Open a custom page
      1. Click the bottom horizontal line of the row or right side vertical line of the row or column.
      2. Click Add Add icon.
  3. Click Add Widget.
  4. On the Pick a Widget screen, on the Content tab, click eForm eForm icon.

Fields

Field Name Definition

Application Type

Function:
Specifies the type of application to add on your widget.
Accepted Values:
  • eForms - Shows all process-based apps.
  • Standalone Forms - Shows all form-based apps.
  • Select Form From URL Query String - Lets you add process model dynamically in preview or after you publish.
Default Value:
None
Example:
Refer to:
Limitations:

Application

Function:
Specifies the name of the application from the list.

This field shows both process-based app and form-based app.

To Open this Field:
  1. On the eForm Widget screen, in the Application Type field, select one of these:
    • eForms
    • Standalone Forms
Accepted Values:
An AgilePoint NX application from the list.

When you select eForms, this field shows all process-based app.

when you select Standalone Forms, this field shows all form-based app.

Default Value:
None
Example:
Refer to:
Limitations:

The option to select an application type is available in these releases:

Process

Function:
Specifies the name of the process model from the list.
To Open this Field:
  1. On the eForm Widget screen, in the Application Type field, select eForms.
  2. In the Application field, select the application name.
Accepted Values:
The process model name from the list.

When you select the application, the process models associated with the application show in this field.

Default Value:
None
Example:
Refer to:
Limitations:

The option to select an application type is available in these releases:

Form Views

Function:
Specifies the View form from the list .
To Open this Field:
  1. On the eForm Widget screen, in the Application Type field, select Standalone Forms.
  2. In the Application field, select the application name.
Accepted Values:
A view form from the list.

When you select the application, all view forms associated with the application show in this field.

Default Value:
None
Limitations:

The option to select an application type is available in these releases:

Key

Function:
Specifies the unique key value for the process model name to show on your page.

To show an eForm on your page, do this after you publish your page:

  1. On your custom page, in the URL field in your web browser, enter ?[key value]=[process model name].
  2. To reload the page, click Enter.

    The page shows the first eForm in the process.

To Open this Field:
  1. On the eForm Widget screen, in the Application Type field, select Select Form From URL Query String.
Accepted Values:
One line of text with no spaces.
Default Value:
None
Limitations:

Title

Function:
Specifies the title for your eForm.

The title shows on the top of your eForm.

To Open this Field:
  1. Enable Show Title.
Accepted Values:
One line of text that can have spaces.
Default Value:
None

Hide Background

Function:
Specifies to hide the background of an eForm.
Accepted Values:
  • On - Shows the background of an eForm.
  • Off - Hides the background of an eForm.
Default Value:
Off

Add

Function:
Adds the widget to your custom page.