
(Example) Offline Mobile eForms in a Process-Based App
This example shows how to configure and use offline mobile eForms in a process-based app.
Background and Setup
Prerequisites
- This example uses the Sales Invoice app from the AgilePoint NX App Store.
For more information, refer to How to Get the App.
- The AgilePoint NX Mobile App installed on a mobile device.
- In AgilePoint NX Portal Settings, Enable Mobile eForms is turned on.
For more information, refer to Enable eForms on Mobile Devices.
Good to Know
- When you design an offline mobile eForm, it can not depend on dynamic content depends on an external data source. For example, if you design Image form control in your offline mobile eForm, the images show if they are stored within your AgilePoint NX application, but not if they are stored in an external data source.
- You can use offline mobile eForms in the AgilePoint NX Mobile App or in a custom mobile app.
- Offline mobile eForms cache the data necessary to use the eForm on the mobile device.
- If the mobile device has an Internet connection, but can not connect to AgilePoint NX, the offline mobile eForm connects to any data sources that are available. For example, if the eForm uses data from Salesforce, and the mobile device can connect to your Salesforce environment, the eForm will access the Salesforce data dynamically, even if the AgilePoint NX data is cached.
- If the mobile app is offline and you submit an eForm or take action on a task, the form is stored in the Outbox. The eForm is submitted the next time the mobile app connects to AgilePoint NX.
- If the form is submitted in offline mode, you can able to change the submitted form
at any number of times before the mobile app submits the form to AgilePoint Server.
To change a submitted form, you must download it from the My Tasks screen.
This feature requires:- AgilePoint NX OnDemand (public cloud), or AgilePoint NX Private Cloud or AgilePoint NX OnPremises v7.0 Software Update 2 or higher
- AgilePoint NX Mobile Dashboard version 2.7 or higher.
- Offline mobile eForms have the following limitations for accessing data in offline mode:
- If a connection to AgilePoint NX is available on the form user's mobile device, the form does not run in offline mode. It runs in the normal, online mode. In other words, offline mobile eForms only apply if the mobile device does not have access to the AgilePoint NX system.
- Offline mobile forms can access any form data that is cached on form load.
- For data outside of the eForm itself and the AgilePoint NX system, offline forms can access data only for systems to which their mobile device can connect.
For example, if the eForm uses data from Salesforce, and the mobile device can connect to your Salesforce environment, the eForm will access the Salesforce data dynamically, even if the AgilePoint NX data is cached.
- These form controls and components are not supported in offline mode:
- Image form control - The images show if they are stored within your AgilePoint NX application, but not if they are stored in an external data source.
- Hyperlink form control - Links show on the form, but form users can only go to linked pages where they have access from their mobile devices.
- File Upload form control - Runtime app users can see uploaded documents in the control, but they can not download the files. Runtime app users also can not upload files in offline mode.
- People Picker and User List form controls - The controls show on the form, but runtime app users can not select people on the controls.
- Auto-Lookup form control - Lookups that are configured to execute on form load are cached. However, any lookups that do not load on form load can not get data from any data source they can not access in offline mode.
- Secure Credentials form control - This control is not supported in offline mode.
- Map form control - This control is not supported in offline mode.
- Multilingual - If multilingual is enabled on a form, the default locale is cached.
Step 1: Configure the Settings for Offline Mobile eForms
First, configure the settings for offline mobile eForms in AgilePoint NX.
Prerequisites
- Sign in to AgilePoint NX as a Tenant Administrator.
How to Start
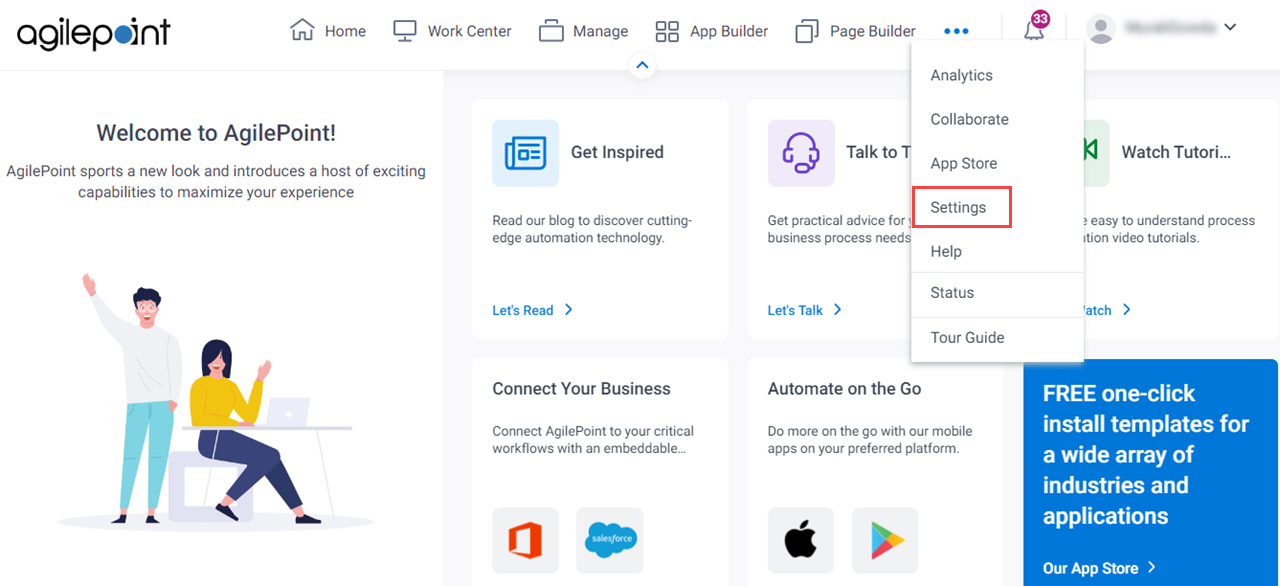
- Click Settings.
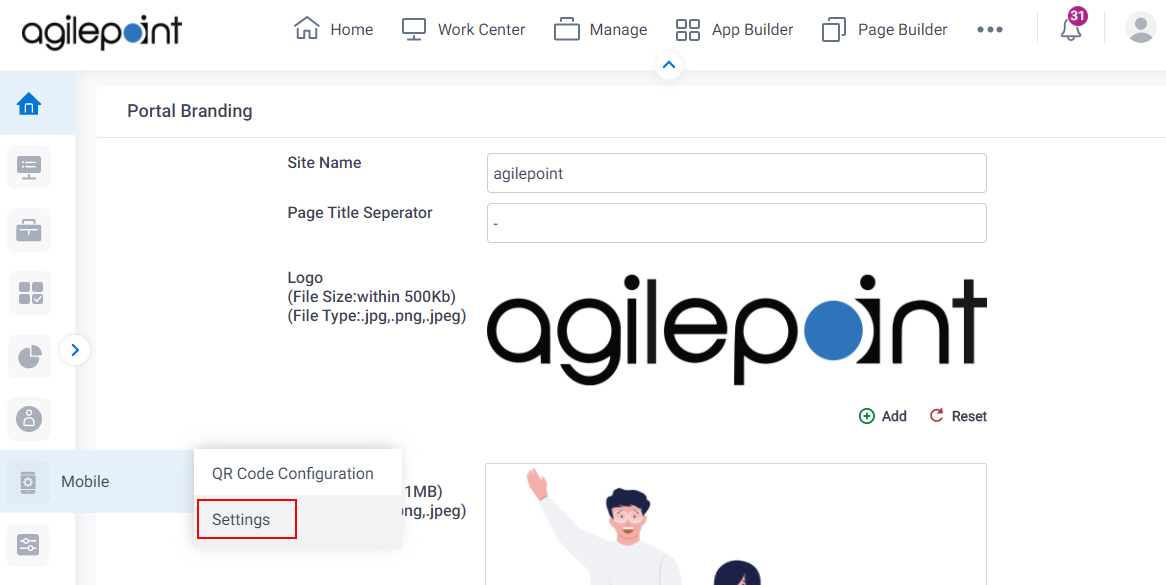
- Click Mobile > Settings.
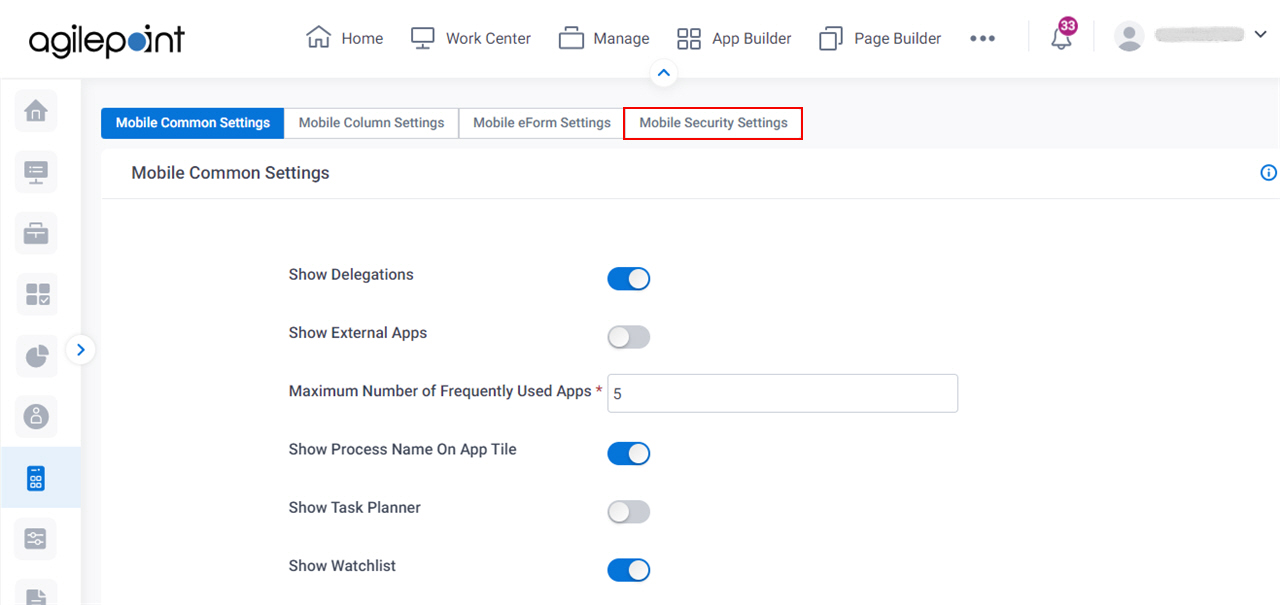
- On the Mobile Common Settings screen, click the Mobile Security Settings tab.
Procedure
- On the Mobile Security Settings tab, turn on the Enable Offline Mobile eForms field.
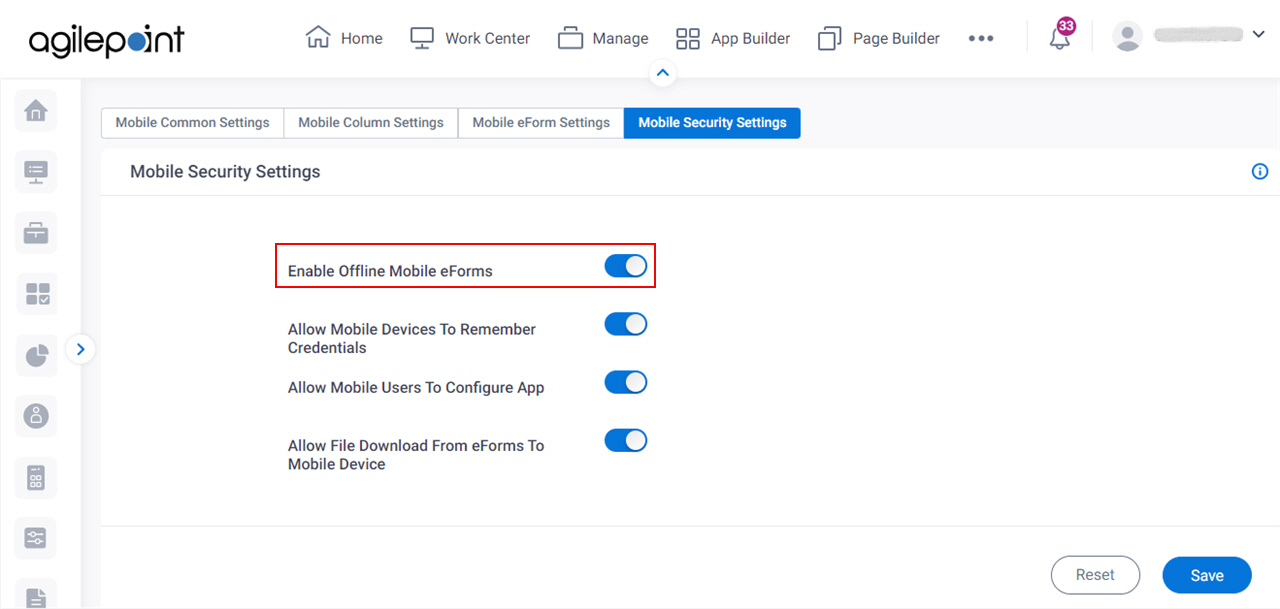
- Click Save.
Step 2: Configure a Human Task Activity to Use in Offline Mode
Next, configure a human task activity to use in offline mode.
How to Start
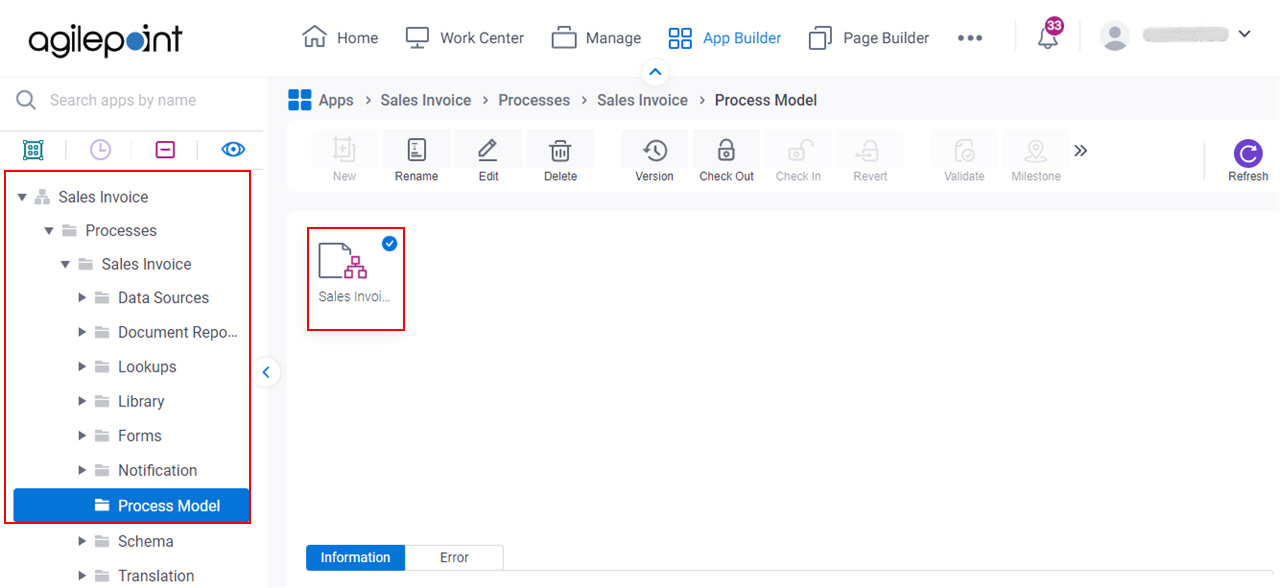
- Click App Builder.

- On the Application Explorer screen,
click Sales Invoice > Processes > Sales Invoice >
Process Model > Sales Invoice.
Procedure
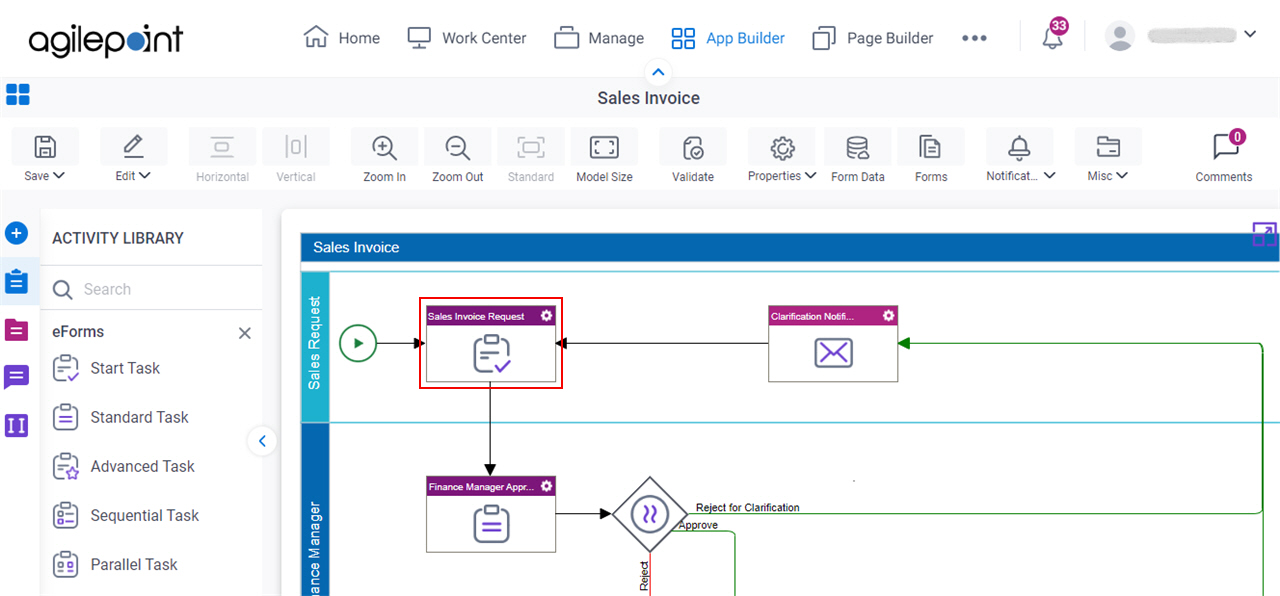
- On the Process Builder screen, in the Sales Invoice process, double-click on the Sales Invoice Request activity.
- On the eForm Configuration screen, click Next.

- On the General Configuration screen, select Enable Offline Capability.
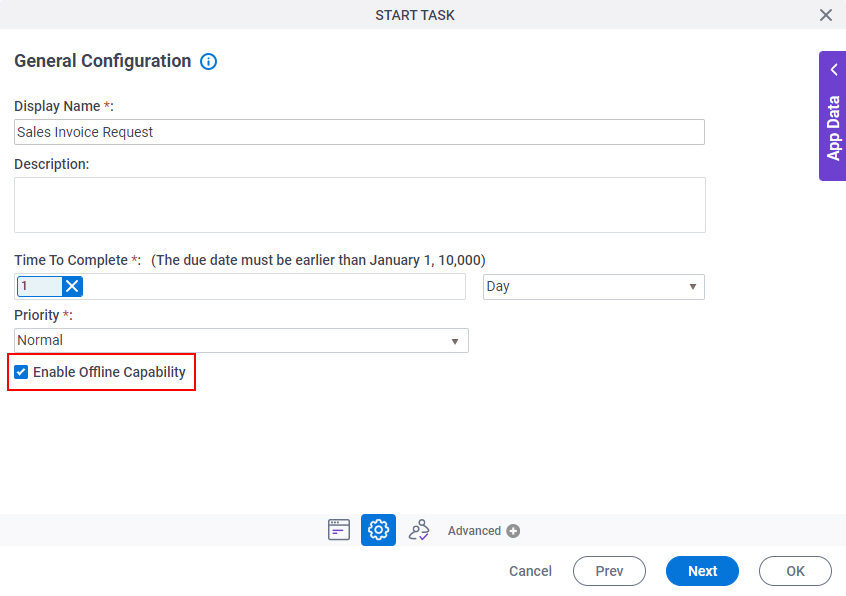
- Click OK.
Step 3: (Optional) Save, Check In, and Publish the Process-Based App
Next, save, check in, and publish the process-based app.
For more information, refer to (Example) Save, Check In, and Publish a Process-Based App.
Step 4: Download the App to Use in Offline Mode
Next, in the AgilePoint NX Mobile App, download the process-based app to use in offline mode.
Good to Know
- The download option shows only on the apps that have an offline capability. To enable the offline capability, refer to Step 2: Configure a Human Task Activity to Use in Offline Mode.
- To download an app, the Mobile App must be connected to AgilePoint Server.
- When you download an app to your mobile device, it downloads the current version of the app. If a new version of the app is published, you must do this procedure again to get the latest version of the app.
How to Start
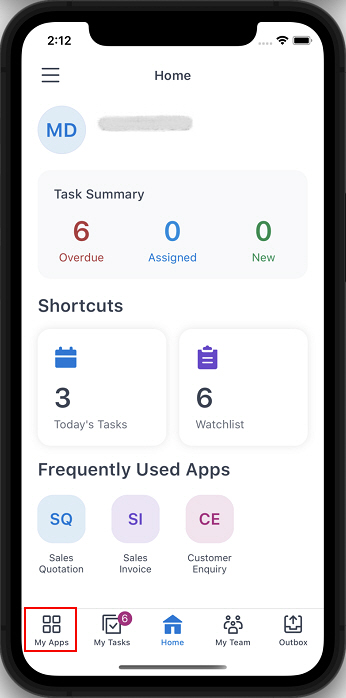
- In AgilePoint NX Mobile App, on the Home screen, tap My Apps.
Procedure
- On the My Apps screen, in the Sales Invoice app, tap Download
 .
. 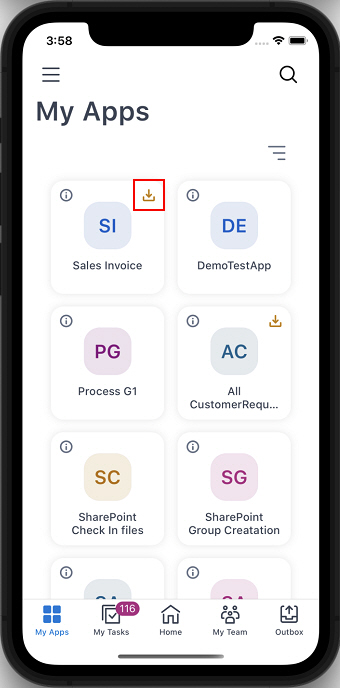
The Download
 icon shows that the app is downloaded to the mobile device and the app can be used in offline mode.
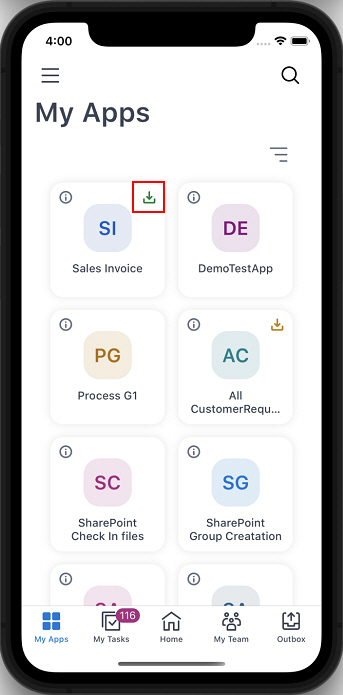
If a new version of the app is published, the icon color changes from green (Download
) to amber (Download ). Click to download the latest version of the app.
Step 5: (Optional) Configure the Mobile App to Always Use Offline Mode
If desired, you can configure the AgilePoint NX Mobile App to always run in offline mode, even if there is an Internet connection and the Mobile App can connect to AgilePoint Server.
Good to Know
- This setting is not required for apps to run in offline mode. Use this setting only if you want to turn off the connection from the Mobile App to AgilePoint Server for a short time — for example, for testing.
- If this setting is turned on:
- The Mobile App does not connect to the AgilePoint Server.
- The Mobile App does not receive new tasks or other updates.
- The Mobile App can only access apps that are downloaded to the mobile device.
- Submitted eForms will not synchronize with the AgilePoint Server until this setting is turned off and the Mobile App has an Internet connection to AgilePoint Server.
How to Start
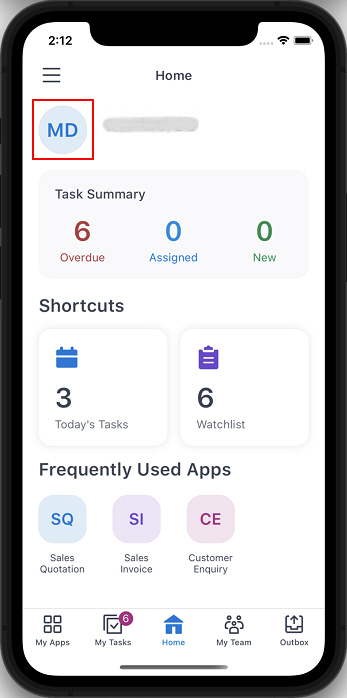
- On the Home screen, tap the profile picture.
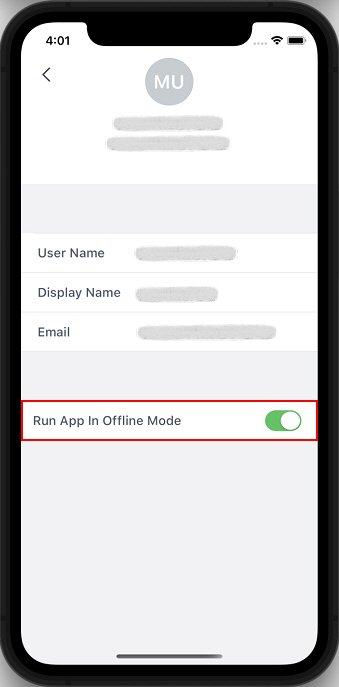
Procedure
- On the User Settings screen, turn on the Run App In Offline Mode field.
Step 6: Configure the Synchronization Settings for the Forms
Next, configure the synchronization settings for the forms that are submitted in offline mode.
How to Start
- On the Home screen, tap the menu icon
 .
.
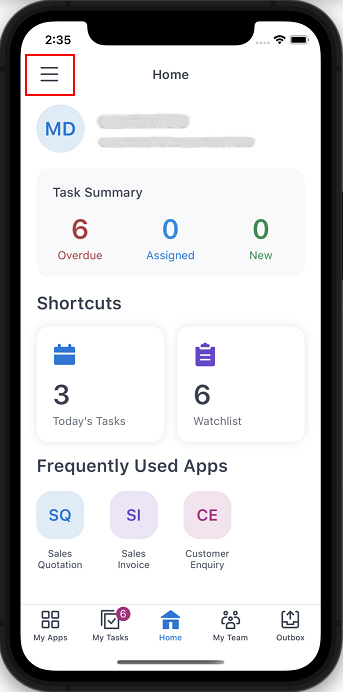
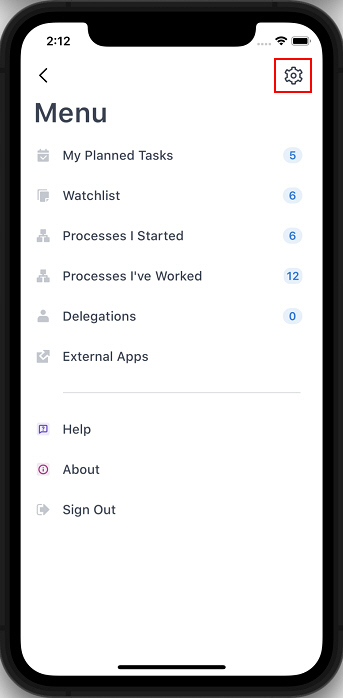
- On the sidebar menu, tap Settings
 .
.
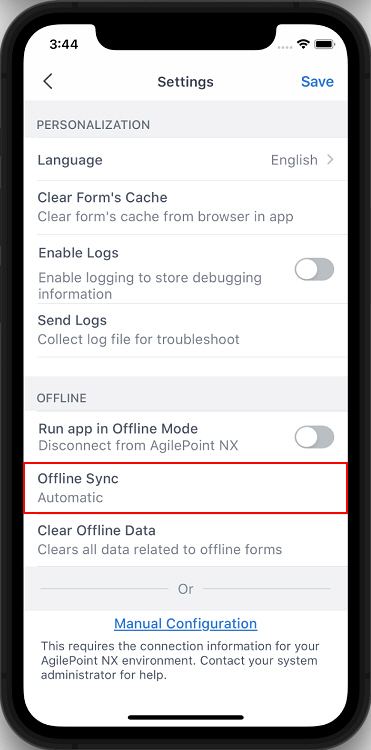
Procedure
- To synchronize the forms with the AgilePoint NX system once the mobile app is online,
on the Settings screen, in the Offline Sync field, select Automatic.
Step 7: Run the App in Offline Mode
Next, run the app on your AgilePoint NX Mobile App in offline mode. The Mobile App runs in offline mode if it can not connect to AgilePoint Server.
Good to Know
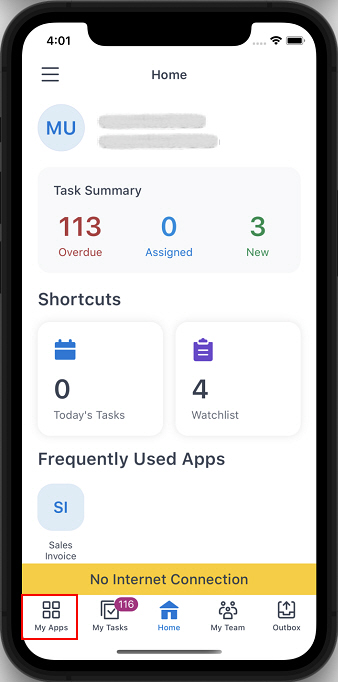
- In offline mode, the My Apps screen shows only the apps downloaded on the mobile device.
- The Mobile App runs in offline mode if it can not connect to AgilePoint Server. This is usually because there is no Internet connection on the mobile device, but it can occur in certain circumstances even if there is an Internet connection.
- If the user wants to use the mobile device in offline mode or if there is an Internet connection, but the user does not let the mobile device connect to the AgilePoint Server, then the user can enable the offline mode. To enable the offline mode, refer to Step 6: (Optional) Configure the Mobile App to Always Use Offline Mode.
How to Start
- On the Home screen, tap My Apps.
Procedure
- On the My Apps screen, tap the Sales Invoice app.
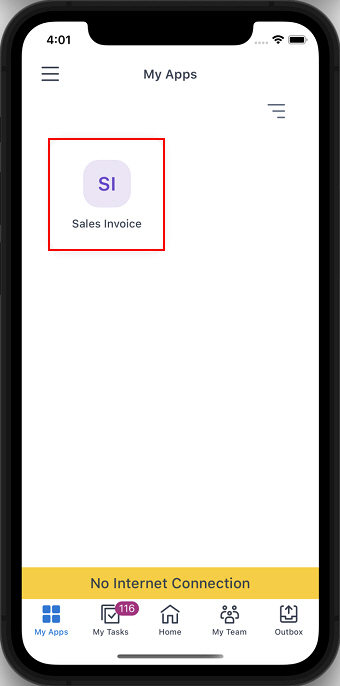
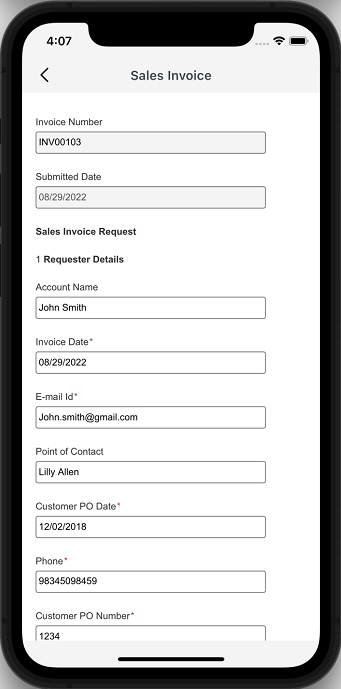
- Complete the Sales Invoice form and submit it in the offline mode.
The forms that are submitted in offline mode are moved to Outbox.
Step 8: (Optional) Manage Forms That are Submitted in Offline Mode
Next, manage the submitted forms in the Outbox in online mode.
Good to Know
- On the User Settings screen, if the Run App In Offline Mode field is turned on, you must turn off to connect the mobile app with the AgilePoint Server.
- To synchronize the forms with the AgilePoint NX system once the mobile app is online, refer to, Step 7: Configure the Synchronization Settings for the Forms.
How to Start
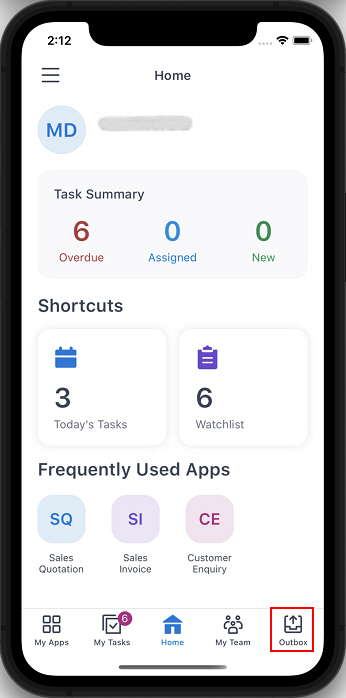
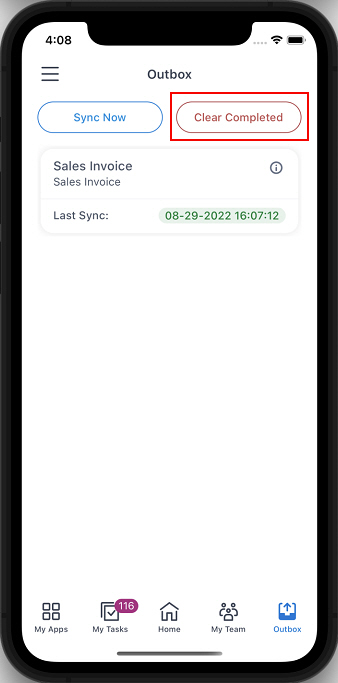
- On the Home screen, tap Outbox.
Procedure
- Once the mobile app is online, the forms that are stored in Outbox synchronize with the AgilePoint NX system. After the form is synchronized with the AgilePoint NX system, the date and time value for the Last Sync field shows in green.
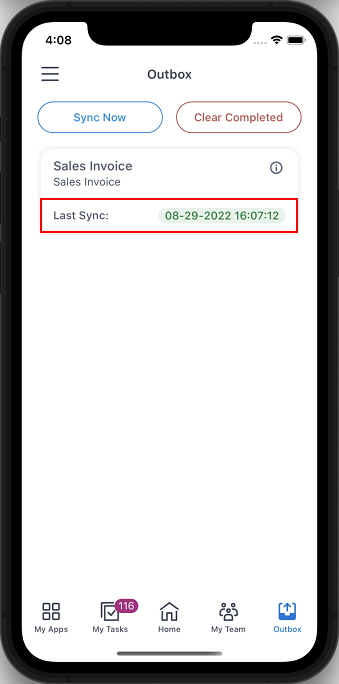
If the Offline Sync field on the Settings screen is set as Manual, or if the mobile app is online and the Last Sync date shows in red, tap Sync Now to synchronize the forms with the AgilePoint NX system.

- To delete the synchronized forms from the Outbox screen, tap Clear Completed.
How to Get the App
This example is based on the Sales Invoice app from the AgilePoint NX App Store. Use this procedure to get the app.
Prerequisites
- AgilePoint NX OnDemand (public cloud), or AgilePoint NX Private Cloud or AgilePoint NX OnPremises v7.0 or higher.
Good to Know
- This procedure is optional. It is provided so you can test the example with an out-of-the-box app.
- This is part of the Background and Setup procedures, but many users preferred this step to appear after the example, not before it.
Procedure
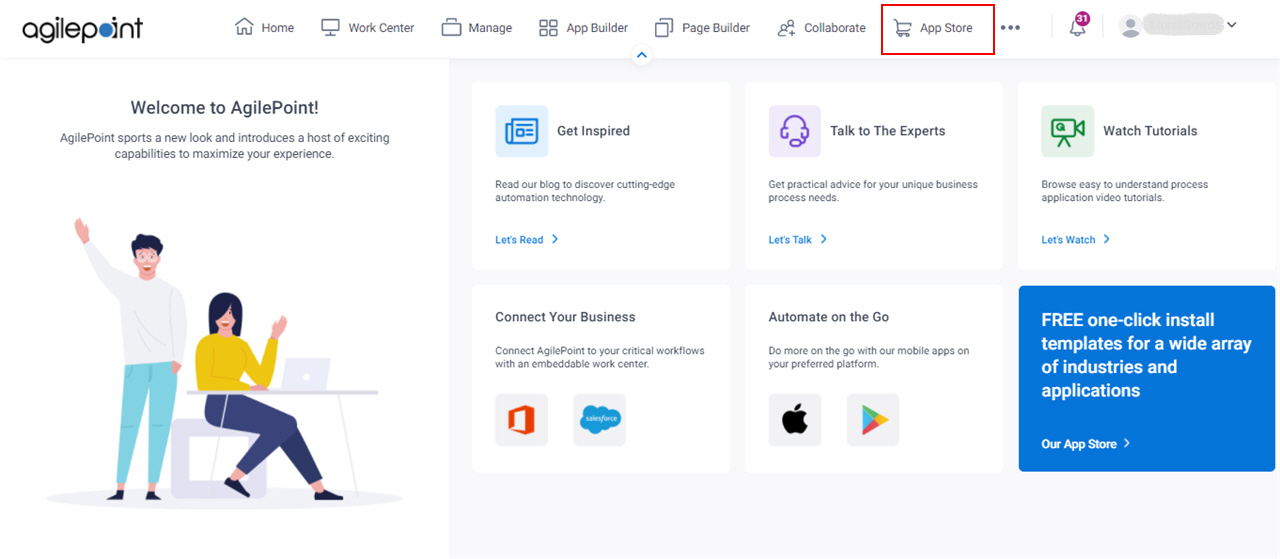
- Click App Store
 .
.
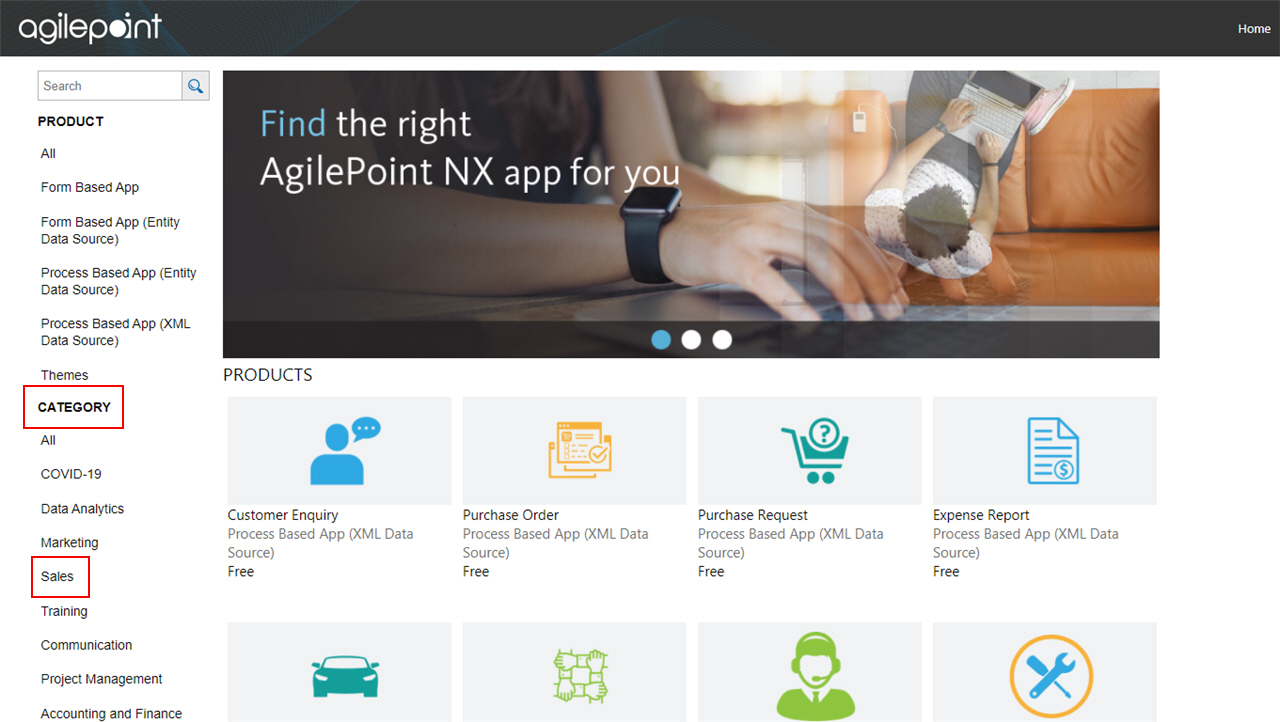
- In the CATEGORY section, click Sales.
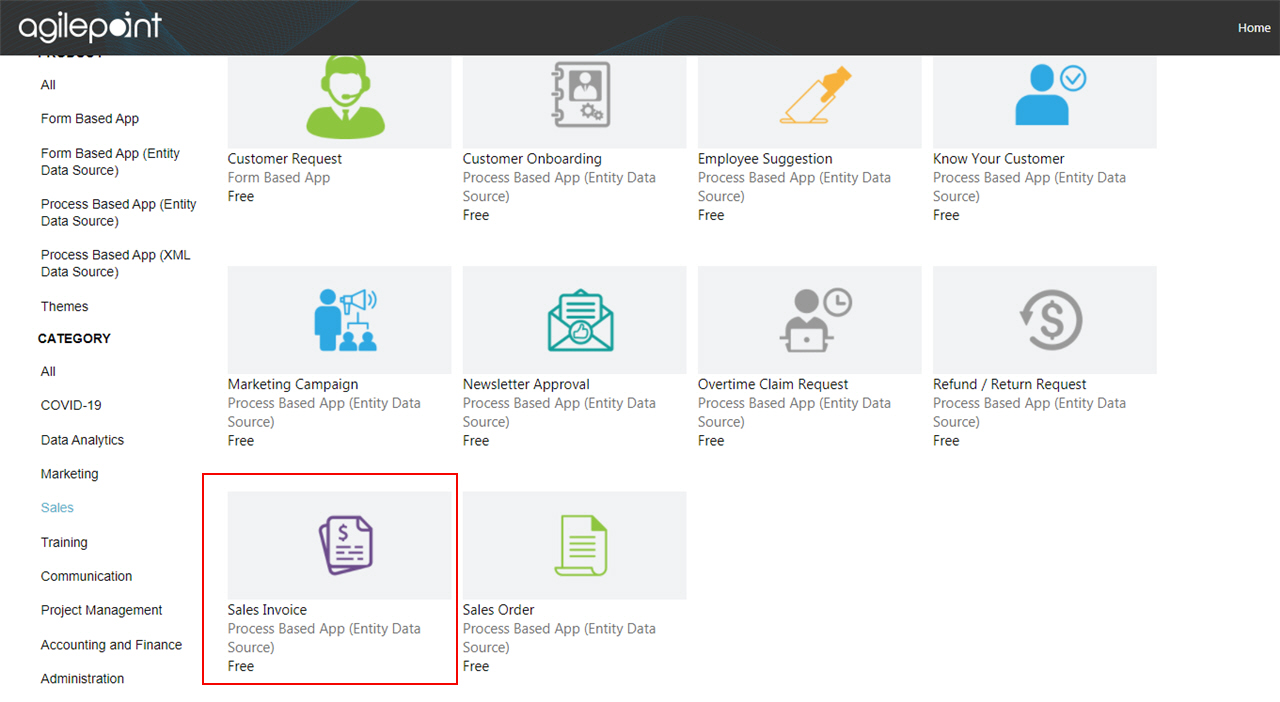
- Click the Sales Invoice app.
- On the Sales Invoice screen, click Add.
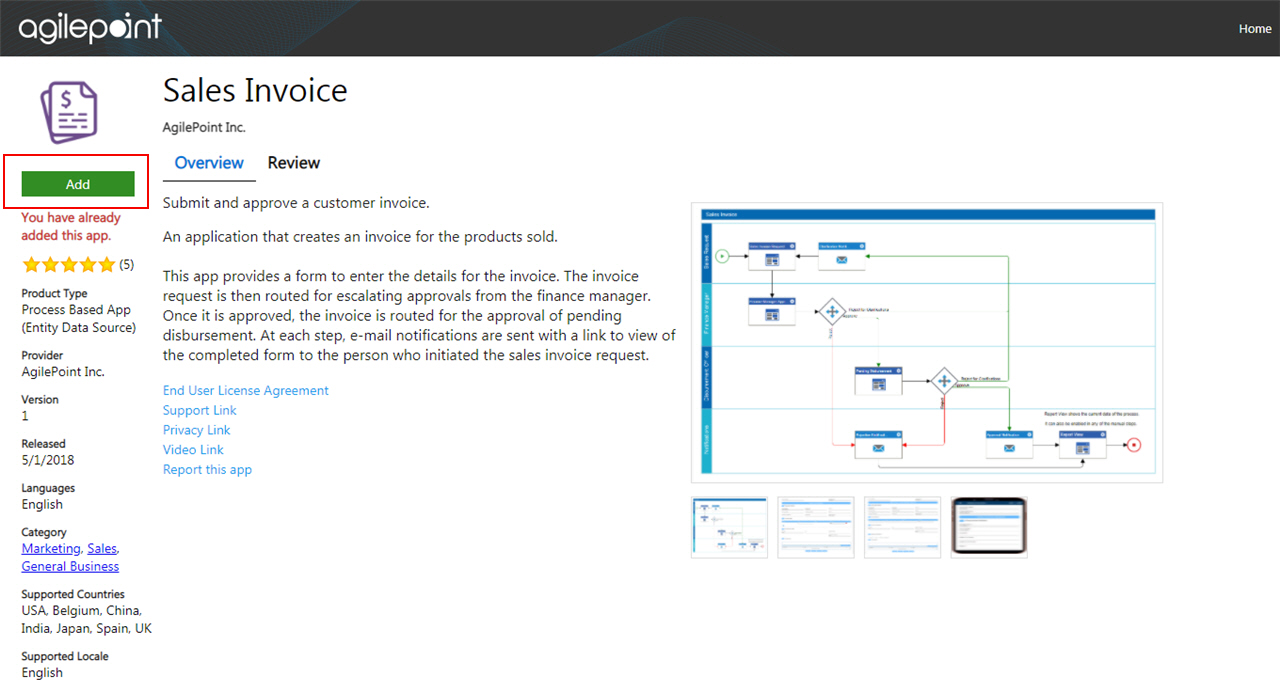
- On the Trust App screen, click Trust it.
- Click Return to site.