Properties for Human Task Activities

Configures the activity properties for human task activities.

Figure: Properties (Web Form Task) screen

Properties screen

Good to Know

How to Start

  1. Open Process Builder.

    For information about how to open this screen, refer to Process Builder.


    Open Process Builder
  2. In Process Builder, in the Activity Library, drag any human task activity onto your process.

    Drag Any Human Task Activity
  3. Select a human task activity.

    Select Human Task Activity
  4. Click Properties > Activity Properties.

    Click Activity Properties

Show Properties

Field NameDefinition

Show Properties

Description:
Specifies which activity properties to show.
Allowed Values:
  • All - Shows all the activity properties.
  • Common - Shows the commonly used activity properties.
  • Configured - Shows the activity properties that are configured for the activity.
  • Required - Shows the activity properties that are mandatory.
Default Value:
All

Basic

Field NameDefinition

Name

Description:
Shows the name of the activity.

The name is defined within the source code for the activity. It shows the name for your information only.

Allowed Values:
Read only.
Default Value:
The name of the activity.

Display Name

Description:
Specifies the activity name that shows in your process.
Allowed Values:
One line of text that can have spaces.

Click the Ellipses button to open the General Configuration screen. Use this screen to complete the Display Name field.

Default Value:
None
Accepts Variables:
No

Description

Description:
Specifies an optional text description for your activity.
Allowed Values:
More than one line of text.

Click the Ellipses button to open the General Configuration screen. Use this screen to complete the Description field.

Default Value:
None
Accepts Variables:
No

Work To Perform

Description:
Specifies the name of the task that shows in a participant's task list.

In most cases, for processes that use ASP.NET forms, this value also determines the file names for the .aspx form pages.

For the Web Form activity, this property does not set the file names for the web form. Instead use the Web Form URL. For more information, refer to Web Form Task (External Forms) activity.

Allowed Values:
The values for this property change with the type of process model you use:
  • Generic - Does this:
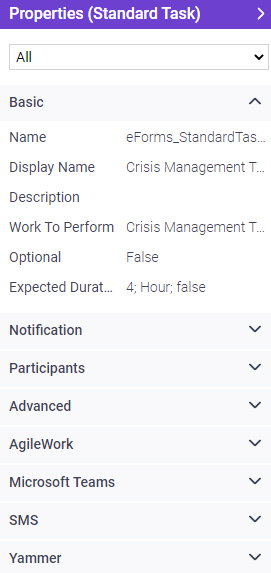
    • Specifies the name that shows in the participant's task list for this task.
    • If you create an ASP.NET project for this process in AgilePoint NX Developer, a new .aspx page is created for each human task with the same file name as the value of the work to perform property.
  • SPList and SPDoc - Specifies the name that shows in the participant's task list for this task
  • InfoPath - Does this:
    • Specifies the name that shows in the participant's task list for this task
    • Specifies the view from the InfoPath form for this process. These values are loaded from the InfoPath form.

      You can add a new work performer name. But AgilePoint does not recommend this. A new name indicates a different type of form, such as an ASP.NET form. This functionality is technically supported, but you must write code to use it.

  • eForms - Specifies the name that shows in the participant's task list for this task
Default Value:
None
Accepts Variables:
No

Optional

Description:
Specifies whether the task can be Cancelled in Manage Center.
Allowed Values:
  • True - The task can be cancelled.
  • False - The task cannot be cancelled.
Default Value:
False

Expected Duration

Description:
Specifies the maximum amount of time that should be allowed for the completion of the task associated with this activity before it is considered Overdue. This is a combination of a number of minutes, hours, days, or weeks.
Allowed Values:
A number of minutes, hours, days, or weeks..

Click the Ellipses button to open the General Configuration screen. Use this screen to complete the Time To Complete field.

Default Value:
1 Day
Accepts Variables:
No

User Defined Properties

Description:
Specifies ClientData process data variable values that are associated with a human task activity when a process runs. You can specify a set of variables as name/value pairs that are sent to your web forms. This is an alternative to sending data with URL parameters.
Allowed Values:
Click the Ellipses button to open the User Defined Properties screen. Use this screen to complete the fields.
Default Value:
None
Accepts Variables:
No

Enable Mobile

Description:
Specifie show a human task activity on a mobile device with a special template for mobile view.
Allowed Values:
  • Selected - Features are enabled to support mobile devices.
  • Deselected - Features are not enabled to support mobile devices.

    If you have set up a mobile view, and then deselect this option, your options are saved.

Default Value:
False

Notification

Field NameDefinition

Incoming Email

Description:
Specifies the name of an activity initiation email used to generate an automatic email notification when the activity starts at runtime.
Allowed Values:
  • An existing e-mail template - Applies the selected, predefined email template.
  • Add new e-mail template - Opens the E-mail Notifications screen, where you can create a new e-mail template.

Click the Ellipses button to open the E-mail Notifications screen.

Default Value:
None
Accepts Variables:
No

Outgoing Email

Description:
Specifies the name of an activity completion email used to send a message when a task is Completed.
Allowed Values:
  • An existing e-mail template - Applies the selected, predefined email template.
  • Add new e-mail template - Opens the E-mail Notifications screen, where you can create a new e-mail template.

Click the Ellipses button to open the E-mail Notifications screen.

Default Value:
None
Accepts Variables:
No

Reassigning Email

Description:
Specifies the name of an activity reassignment email used to generate an automatic email notification when this activity is reassigned to new participants at runtime.
Allowed Values:
  • An existing e-mail template - Applies the selected, predefined email template.
  • Add new e-mail template - Opens the E-mail Notifications screen, where you can create a new e-mail template.

Click the Ellipses button to open the E-mail Notifications screen.

Default Value:
None
Accepts Variables:
No

Timeout Email

Description:
Specifies the name of an activity overdue email used to create an email notification to send the participant if a task is in Overdue status.
Allowed Values:
  • An existing e-mail template - Applies the selected, predefined email template.
  • Add new e-mail template - Opens the E-mail Notifications screen, where you can create a new e-mail template.

Click the Ellipses button to open the E-mail Notifications screen.

Default Value:
None
Accepts Variables:
No

Reminding Email

Description:
Specifies the name of an email template used to send a message when a task is Overdue.
Allowed Values:
  • An existing e-mail template - Applies the selected, predefined email template.
  • Add new e-mail template - Opens the E-mail Notifications screen, where you can create a new e-mail template.

Click the Ellipses button to open the E-mail Notifications screen.

Default Value:
None
Accepts Variables:
No

Participants

Field NameDefinition

Participant

Description:
Specifies the participants who can be assigned to complete the task.

This property can be set to a specified user, group, or a role.

Allowed Values:
  • Add Participant - Opens the Participants screen, where you can add a participant.
Default Value:
None
Accepts Variables:
No

Max Participant

Description:
Specifies the number of group members who need to be assigned as participants for a task.
Allowed Values:
  • An integer that specifies a number of participants within a group required to complete a task.
  • Maximum Participants - Specifies that all members of a group are required to participate.

Click the Ellipses button to open the Participants screen. Use this screen to complete the The maximun number of participant to complete this task or Unlimited Participants field.

Default Value:
1
Example:
If the participant is set to a group of users, and Max number of people to complete this task is 2, then 2 members of the group actually are required to participate in the task.

Reuse Participant

Description:
Specifies if, when a activity runs more than one time during a process, the same participants must complete the task each time.
Allowed Values:
  • True - If an activity is runs more than one time, the same participants who took assignment the first time are also assigned the task each time after.
  • False - If an activity is runs more than one time, any participants can take assignment each time.
Default Value:
True
Example:
Ann is part of a group, and takes assignment for a task. She rejects the task. If this field is selected, the next time the process starts this task, the same user, Ann is assigned the task. If this field is deselected, the task goes back into the pool, and anyone in the group can take assignment.

Also refer to:

Advanced

Field NameDefinition

Debug

Description:
Tracks the performance of an activity for the purpose of troubleshooting.
Allowed Values:
  • True - Shows that the activity logs the additional progress and debugging messages to the AgilePoint Server log file at runtime. Debugging information includes, for example, data being passed to or from the activity, or database connection information.

    These messages help in verifying that the activity is functioning properly and/or with troubleshooting any problems or suspected problems with the activity's runtime behavior or configuration.

  • False - Shows that the activity does not log additional progress and debugging messages to the AgilePoint Server log file at runtime.
Default Value:
False
Accepts Variables:
No

Update Custom Attribute

Description:
Specifies a value for a process data variable based on a specified type of event.
Allowed Values:
Click the Ellipses button to open the Update Process Instance Variable screen. Use this screen to complete the fields.
Default Value:
None
Accepts Variables:
No

Auto Complete

Description:
Specifies whether the status of a task is set to Completed.
Allowed Values:
  • True - The first time a task is entered at runtime, it is automatically marked as Completed.

    If the task is entered again at runtime, it is not automatically marked as Completed. This helps to avoid an infinite loop.

  • False - A task is not automatically marked as Completed.
Default Value:
False
Accepts Variables:
No

Wait Work Performed

Description:
Specifies whether data entry is required before a task can be completed in Manage Center.
Allowed Values:
  • True - Specifies that some data entry is required before a task can be Completed. If there is a form for a task, then data must be entered in the form.
  • False - Specifies that data entry is optional before a task can be completed in Manage Center.
Default Value:
True
Example:
This property might be set to False if a task requires some work that does not include data entry, such as delivering items to the post office.

Wait All Incoming

Description:
Specifies which direct predecessor activities to wait for before starting the activity at runtime.
Allowed Values:
  • False - Specifies that the activity starts as soon as any one of the activity's direct predecessors is Completed.
  • True (Static) - Specifies that the activity starts only after all of the activity's direct predecessors are Completed.All other activities process are ignored.

    This setting is the logically the same as having an And activity with Dynamic set to False.

  • True (Dynamic) - Specifies that the activity starts only after all of the activity's direct predecessors are Completed, along with all preceding activities in the process branch. This setting ignores activities that are skipped or bypassed because of the process logic or manual action in the Manage Center.

    If any of activities in the process branch is delayed or does not start, this activity will not start, the process instance can be delayed indefinitely at this activity.

    This setting is the logically the same as having an And activity with Dynamic set to True.

Example:
This topic gives details and examples for this property's configuration:
Default Value:
False

Audit Level

Description:
Specifies the amount of process related data that is stored to the AgilePoint NX workflow database. You can set this property at either the process template properties level or at the individual activity level.
Allowed Values:
  • High - Specifies that AgilePoint NX stores all data about the activity or process to the database.
  • Low - Specifies that AgilePoint NX will only store limited data to the database. This option enables you to selectively filter out unnecessary data.
    • At the process model level, the records for tasks with status of Removed and New are deleted from the database. After leaving the human task activity, the human task with the status of Removed are deleted first, then after the whole process completes, the tasks with status of New are deleted. Also the records for unreached activity instances are deleted from the database.

      Setting the Audit Level to Low has no effect on system activities at the process model level.

    • At the activity level for system activities, the records are deleted from database after the activity completes. No records are stored for the activity.
Default Value:
High
Example:
Setting the Audit Level to Low at the process model level is useful if you assign a group to a task. Tasks with status of Removed and New are not meaningful data after the process completes.

Setting the Audit Level to Low at the activity level is useful for an activity with a timer that goes through a large number of loops. Usually organizations are not interested in the information about the Timer activity, so setting the audit level for a Timer activity to Low deletes the records now, and the database size does not grow as fast.

Session Mode

Description:
Specifies how to manage an open tasks if the same human task activity runs more than one time within a process instance.
Allowed Values:
  • Single - If the same activity runs more than one time in a process instance, any task that is not complete from a previous iteration are Cancelled, and a New task is created.
  • Multiple - If the same activity runs more than one time in a process instance, a new task is created, but any tasks that are not open from previous iterations are not cancelled.
Default Value:
Single

Priority

Description:
Specifies the importance of a task.
Allowed Values:
  • High - Specifies a high priority task. A high priority task shows High High icon icon.
  • Normal - Specifies a normal priority task. A normal priority task shows Normal Normal icon icon.
  • Low - Specifies a low priority task. A low priority task shows Low Low icon icon.
Default Value:
Normal
Accepts Variables:
Yes

AgileWork

Field NameDefinition

Assembly Name

Description:
The name of the .NET assembly that holds the specific system activity component with which this activity instance is associated.
Allowed Values:
Read only.

Class Name

Description:
The fully qualified Type name, including the namespace, of the .NET class (in the .NET assembly specified by the Assembly Name property) that represents the system activity component with which this activity instance is associated.
Allowed Values:
Read only.

Mobile

Field NameDefinition

Mobile View

Description:
Specifies whether users can view the task associated with the human task activity on a mobile device.
Allowed Values:
Click the Ellipses button to open the Mobile View screen. Use this screen to complete the fields.
Default Value:
None
Accepts Variables:
No

Microsoft Teams

Field NameDefinition

Enable Microsoft Teams

Description:
Specifies whether to use Microsoft Teams to send a notification.
Allowed Values:
Default Value:
True

Reassigned Microsoft Teams

Description:
Specifies the name of the Microsoft Teams template to use for a message when the task is Reassigned to new participants.
Allowed Values:
  • An existing Microsoft Teams template - Uses the selected Microsoft Teams template.
  • Add New Microsoft Teams Template - Opens the Microsoft Teams Configuration screen, where you can add a new Microsoft Teams template.

Click the Ellipses button to open the Microsoft Teams Configuration screen.

For more information, refer to Microsoft Teams Notifications screen.

Default Value:
None
Accepts Variables:
No

Assigned Microsoft Teams

Description:
Specifies the name of the Microsoft Teams template to use for a message when the task is Assigned.
Allowed Values:
  • An existing Microsoft Teams template - Uses the selected Microsoft Teams template.
  • Add New Microsoft Teams Template - Opens the Microsoft Teams Configuration screen, where you can add a new Microsoft Teams template.

Click the Ellipses button to open the Microsoft Teams Configuration screen.

For more information, refer to Microsoft Teams Notifications screen.

Default Value:
None
Accepts Variables:
No

Completed Microsoft Teams

Description:
Specifies the name of the Microsoft Teams template to use for a message when a task is Completed.
Allowed Values:
  • An existing Microsoft Teams template - Uses the selected Microsoft Teams template.
  • Add New Microsoft Teams Template - Opens the Microsoft Teams Configuration screen, where you can add a new Microsoft Teams template.

Click the Ellipses button to open the Microsoft Teams Configuration screen.

For more information, refer to Microsoft Teams Notifications screen.

Default Value:
None
Accepts Variables:
No

Cancelled Microsoft Teams

Description:
Specifies the name of the Microsoft Teams template to use for a message when a task is Cancelled.
Allowed Values:
  • An existing Microsoft Teams template - Uses the selected Microsoft Teams template.
  • Add New Microsoft Teams Template - Opens the Microsoft Teams Configuration screen, where you can add a new Microsoft Teams template.

Click the Ellipses button to open the Microsoft Teams Configuration screen.

For more information, refer to Microsoft Teams Notifications screen.

Default Value:
None
Accepts Variables:
No

Overdue Microsoft Teams

Description:
Specifies the name of the Microsoft Teams template to use for a message when a task is Overdue.
Allowed Values:
  • An existing Microsoft Teams template - Uses the selected Microsoft Teams template.
  • Add New Microsoft Teams Template - Opens the Microsoft Teams Configuration screen, where you can add a new Microsoft Teams template.

Click the Ellipses button to open the Microsoft Teams Configuration screen.

For more information, refer to Microsoft Teams Notifications screen.

Default Value:
None
Accepts Variables:
No

SMS

Field NameDefinition

Enable SMS

Description:
Specifies whether to use SMS to send a notification.
Allowed Values:
Default Value:
Flase

Reassigned SMS

Description:
Specifies the name of an SMS template you can use to send a message when the task is Reassigned to new participants.
Allowed Values:
  • An existing SMS template - Applies the selected SMS template.
  • Add New SMS Template - Opens the SMS Configuration screen, where you can add a new SMS template.

Click the Ellipses button to open the SMS Configuration screen.

For more information, refer to SMS Notifications screen.

Default Value:
None
Accepts Variables:
No

Assigned SMS

Description:
Specifies the name of an SMS template you can use to send a message when the task is Assigned.
Allowed Values:
  • An existing Skype for Business template - Uses the selected Skype for Business template.
  • Add New Skype for Business Template - Opens the Skype for Business Configuration screen, where you can add a new Skype for Business template.

Click the Ellipses button to open the Skype for Business Configuration screen.

For more information, refer to Skype for Business Configuration screen.

Default Value:
None
Accepts Variables:
No

Completed SMS

Description:
Specifies the name of an SMS template you can use to send a message when a task is Completed.
Allowed Values:
  • An existing SMS template - Applies the selected SMS template.
  • Add New SMS Template - Opens the SMS Configuration screen, where you can add a new SMS template.

Click the Ellipses button to open the SMS Configuration screen.

For more information, refer to SMS Notifications screen.

Default Value:
None
Accepts Variables:
No

Cancelled SMS

Description:
Specifies the name of an SMS template you can use to send a message when a task is Cancelled.
Allowed Values:
  • An existing SMS template - Applies the selected SMS template.
  • Add New SMS Template - Opens the SMS Configuration screen, where you can add a new SMS template.

Click the Ellipses button to open the SMS Configuration screen.

For more information, refer to SMS Notifications screen.

Default Value:
None
Accepts Variables:
No

Overdue SMS

Description:
Specifies the name of an SMS template you can use to send a message when a task is Overdue.
Allowed Values:
  • An existing SMS template - Applies the selected SMS template.
  • Add New SMS Template - Opens the SMS Configuration screen, where you can add a new SMS template.

Click the Ellipses button to open the SMS Configuration screen.

For more information, refer to SMS Notifications screen.

Default Value:
None
Accepts Variables:
No

Yammer

Field NameDefinition

Enable Yammer

Description:
Specifies whether Viva Engage is enabled to send a message.
Allowed Values:
  • True - The Yammer feature is enabled. This value must be set to True, even if messaging templates are enabled.
  • False - The Yammer feature is disabled.
Default Value:
True

Reassigned Message

Description:
Specifies the name of a Viva Engage template used to send a message when the task is Reassigned to new participants.
Allowed Values:
  • An existing Yammer template - Applies the selected, predefined Yammer template.
  • Add New Yammer Template - Opens the Yammer Configuration screen, where you can add a new Yammer template.

Click the Ellipses button to open the Yammer Configuration screen.

Default Value:
None
Accepts Variables:
No

Assigned Message

Description:
Specifies the name of a Viva Engage template used to send a message when the task is Assigned.
Allowed Values:
  • An existing Yammer template - Applies the selected, predefined Yammer template.
  • Add New Yammer Template - Opens the Yammer Configuration screen, where you can add a new Yammer template.

Click the Ellipses button to open the Yammer Configuration screen.

Default Value:
None
Accepts Variables:
No

Completed Message

Description:
Specifies the name of a Viva Engage template used to send a message when a task is Completed.
Allowed Values:
  • An existing Yammer template - Applies the selected, predefined Yammer template.
  • Add New Yammer Template - Opens the Yammer Configuration screen, where you can add a new Yammer template.

Click the Ellipses button to open the Yammer Configuration screen.

Default Value:
None
Accepts Variables:
No

Cancelled Message

Description:
Specifies the name of a Viva Engage template used to send a message when a task is Cancelled.
Allowed Values:
  • An existing Yammer template - Applies the selected, predefined Yammer template.
  • Add New Yammer Template - Opens the Yammer Configuration screen, where you can add a new Yammer template.

Click the Ellipses button to open the Yammer Configuration screen.

Default Value:
None
Accepts Variables:
No

Overdue Message

Description:
Specifies the Viva Engage template and schedule for a reminder message.
Allowed Values:
  • An existing Yammer template - Applies the selected, predefined Yammer template.
  • Add New Yammer Template - Opens the Yammer Configuration screen, where you can add a new Yammer template.

Click the Ellipses button to open the Yammer Configuration screen.

Default Value:
None
Accepts Variables:
No

Chatter

Field NameDefinition

Enable Chatter

Description:
Specifies whether Salesforce Chatter is enabled to send a message.
Allowed Values:
  • True - The Chatter feature is enabled. This value must be set to True, even if messaging templates are enabled.
  • False - The Chatter feature is disabled.
Default Value:
True

Cancelled Chatter Template

Description:
Specifies the name of a Chatter template for a message that sends when a task is Cancelled.
Allowed Values:
  • An existing Chatter template - Applies the selected, predefined Yammer template.
  • Add New Chatter Template - Opens the Chatter Configuration screen, where you can add a new Chatter template.

Click the Ellipses button to open the Chatter Configuration screen.

Default Value:
None
Accepts Variables:
No

Reassigned Chatter Template

Description:
Specifies the name of a Chatter template used to send a message when this activity is assigned to new participants.
Allowed Values:
  • An existing Chatter template - Applies the selected, predefined Yammer template.
  • Add New Chatter Template - Opens the Chatter Configuration screen, where you can add a new Chatter template.

Click the Ellipses button to open the Chatter Configuration screen.

Default Value:
None
Accepts Variables:
No

Assigned Chatter Template

Description:
Specifies the name of a Chatter template for the message that sends when this activity starts.
Allowed Values:
  • An existing Chatter template - Applies the selected, predefined Yammer template.
  • Add New Chatter Template - Opens the Chatter Configuration screen, where you can add a new Chatter template.

Click the Ellipses button to open the Chatter Configuration screen.

Default Value:
None
Accepts Variables:
No

Completed Chatter Template

Description:
Specifies a Chatter template for a message that sends when a task is Completed.
Allowed Values:
  • An existing Chatter template - Applies the selected, predefined Yammer template.
  • Add New Chatter Template - Opens the Chatter Configuration screen, where you can add a new Chatter template.

Click the Ellipses button to open the Chatter Configuration screen.

Default Value:
None
Accepts Variables:
No

Overdue Chatter Template

Description:
Specifies the Chatter template and schedule for a reminder message.
Allowed Values:
  • An existing Chatter template - Applies the selected, predefined Yammer template.
  • Add New Chatter Template - Opens the Chatter Configuration screen, where you can add a new Chatter template.

Click the Ellipses button to open the Chatter Configuration screen.

Default Value:
None
Accepts Variables:
No