
Call a REST Service Method from a Process
To call a REST service method from a process, do the procedure in this topic.
Examples
Prerequisites
- An operational REST Service.
Good to Know
- In most text fields, you can use process data variables as an alternative to literal data values.
- JSON or XML patch files are also supported to patch the document with the specified changes.
- You can configure whether this activity waits for other activities before it runs.
For more information, refer to How Do I Configure an Activity to Wait for Other Incoming Activities?
- Some information about third-party integrations is outside the scope of the AgilePoint NX Product Documentation, and it is the responsibility of the vendors who create and maintain these technologies to provide this information. This includes specific business uses cases and examples; explanations for third-party concepts; details about the data models and input and output data formats for third-party technologies; and various types of IDs, URL patterns, connection string formats, and other technical information that is specific to the third-party technologies. For more information, refer to Where Can I Find Information and Examples for Third-Party Integrations?
How to Start
- On the Application Explorer screen, do one of these:
- Do one of these:
- Add an activity:
- In the Process Builder, in the Activity Library,
open the Web Services
 tab.
tab. - On the Web Services
tab,
drag the REST Service
 activity onto your process.
- In the Process Builder, in the Activity Library,
open the Web Services
- Change an activity:
- In your process, double-click your activity.
- Add an activity:
Procedure
- Complete the fields on the
General Configuration screen.
For more information, refer to Configure General Options for the REST Service.
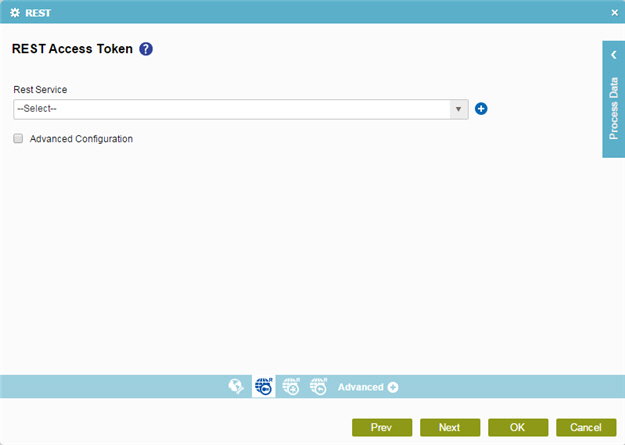
- Click REST Access Token
 .
. - On the
REST Access Token screen,
in the REST Service list, select your REST service access token.
To create a new access token, click Add Token
 . For more information, refer to
Access Token for REST.
. For more information, refer to
Access Token for REST.- To connect to the REST service, in the REST Service list, select your REST service access token.
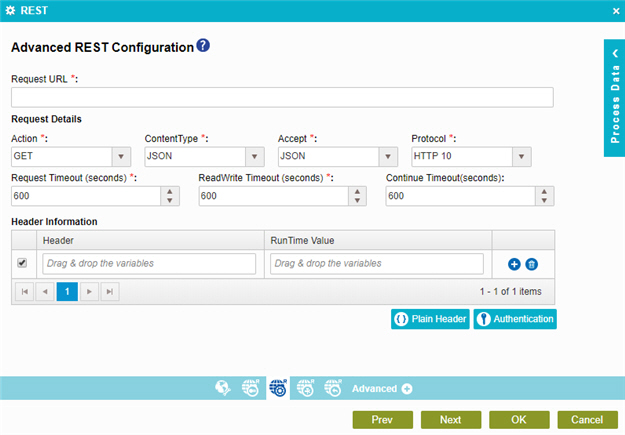
- (Optional) To do advanced configuration for the REST service, do this procedure.
- Select Advanced Configuration.
- Click REST Configuration
 .
. - On the Advanced REST Configuration screen, do this procedure.
- In the Request URL field, enter the REST service request URL for your method.
- In the Action field, select the type of action for the REST service to do.
- In the Content-Type field, select the type of content the REST service uses.
- In the Accept field, select the data format to accept in a REST service.
- In the Protocol field, select the communication protocol for your REST service.
- In the Request Timeout(seconds) field, select the maximum amount of time, in seconds, allowed for the completion of the REST service call for the activity.
- In the ReadWrite Timeout(seconds) field, select the maximum amount of time, in seconds, for read and write methods.
- Complete these fields
as necessary.
Field Name Definition Header Information
- Function:
- Specifies the custom headers for the REST service.
Request headers are usually used to give security information, such as authentication credentials.
- Accepted Values:
-
- Header
- RunTime Value
Use the Create
button to add the Header and RunTime Value for the
REST service. - Default Value:
- None
- Limitations:
-
Some information about third-party integrations is outside the scope of the AgilePoint NX Product Documentation, and it is the responsibility of the vendors who create and maintain these technologies to provide this information. This includes specific business uses cases and examples; explanations for third-party concepts; details about the data models and input and output data formats for third-party technologies; and various types of IDs, URL patterns, connection string formats, and other technical information that is specific to the third-party technologies. For more information, refer to Where Can I Find Information and Examples for Third-Party Integrations?
Plain Header
- Function:
- Specifies the header name and value to add in the Header and RunTime Value field.
Authentication
- Opens this Screen:
-
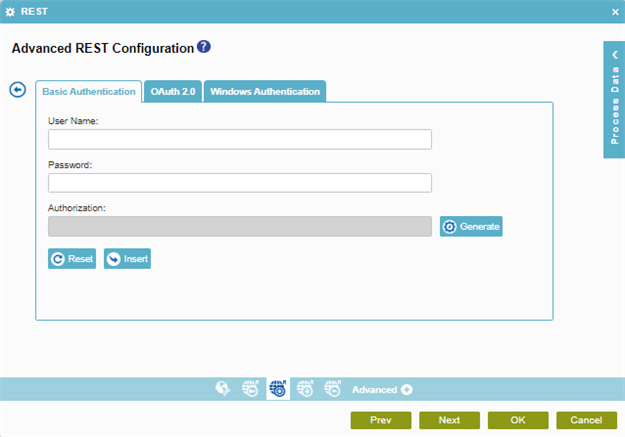
- Advanced REST Configuration > Authentication screen > Basic Authentication tab - Creates REST service authentication credentials to connect to a REST service URL with basic authentication.
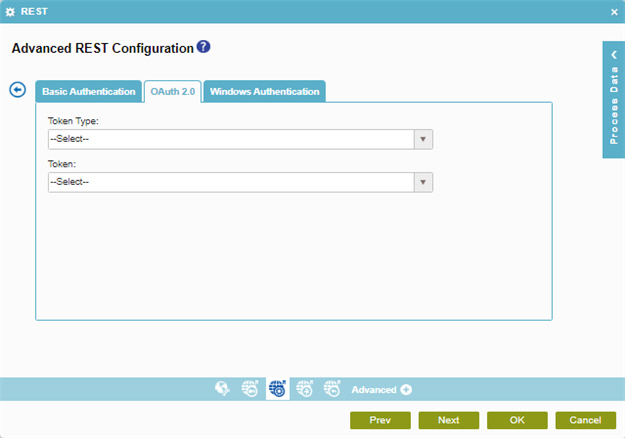
- Advanced REST Configuration > Authentication screen > OAuth 2.0 tab - Creates REST service authentication credentials to connect to a REST service URL with the OAuth 2.0 protocol.
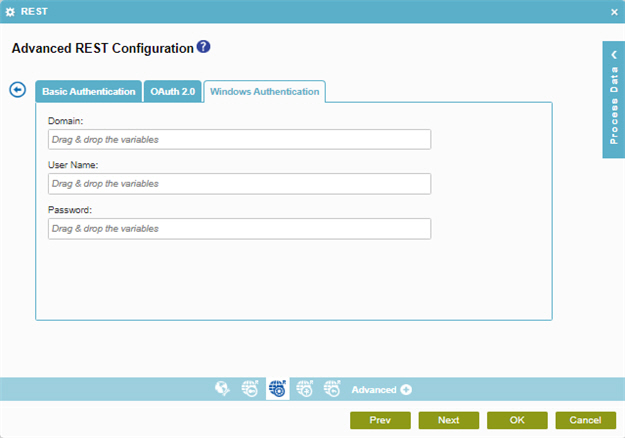
- Advanced REST Configuration > Authentication screen > Windows Authentication tab - Creates REST service authentication credentials to connect to a REST service URL with Windows Authentication (NTLM).
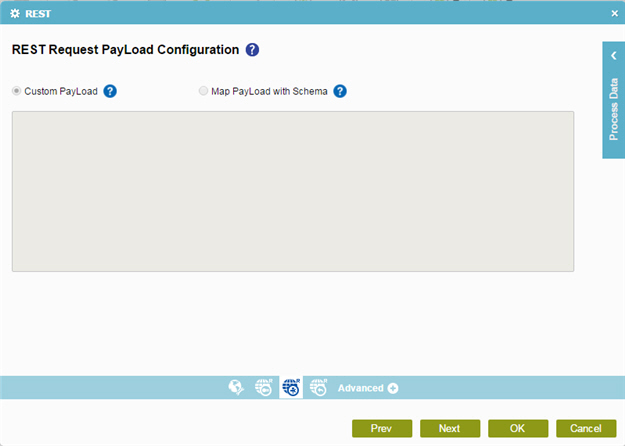
- Click REST Request Payload
 .
. - On the REST Request Payload Configuration
screen, do one of these:
- To configure the custom payload details for the REST Service request, do this procedure.
- Select Custom Payload.
- Enter payload values in the box to use when the process runs. The values of the payload must be in JSON/XML format.
- To map the PayLoad with Schema, do this procedure.
- Select Map Payload with Schema.
- In the box, enter the payload values which you want to map from schema.
- Click Map Schema.
- On the Schema Mapper screen, map the request columns to the schema elements.
- To configure the custom payload details for the REST Service request, do this procedure.
- Click REST Response
 .
. - On the REST Response Configuration screen,
complete these fields
as necessary.
Field Name Definition Response Status Code
- Function:
- Specifies the process data variable that stores the response status code, which tells status of the HTTP request.
- Accepted Values:
- A process data variable.
- Default Value:
- None
- Accepts Process Data Variables:
- Yes
Error Response
- Function:
- Specifies the process data variable that stores the HTTP response message, which tells the result of the request.
- Accepted Values:
- A process data variable.
- Default Value:
- None
- Accepts Process Data Variables:
- Yes
- To connect response data from the REST service call to your process, do one of these.
- To connect the response to a process data variable, complete this field
as necessary.
Field Name Definition Save Response to Custom Attribute
- Function:
- Specifies the variable that contains the response to a method call. The method calls a REST service.
- Accepted Values:
- A process data variable.
- Default Value:
- None
- Accepts Process Data Variables:
- Yes
- To connect the response to your schema, do one of these:
- Select Map Response to Process Schema.
- Select Enter Sample Response.
- In Schema field, drag a variable from Process Data screen to use for the custom header.
- In the Header field, enter the name of the custom header.
- Select Map Response to Process Schema.
- Select Get Response from Simulation.
- Click Simulate.
- On the REST Response Configuration > Simulate screen, click Simulate.
- Click Save.
- Click Back
 .
. - In the Schema field, drag a variable from Process Data screen to store the value of the header.
- Select Map Response to Process Schema.
- Select Get Response from Simulation.
- Click Adhoc Mapping.
- Complete the fields on the REST Response Configuration > Ad Hoc Mapping screen.
- Click Back .
- Select Map Response to Process Schema.
- To connect the response to a process data variable, complete this field
as necessary.