Configure a Conditional Expression
To configure a conditional expression for your process, do the procedure in this topic.


Video: Configure a Condition Activity
Video: eForms with SharePoint - Part 4
Video: Add Conditions and Salesforce Actions
Examples
- (Example) Configure a Condition Activity to Check the Leave Approval Status in the Absence Request Process
- (Example) Configure a Condition Activity to Check the Leave Information
- (Example) Configure a Condition Activity to Check the Leave Hours Available in the Absence Request Process
- Examples - Step-by-step use case examples, information about what types of examples are provided in the AgilePoint NX Product Documentation, and other resources where you can find more examples.
Good to Know
- In most text fields, you can use process data variables as an alternative to literal data values.
- Make sure you configure the direction of the incoming and outgoing arrow through Condition Builder screen correctly.
- You can configure whether this activity waits for other activities before it runs.
For more information, refer to How Do I Configure an Activity to Wait for Other Incoming Activities?
How to Start
- On the Application Explorer screen, do one of these:
- Do one of these:
- Add an activity:
- In the Process Builder, in the Activity Library, open the Common
 tab.
tab. - On the Common
 tab,
drag the Condition
  activity onto your process.
- In the Process Builder, in the Activity Library, open the Common
- Change an activity:
- In your process, double-click your activity.
- Add an activity:
Procedure
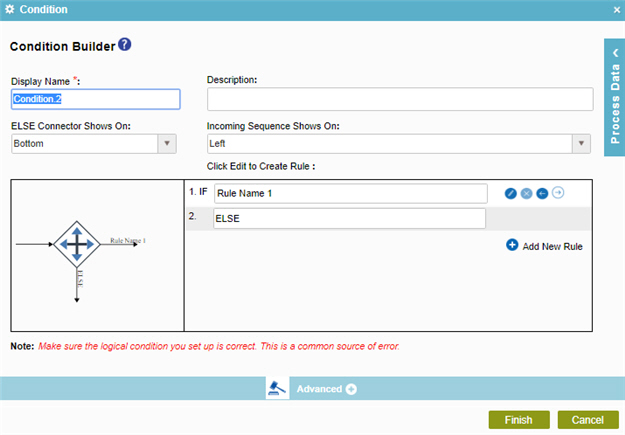
- On the Condition Builder screen, in the Display Name field, enter the activity name to show in your process.
- (Optional) In the Description field, enter more than one line of text description for your activity.
- (Optional) In the Else connector shows on field, select the location and direction of the else arrow.
- Do one of these as necessary:
- Click Outgoing Sequence Shows On Left
 to
specify the direction of the outgoing arrow in left.
 - Click Outgoing Sequence Shows On Right
 to
specify the direction of the outgoing arrow in right.
- Click Outgoing Sequence Shows On Left
- To configure a rule, in the IF field, enter your rule name.
- To specify your rule, click Edit
 .
. - Do one of these as necessary:
- To create a simple rule, do this procedure.
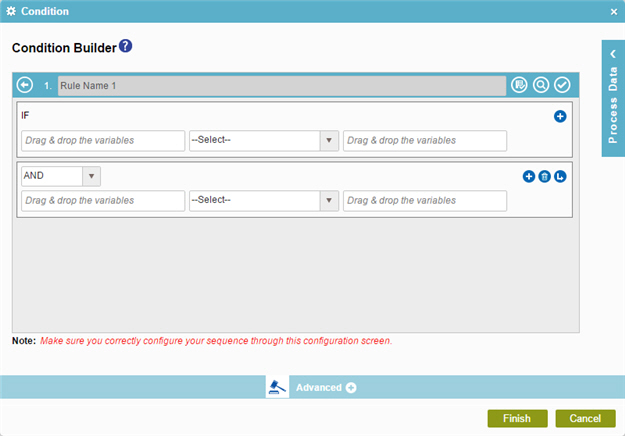
- On the Build Basic Query screen, in the Rule Variable field, enter the variable name, or drag a process data variable from the Process Data screen.
- In the Operator field, select the operator to compare the values in your logical expression.
Field Name Definition Operator
- Function:
- Lets you select the operators for a logical expression.
- Accepted Values:
-
Data Type Expression Operators String
, ==, StartsWith, EndsWith, Contains, !=, Does Not Contain Data, Contains Data
Bool
==
Date Time
, ==, >, >= , <, <=, !=
Number
, ==, >, >=, <, <=, !=
- Default Value:
- None
- Example:
- Refer to:
- In the Rule Value field, enter the value to compare, or drag a process data variable from the Process Data screen.
For Example:
IF RequestedAmount <= 25000 - Click Validate
 to make sure
the rule is correct.
 - (Optional) Click Add
 to add a condition that can be connected to the previous expression with a logical AND or OR operator.
 For Example:
IF RequestedAmount <= 25000 OR Department == Sales - Click Preview
 to see the preview
of your rule.
 - (Optional) Click Subcondition
 to add a statement
that adds a subordinate condition to a rule.
 - Click Back
 to save your rule and go back to the Condition Builder screen.
 - (Optional) To add more rules, click
Add New Rule
 , and repeat the procedure to specify a rule.
- To create a complex rule, do this procedure.
- On the Build Basic Query screen
click Build Advance Query
 .
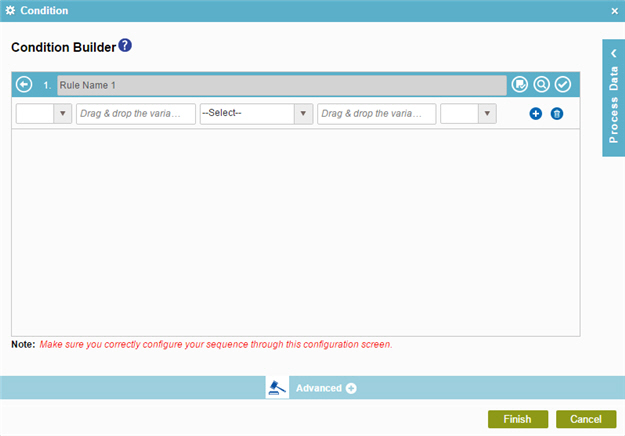
. - On the Build Advance Query screen, in the Bracket field, select the opening bracket to create complex expressions.
- In the Rule Variable field, enter the variable name, or drag a process data variable from the Process Data screen.
- In the Operator field, select the operator to compare the values in your logical expression.
Field Name Definition Operator
- Function:
- Lets you select the operators for a logical expression.
- Accepted Values:
-
Data Type Expression Operators String
, ==, StartsWith, EndsWith, Contains, !=, Does Not Contain Data, Contains Data
Bool
==
Date Time
, ==, >, >= , <, <=, !=
Number
, ==, >, >=, <, <=, !=
- Default Value:
- None
- Example:
- Refer to:
- In the Rule Value field, enter the value to compare, or drag a process data variable from the Process Data screen.
For Example:
IF RequestedAmount <= 25000 - In the Bracket field, select the closing bracket.
- Click Validate
 to make sure
the rule is correct.
 - (Optional) Click Add
 to add a condition that can be connected to the previous expression with a logical AND or OR operator.
 For Example:
IF RequestedAmount <= 25000 OR Department == Sales - Click Preview
 to see the preview
of your rule.
 - Click Back
 to save your rule and go back to the
Build Basic Query screen.
 - (Optional) To add more rules, click
Add New Rule
 , and repeat the procedure to specify a rule.
- On the Build Basic Query screen
click Build Advance Query
- To create a simple rule, do this procedure.


