Configure Lookup for Dynamics CRM > Name/Value > Quick Config tab

Configures a lookup using the existing data format from your data source.
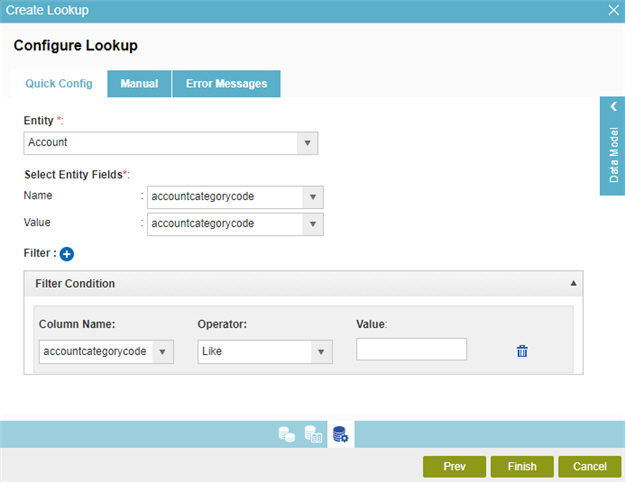
Figure: Quick Config tab

Quick Config tab

Good to Know

  • Some information about third-party integrations is outside the scope of the AgilePoint NX Product Documentation, and it is the responsibility of the vendors who create and maintain these technologies to provide this information. This includes specific business uses cases and examples; explanations for third-party concepts; details about the data models and input and output data formats for third-party technologies; and various types of IDs, URL patterns, connection string formats, and other technical information that is specific to the third-party technologies. For more information, refer to Where Can I Find Information and Examples for Third-Party Integrations?

How to Start

  1. On the Application Explorer screen, do one of these:
  2. Do one of these:
    • Add your form control:
      1. On the eForm Builder screen, in the Toolbox, open one of these tabs:
        • Common Controls Common Controls icon
        • Advanced Controls Advanced Controls icon
        • Telerik Controls Telerik Controls icon
      2. On your tab, drag one of these controls onto your form:
        • Auto-Suggest Auto-Suggest icon
        • List Box List Box icon
        • Subform Subform icon
        • Check Box Check Box icon
        • Auto Lookup Auto Lookup icon
        • List View List View icon
        • Pop-Up Select Pop-Up Select icon
        • Drop-Down List Drop-Down List icon
        • Auto-Suggest Auto-Suggest icon
        • Chart Chart icon
        • Data Grid Data Grid icon
        • Drop-Down List Drop-Down List icon
        • Data Grid Data Grid icon
        • Multi-Select List Box Multi-Select List Box icon
    • Change your form control:
      1. On your eForm, click the control, and click Edit Edit icon.
  3. On the Configure tab, click Add Lookup Add Lookup icon.
  4. On the Select Data Source Type screen, select Microsoft Dynamics CRM Microsoft Dynamics CRM icon, and click Next.
  5. On the Lookup Details screen, select Name/Value, and click Next.
  6. On the Configure Lookup screen, click the Quick Config tab.

Fields

Field Name Definition

Entity

Function:
Specifies the name for your entity.
Accepted Values:
The name of your entity.
Default Value:
None
Example:
Refer to:

Name

Function:
The name of an item, such as a property or attribute in a name/value pair.
To Open this Field:
  1. On the Configure Lookup screen, in the Request tab, select the name of the method from the Service Operation list.
Accepted Values:
The name of your entity field.
Default Value:
None

Value

Function:
The value for an item, such as the value for a process data variable in a key-value pair.
To Open this Field:
  1. On the Configure Lookup screen, in the Request tab, select the name of the method from the Service Operation list.
Accepted Values:
A valid object value.
Default Value:
None

Expand Expand icon

Function:
Shows the field list options.
To Open this Field:
  1. On the Configure Lookup screen, in the Entity list, select an entity.

Collapse Collapse icon

Function:
Closes the field list.
To Open this Field:
  1. On the Configure Lookup screen, in the Entity list, select an entity.

Add Filter Add Filter icon

Function:
Adds a row to give a condition for the filter.
To Open this Field:
  1. On the Configure Lookup screen, in the Entity list, select an entity.

Column Name

Function:
Specifies the name of the entity column.
To Open this Field:
  1. Click Add Filter Add Filter icon
Accepted Values:
A valid entity column name.
Default Value:
None

Operator

Function:
Specifies the operator to use in filter.
To Open this Field:
  1. Click Add Filter Add Filter icon
Accepted Values:
  • Like
  • Contains
  • Does Not Contain
  • Equal
  • Not Equal
  • Begins With
  • Does Not Begin With
  • Ends With
  • Does Not End With
  • Is Null
  • Is Not Null
Default Value:
Like
Limitations:

The Is Null and Is Not Null options are available in these releases:

Delete Filter Delete Filter icon

Function:
Deletes the filter condition.