(Example) How to Get the Access Token Credentials from Snowflake
To get the access token credentials from Snowflake, do the procedure in this topic.
Background and Setup
Prerequisites
- One of these account types:
- Snowflake Standard Edition
- Snowflake Enterprise Edition
- Snowflake Business Critical Edition
- Virtual Private Snowflake
- A Snowflake user account that has the SYSADMIN role.
To create a user in Snowflake or grant a user the SYSADMIN role, refer to the Snowflake documentation.
Good to Know
- By default, Snowflake expires its refresh tokens after 90 days.
A refresh token is an OAuth 2.0 object that allows an access token to renew. After the refresh
token expires, the associated access token can no longer be used and a new access token must be created.
This requires action in both AgilePoint NX and Snowflake.
You can request Snowflake Support to change the refresh token timeout for your Snowflake environment. For example, to request a timeout of 5 years, request the maximum OAUTH_REFRESH_TOKEN_VALIDITY for a SECURITY INTEGRATION to be increased to 157784630 sec.
If you do not change the default timeout for refresh tokens, AgilePoint strongly recommends setting a reminder to update your Snowflake access token every 90 days. If the refresh token expires, all AgilePoint NX apps that use the Snowflake access token will stop until the access token is updated. Then you will need to start the apps in Manage Center. AgilePoint NX does not provide automated reminders for this timeout.
- This topic explains how to create a new access token for Snowflake. To update a Snowflake access token — for example, if the Snowflake refresh token has expired — refer to (Example) How to Update an Access Token for Snowflake.
- OAuth 2.0 access tokens require a 2-way exchange of credentials between AgilePoint NX and the external service. This means that you must get the credentials from the third-party service to paste in the AgilePoint NX access token, and get the redirect URI from AgilePoint NX to paste in the external service. This requires you to open both the AgilePoint NX access token and the third-party service at the same time, so you can copy and paste from one screen to the other.
This topic shows the suggested procedure for Snowflake. The exact procedure for your access token depends on whether you already have a connection (usually called an app) configured in the external service.
- This topic gives one example. The procedure may vary depending on your configuration and account settings in the third-party service.
- Some information about third-party integrations is outside the scope of the AgilePoint NX Product Documentation. It is the responsibility of the vendors who create and maintain these technologies to provide this information. This includes specific business use cases and examples; explanations for third-party concepts; details about the data models and input and output data formats for third-party technologies; and various types of IDs, URL patterns, connection string formats, or other technical information that is specific to the third-party technologies. For more information, refer to Where Can I Find Information and Examples for Third-Party Integrations?
Step 1: Start Creating an Access Token in AgilePoint NX
First, create a new access token in AgilePoint NX for Snowflake.
How to Start
- There is more than one way to create an access token.
For more information, refer to Access Token for Snowflake.
Procedure
- In AgilePoint NX, open the access token configuration screen
for Snowflake.

Do not configure the access token credentials.
Keep the access token configuration screen open in AgilePoint NX, but do not save it.
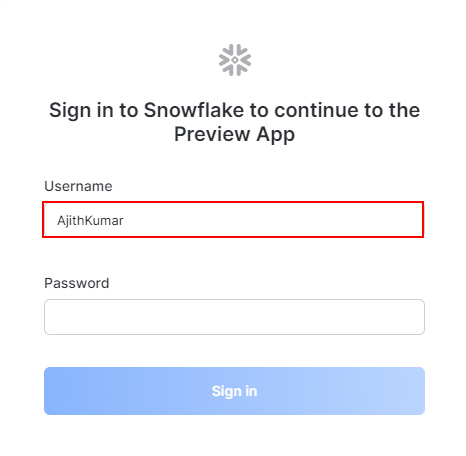
Step 2: Sign In to Snowflake with a User Account that has the SYSADMIN Role
Next, sign in to Snowflake with a user account that has the SYSADMIN role.
How to Start
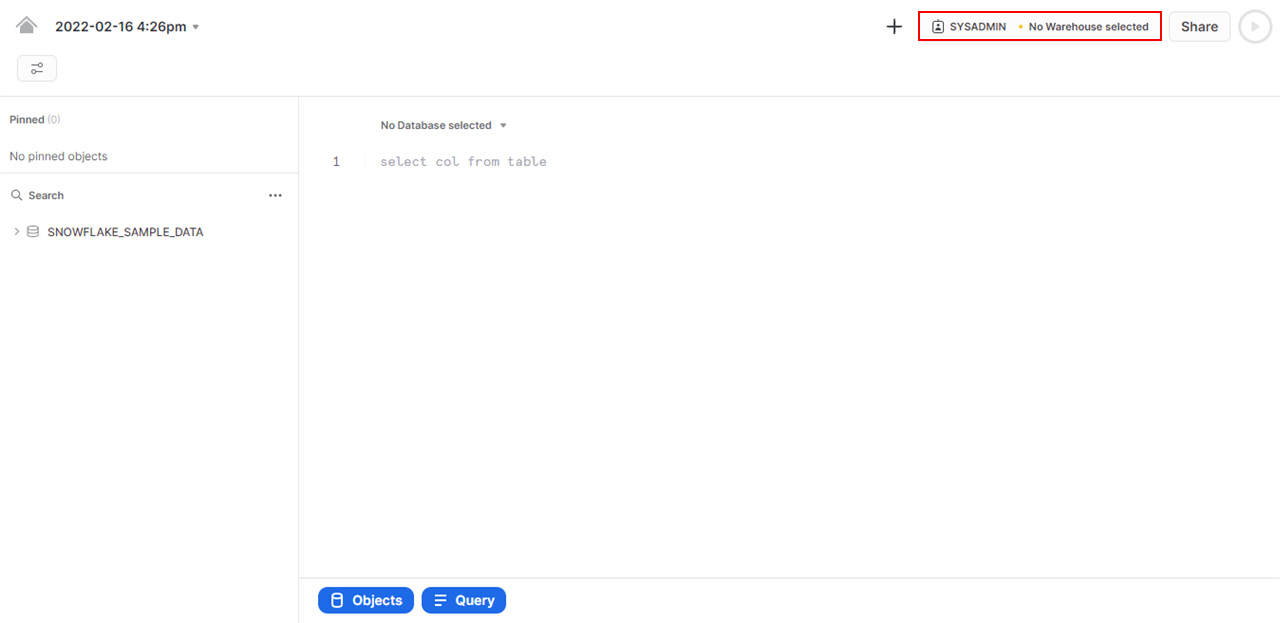
- In a new web browser tab, sign in to the Snowflake portal with a Snowflake account that has the SYSADMIN role.
Procedure
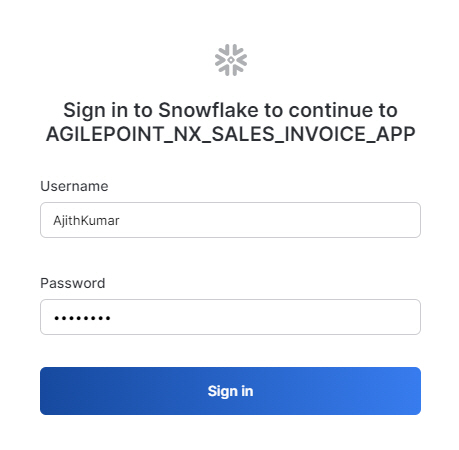
- On the Sign in to Snowflake to continue to the Preview App screen, in the Username field, enter the username for the user.
- In the Password field, enter the password for the user account.
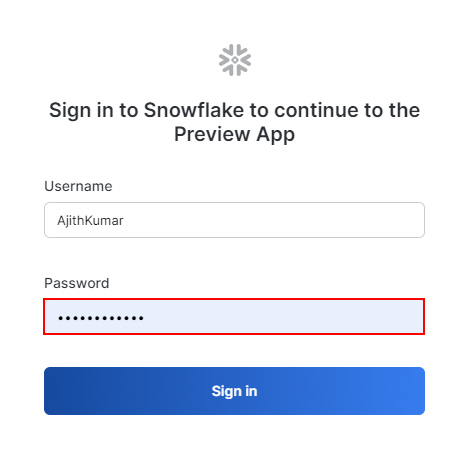
- Click Sign in.
Step 3: Copy the Account Identifier from Snowflake
Next, copy the account identifier from Snowflake to your AgilePoint NX access token.
How to Start
- In one web browser tab, sign in to Snowflake with a user account that has the SYSADMIN role.
For more information, refer to Sign In to Snowflake with a User Account that has the SYSADMIN Role.
- In a different web browser tab, in AgilePoint NX, open the Snowflake access token configuration screen.
Procedure
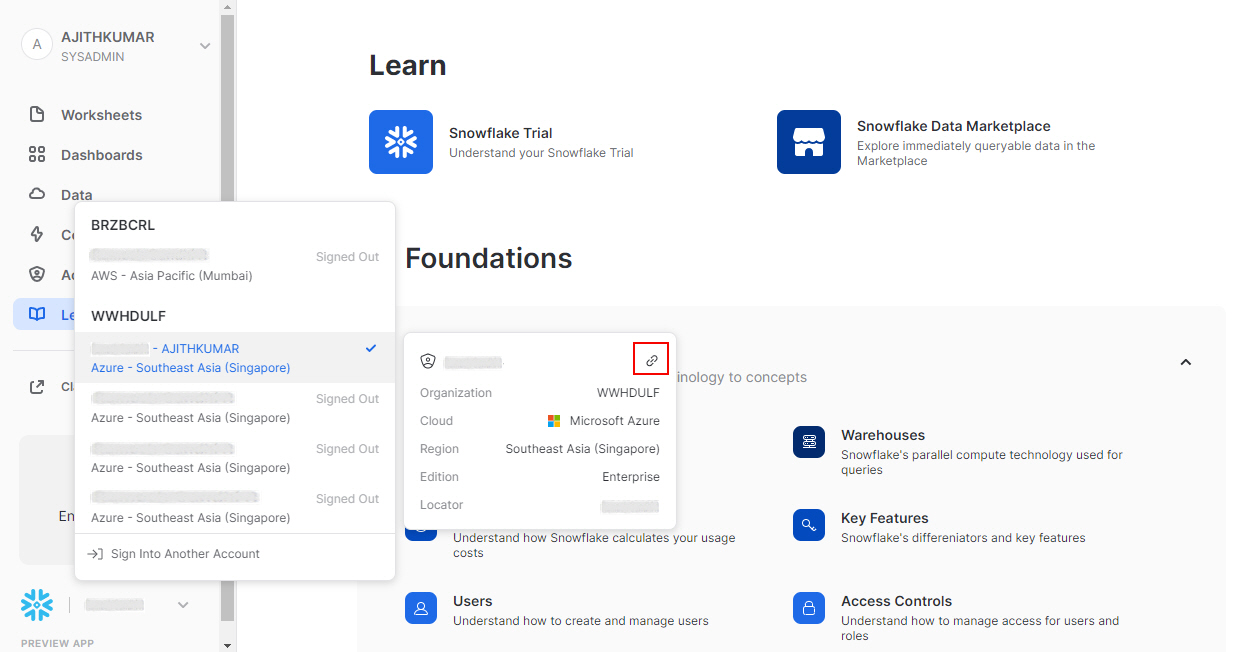
- In Snowflake, on the Worksheets screen, in the left pane, expand the account ID.
- On the Account ID, keep the cursor over the account, and click Copy Account URL.
- In a text file editor, paste the Copy Account URL value.
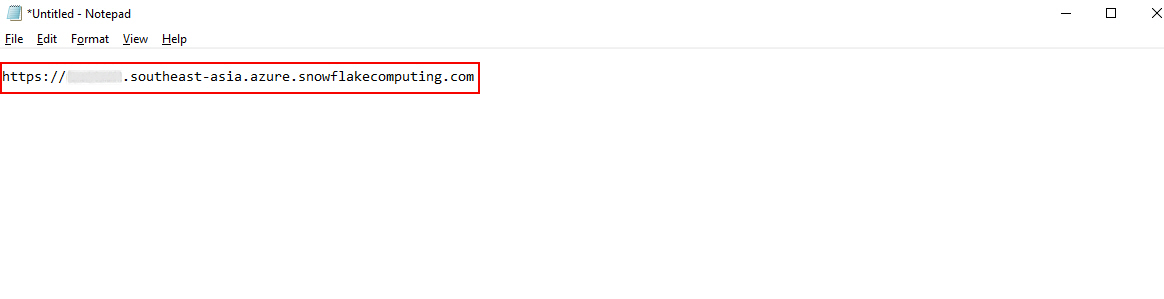
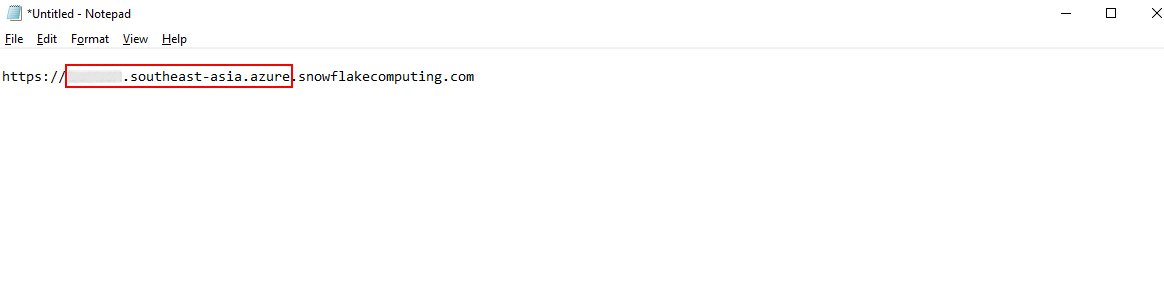
- In the account URL, copy the account identifier.
This is an example value. The account identifier has a unique ID, the region, and the cloud provider. The region and the cloud provider vary based on the option you selected when you sign up to Snowflake.
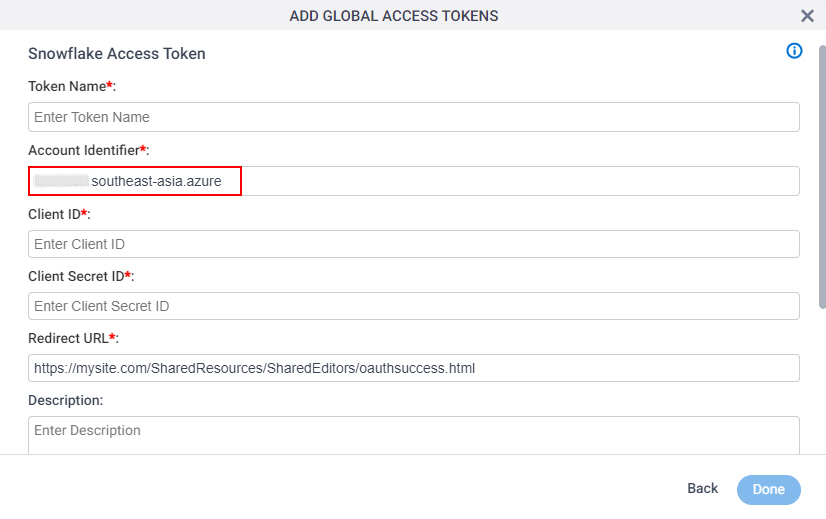
- In AgilePoint NX, on the Snowflake Access Token Configuration screen, in the Account Identifier field, paste the value.
Step 4: Run a Query to Create an App
Next, run the query in Snowflake to create an app.
How to Start
- In one web browser tab, in Snowflake, click WorkSheets.

Procedure
- In Snowflake, on the Worksheets screen, click Worksheet.

- On the Worksheet screen, click SYSADMIN / No Warehouse selected field.
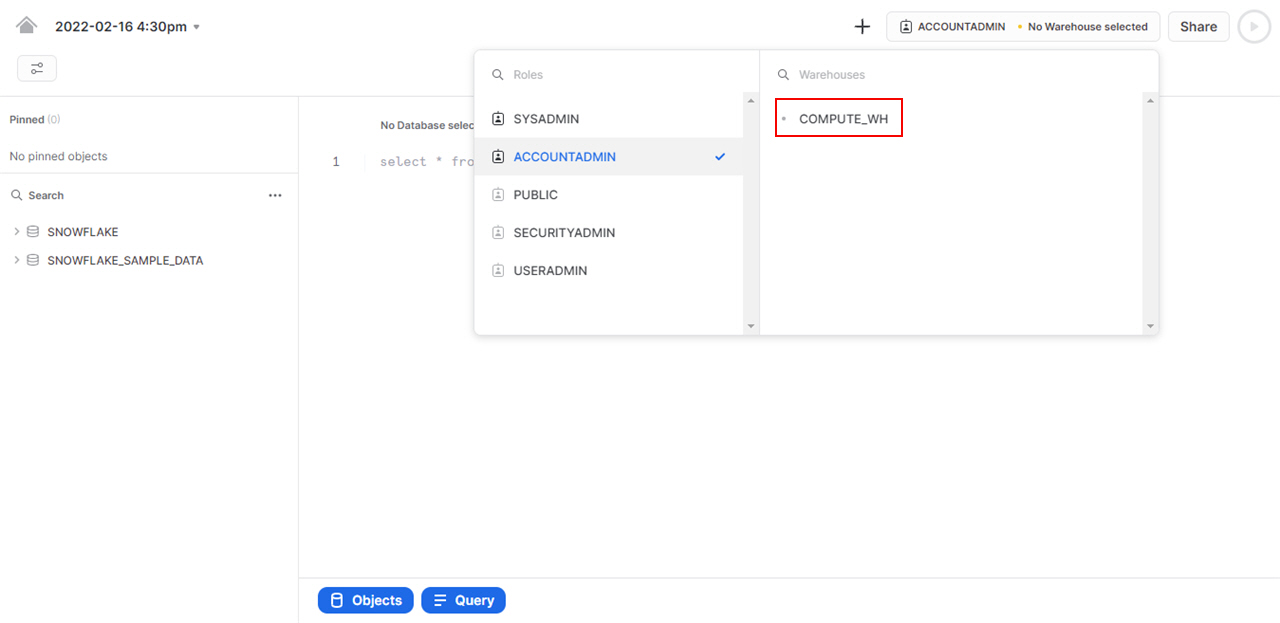
- In the Roles field, select ACCOUNTADMIN.
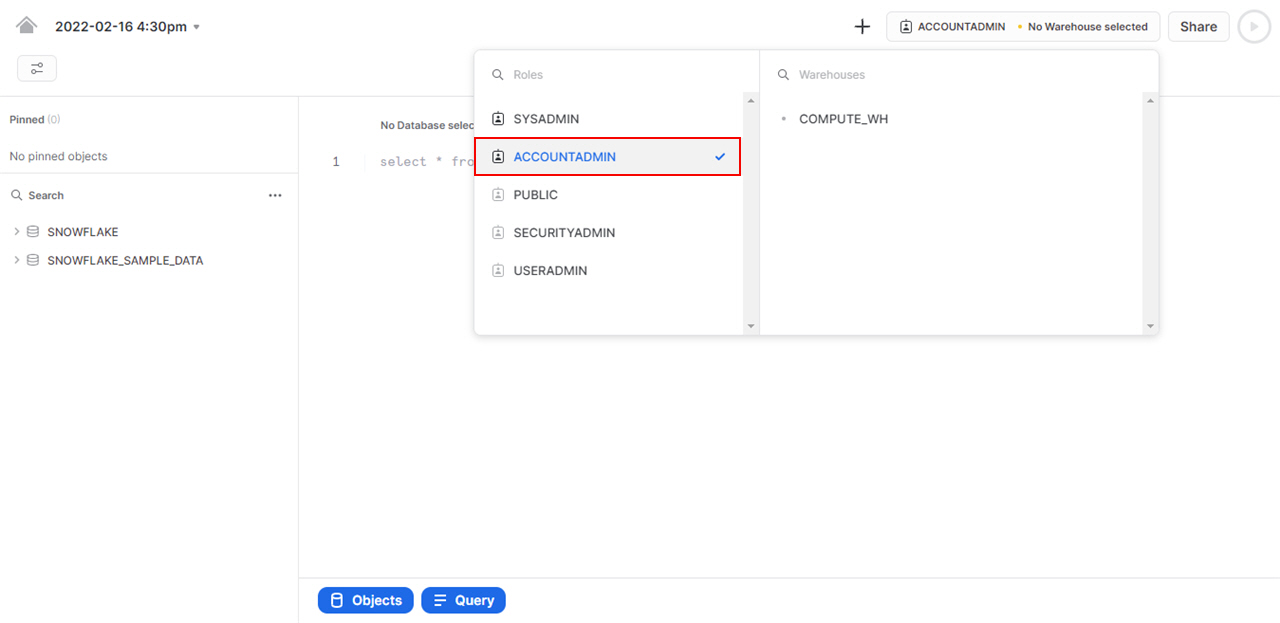
- In the Warehouses field, select COMPUTE_WH.
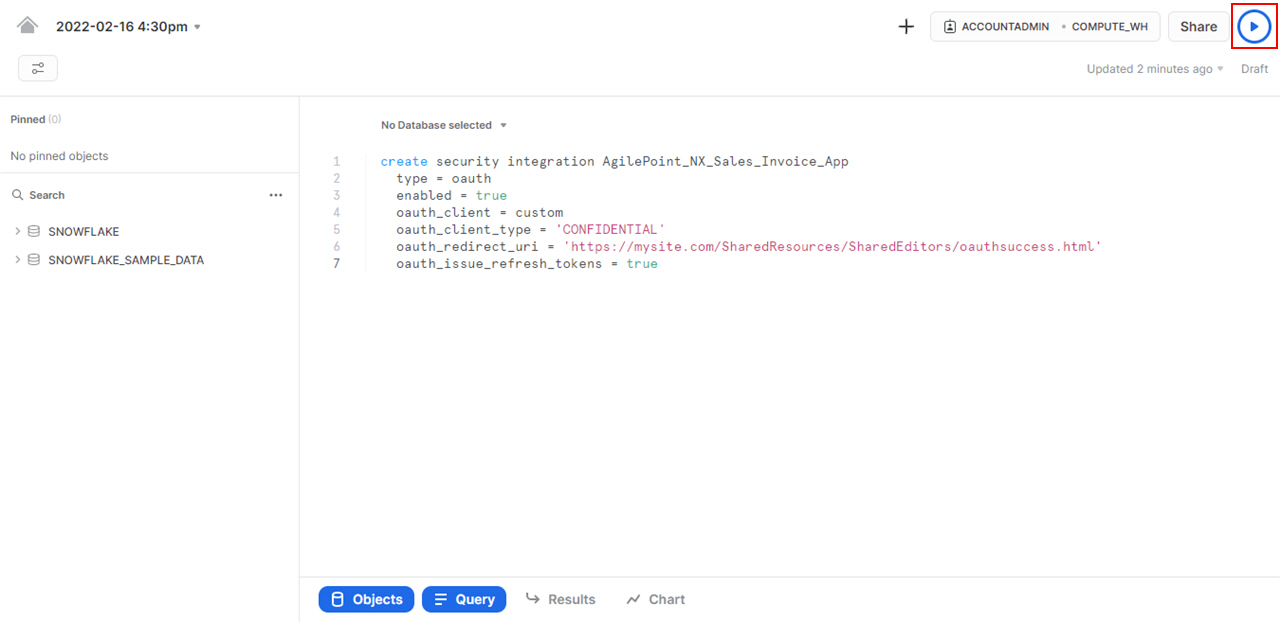
- In the Query field, enter this query.
Format:
create security integration [app name]
  type = oauth
  enabled = true
  oauth_client = custom
  oauth_client_type = 'CONFIDENTIAL'
  oauth_redirect_uri = '[value of the Redirect URL field on the
                        Access Token Configuration screen in AgilePoint NX]'
  oauth_issue_refresh_tokens = true
Example:
create security integration AgilePoint_NX_Sales_Invoice_App
  type = oauth
  enabled = true
  oauth_client = custom
  oauth_client_type = 'CONFIDENTIAL'
  oauth_redirect_uri = 'https://mysite.com/SharedResources/SharedEditors/oauthsuccess.html'
  oauth_issue_refresh_tokens = true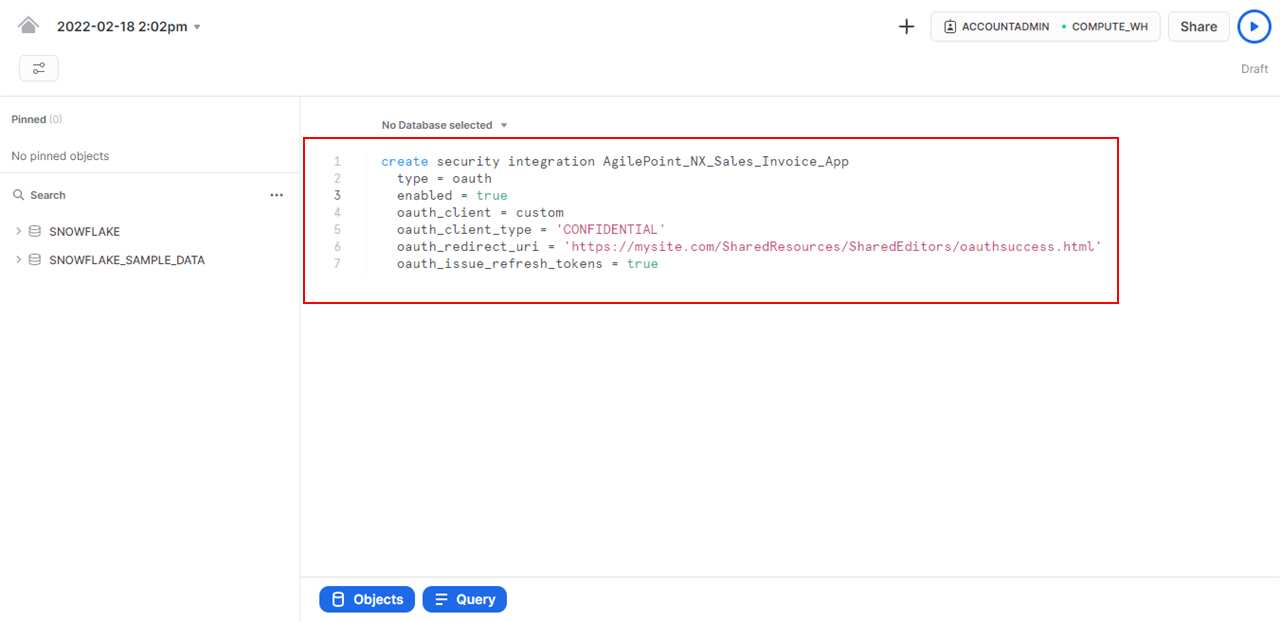
The value in the oauth_redirect_uri field is an example value. In a production environment, copy the actual Redirect URL value on the Snowflake Access Token Configuration screen from AgilePoint NX.
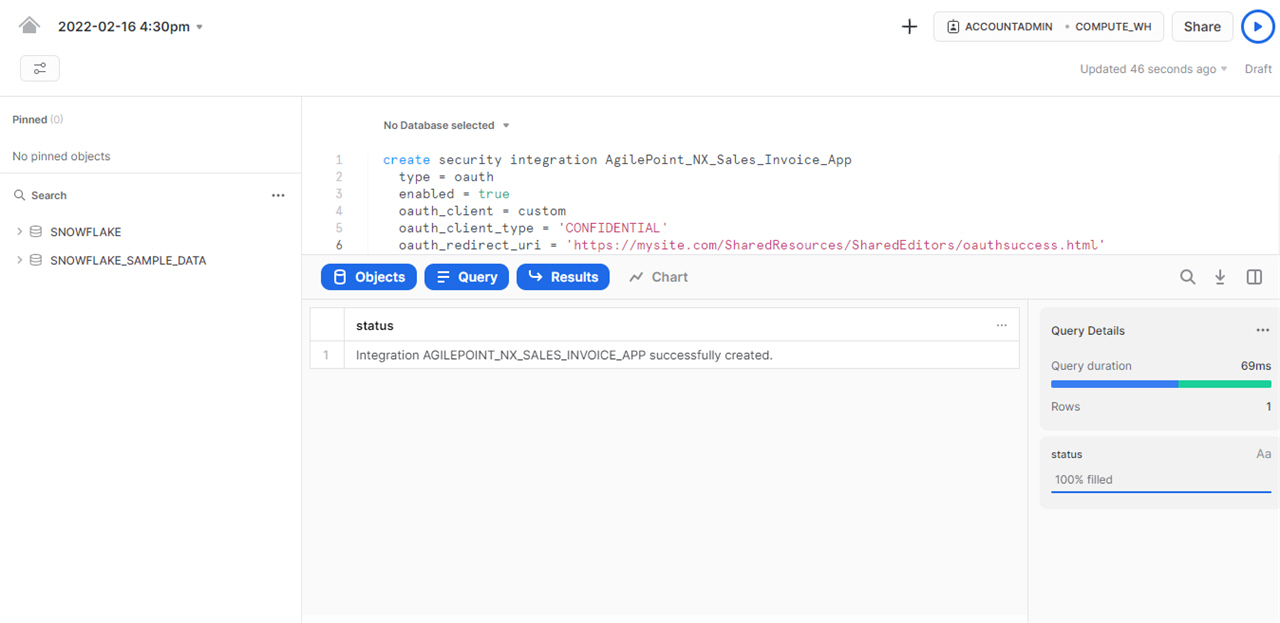
- Click Run.
The Worksheet screen shows the status of the query.
Step 5: Run a Query to Create Credentials
Next, run a query in Snowflake to create the app credentials.
How to Start
- Create an app in Snowflake.
For more information, refer to Run a Query to Create an App.
Procedure
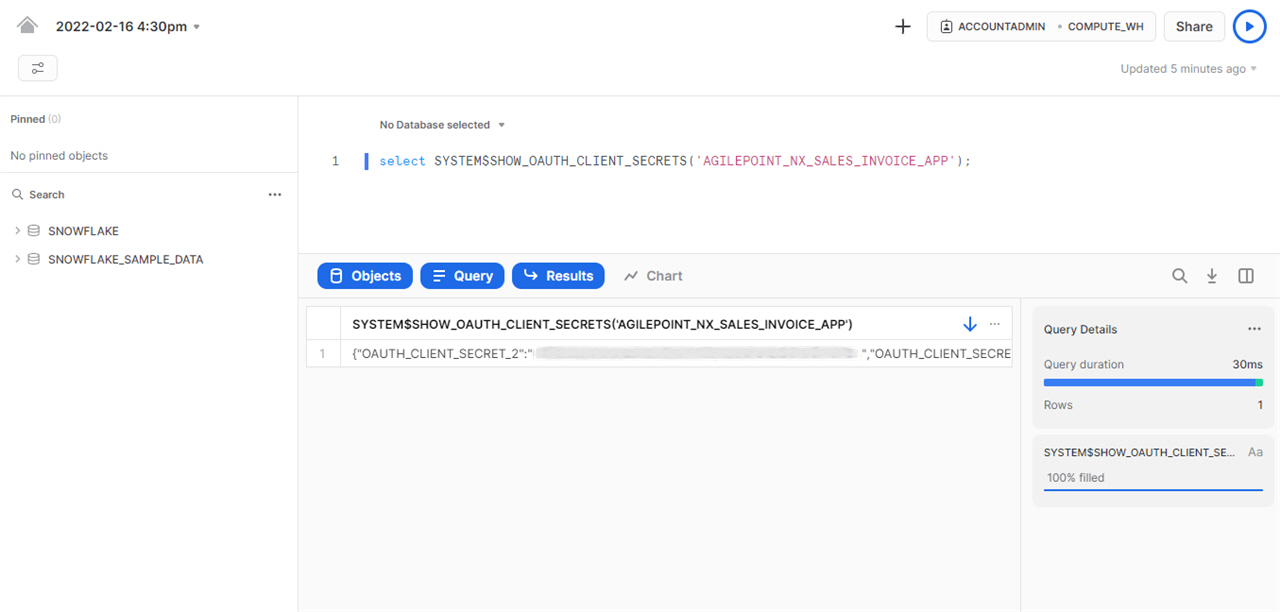
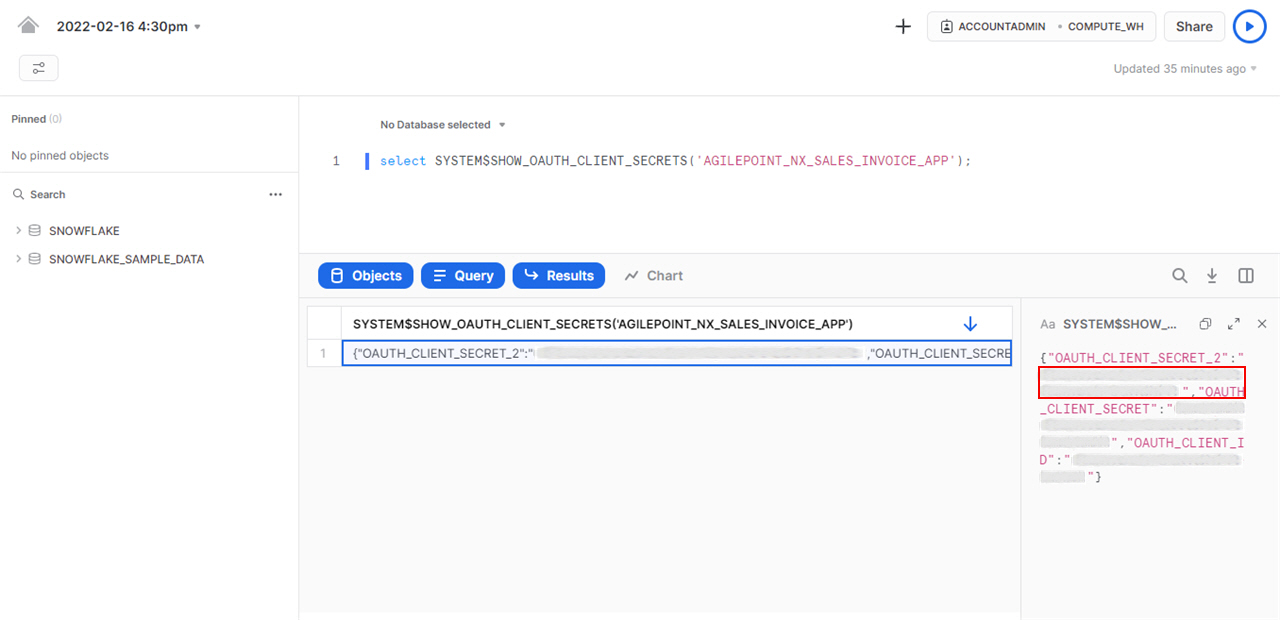
- On the Worksheet screen, in the Query field, paste this query.
Format:
select SYSTEM$SHOW_OAUTH_CLIENT_SECRETS('[APP NAME]');Example:
select SYSTEM$SHOW_OAUTH_CLIENT_SECRETS('AGILEPOINT_NX_SALES_INVOICE_APP');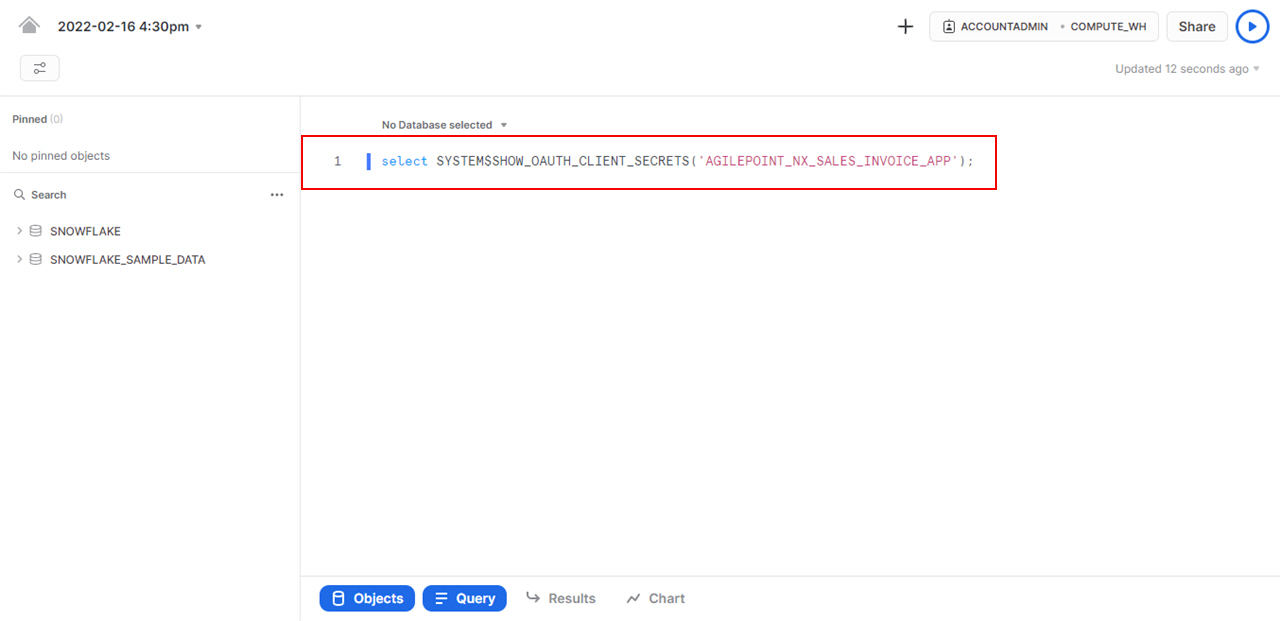
- Click Run.
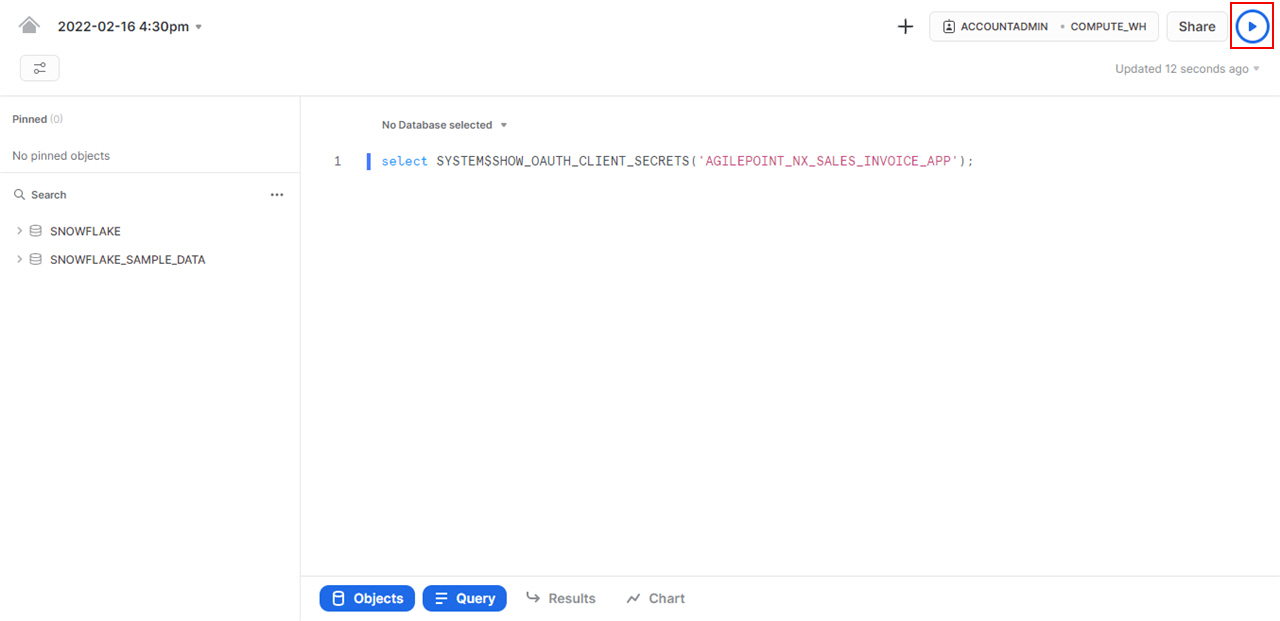
The Worksheet screen shows the OAuth Client Secrets.
Step 6: Copy the Snowflake App Credentials
Next, copy the Snowflake app credentials to your AgilePoint NX access token.
How to Start
- In one web browser tab,
in Snowflake, open the Worksheet where you created the App Credentials.
For more information, refer to Run a Query to Create Credentials.
- In a different web browser tab, in AgilePoint NX, open the Snowflake access token configuration screen.
Procedure
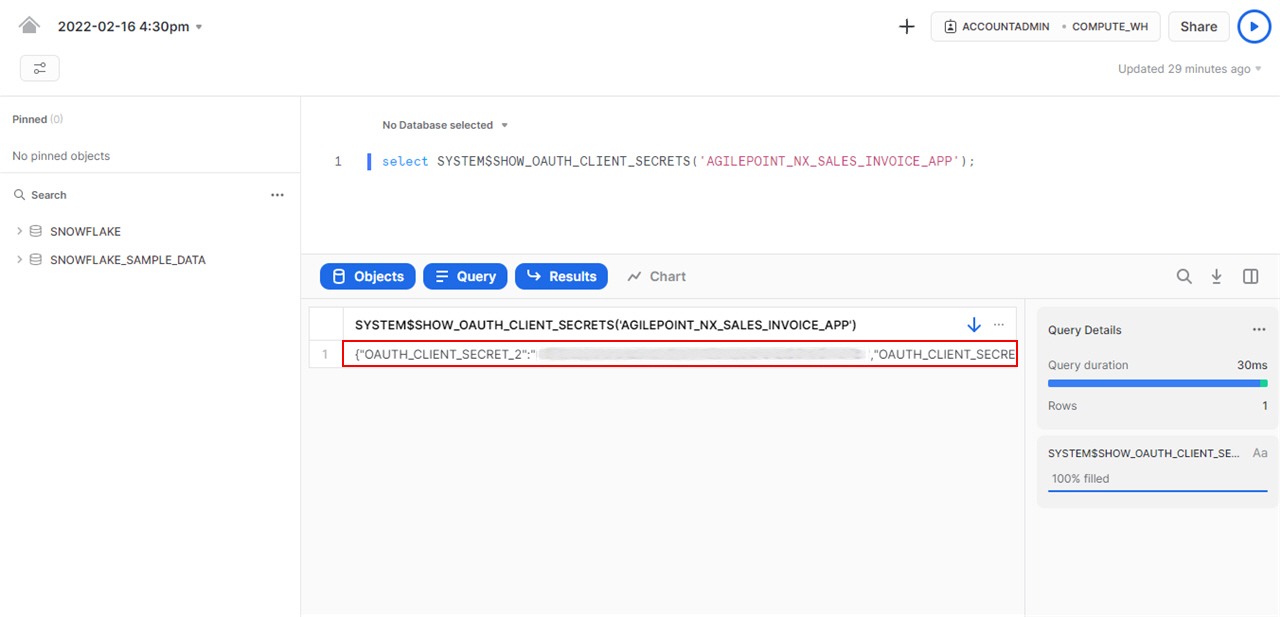
- In Snowflake, on the Worksheet screen, in the Results section, click the generated OAuth Client Secrets to open.
- In the right pane, copy the OAUTH_CLIENT_ID value.
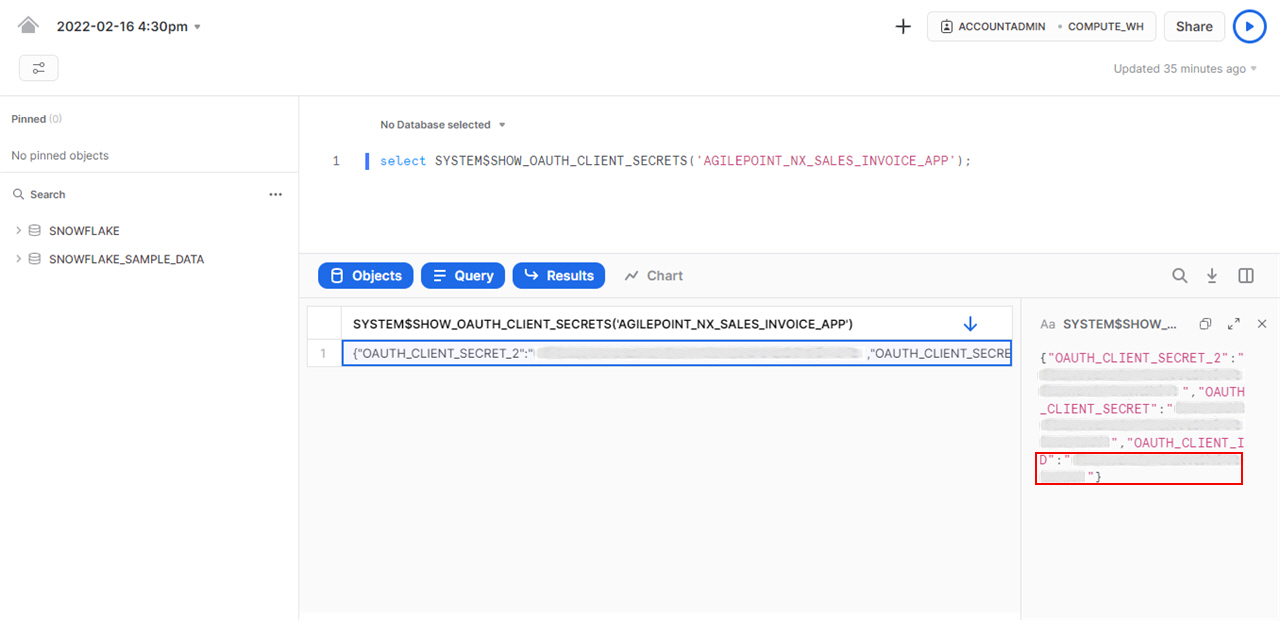
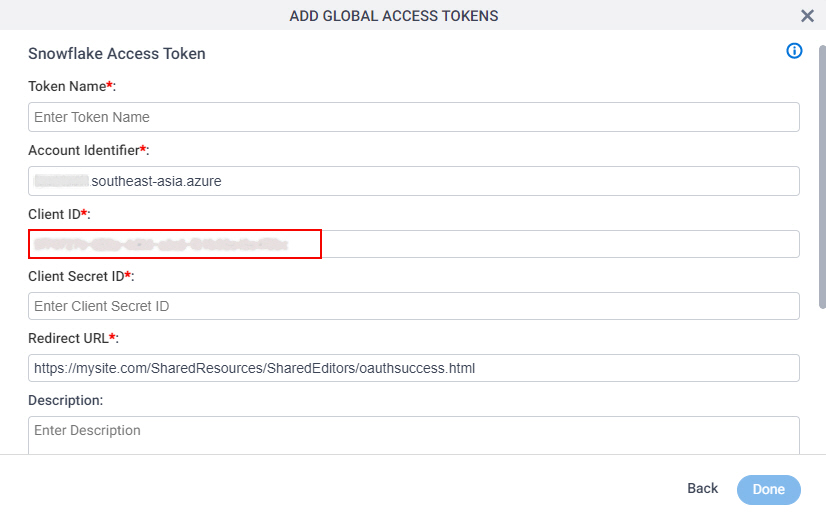
- In AgilePoint NX, on the Snowflake Access Token Configuration screen, in the Client ID field, paste the OAUTH_CLIENT_ID value from Snowflake.
- In Snowflake, on the Worksheet screen, in the right pane, copy any one of the OAUTH_CLIENT_SECRET values.
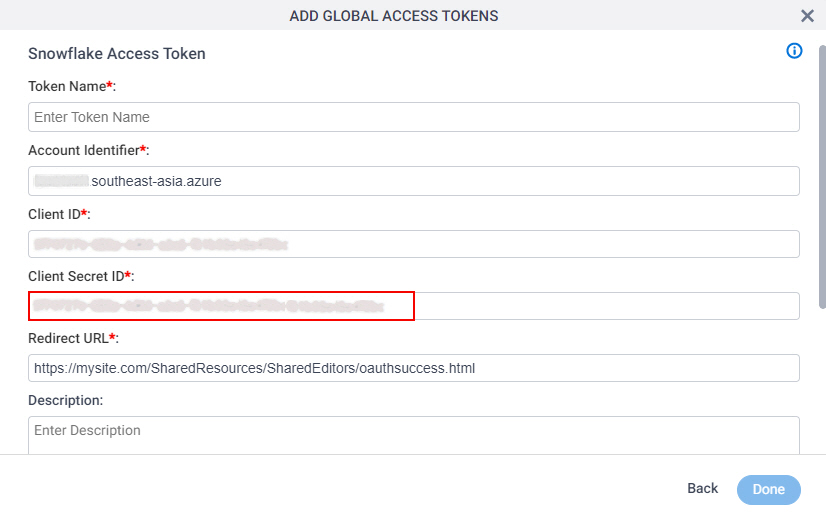
- In AgilePoint NX, on the Snowflake Access Token Configuration screen, in the Client Secret ID field, paste the OAUTH_CLIENT_SECRET value from Snowflake.
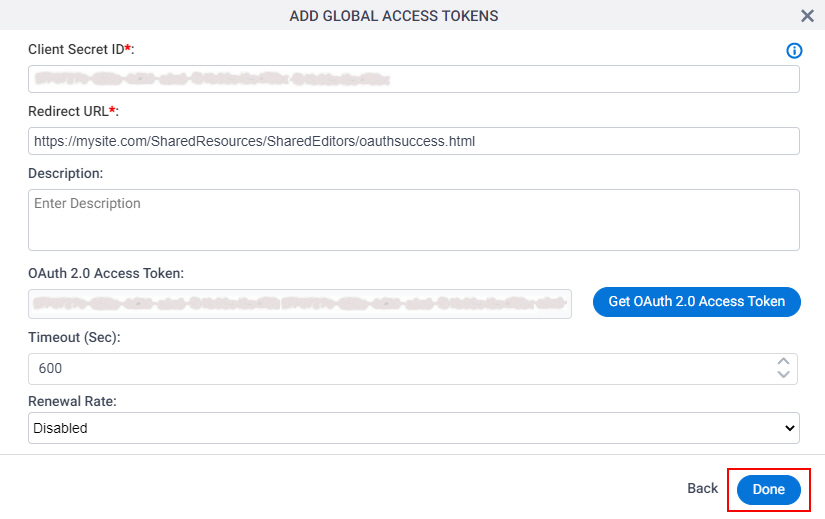
Step 7: Complete the AgilePoint NX Access Token
Next, complete the AgilePoint NX access token configuration for Snowflake.
How to Start
- In AgilePoint NX, open the Snowflake access token configuration screen.
Procedure
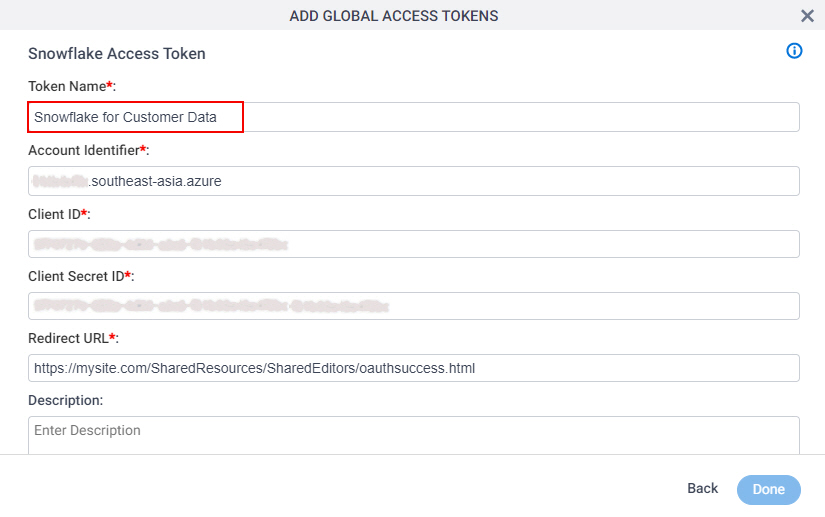
- In AgilePoint NX, on the Snowflake Access Token Configuration screen, in the Token Name field,
enter a name for the access token.
- Click Get OAuth 2.0 Access Token.
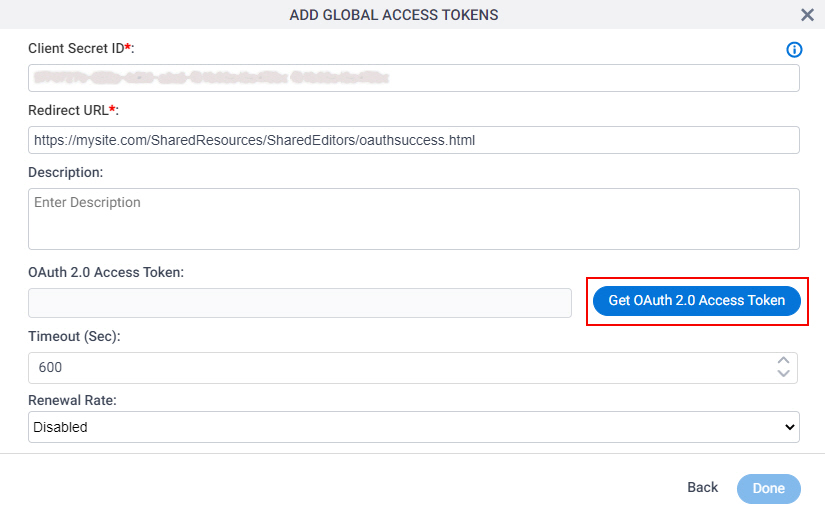
A new tab or window opens in your web browser.
- On the new tab, in the Sign in to Snowflake to continue to AGILEPOINT_NX_SALES_INVOICE_APP screen,
sign in to Snowflake with Snowflake account credentials.
- In the AGILEPOINT_NX_SALES_INVOICE_APP would like access to your Snowflake Account screen, click Allow.
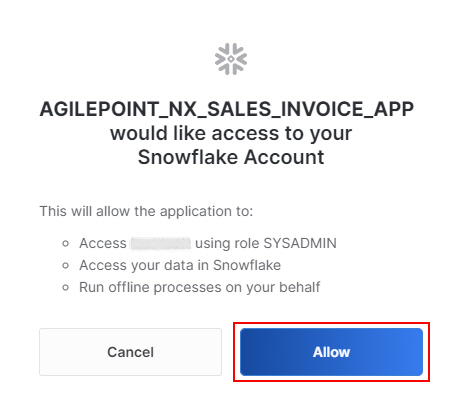
The new tab or window closes in your web browser, and the Snowflake access token screen shows the OAuth 2.0 access token in the OAuth 2.0 Access Token field.
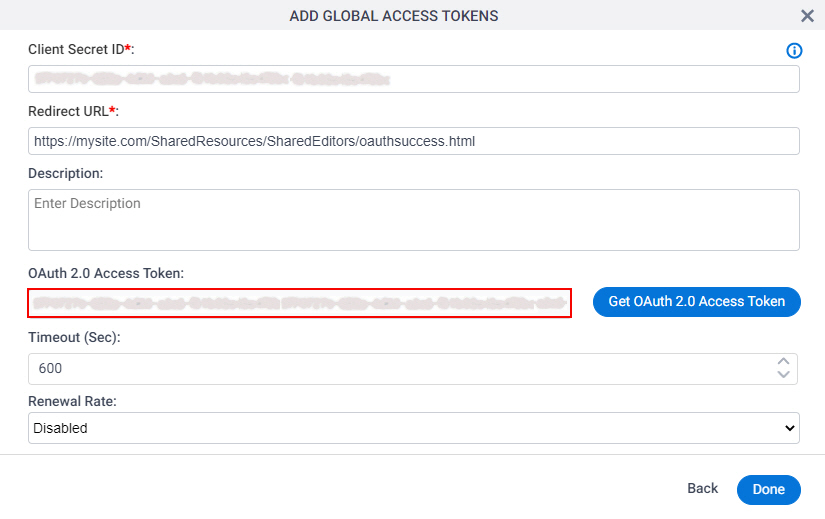
- Click Done.