
Create an AgilePoint Server instance
This topic shows how to create an AgilePoint Server instance.
Background and Setup
Prerequisites
- AgilePoint NX OnPremises or AgilePoint NX Private Cloud.
- An AgilePoint NX license that supports more than one AgilePoint Server instance.
Good to Know
- You must complete the procedures in this topic in the order shown.
Create Folders for a New AgilePoint Server Instance
To set up folders for a new AgilePoint Server instance, do the procedure in this topic.
Procedure
- On the AgilePoint Server machine, create these folders:
- (Folder for an additional AgilePoint Server instance) C:\Program Files\AgilePoint\[YourAgilePointServerInstanceName] - This folder contains all the files and folders related to AgilePoint Sever instance. You can customize the name.
- (New AgilePoint web application folder)
C:\Program Files\AgilePoint\[YourAgilePointInstanceWebsiteName] - This folder contains the web sites for the AgilePoint NX AgilePoint Server and Analytics Center. You can customize the name.
- YourPortalWebsiteName - This folder contains all the files and folders related to the Portal.
- YourAnalyticsCenterWebsiteName - You can create this folder if you have a license for Analytics Center. This folder contains all the files and folders related to the Analytics Center.
- YourReportCenterWebsiteName - You can create this folder if you have a license for
Report Center. This folder contains all the files and folders related to the Report Center.
Note: The Report Center component (sometimes referred to as AgileReports) can only be used by customers who purchased this component before April 1, 2020. This version is no longer available for purchase, including by current and previous purchasers of AgilePoint NX or the Report Center component. In AgilePoint NX v8.0 and higher, Report Center has been replaced with the Analytics Center component.
Set up Databases for a New AgilePoint Server Instance
AgilePoint requires one or more databases, depending upon the AgilePoint components you install. You must create these databases on your database server.
To set up databases for a new AgilePoint Server instance, do the procedure in this topic.
How to Start
- Make sure your SQL Server is up and running.
- Open the SQL Server Management Studio:
- On your AgilePoint Server machine, click Start, and type Run.
- Click Run.
- On the Run screen, in the Open field, enter SSMS.exe.
- Click OK.
Good to Know
- It is only necessary to create the database. The database tables are created automatically during installation.
Procedure
Repeat the following instructions to create the databases listed in the AgilePoint Databases section.
- In SQL Server Management Studio, Right-click on Databases and select New Database.
- On the New Database screen, enter a database name.
AgilePoint Databases
| Component | Database Name (Suggested but Optional) | Function |
|---|---|---|
|
YourWorkflowDBName |
Stores application data in AgilePoint NX. This is the main AgilePoint NX database. | |
|
Portal Master |
YourApPortalDbName |
Stores overall information for all AgilePoint NX Portal tenants. |
|
Portal Tenant |
YourApPortalTenantDBName |
Stores non-workflow data for an AgilePoint NX Portal tenant. |
|
Report Center |
YourReportCenterMetaDbName |
The database for Report Center data. |
Create a New Website in IIS for an AgilePoint Server Instance
To create a new web site in IIS for an AgilePoint Server instance, do the procedure in this topic.
How to Start
- On the AgilePoint Server machine, open IIS Manager.
Procedure
- In IIS Manager, In the Connections pane, right-click the Application Pools.
- Click Add Application Pool.
- On the Add Application Pool screen, in the Name field, enter the name of the application pool.
- On the Actions pane, click Advanced Settings.
- On the Generate Process Model Event Log Entry, in the Identity field, click the Ellipses (...) button.
- On the Application Pool Identity screen, in the Custom account, click Set.
- On the Set Credentials screen, in the User name field, enter the user name for the AgilePoint Service Account.
Format:
domain\username
Example:
MYDOMAIN\APServiceUser
- In the Password field, enter the password for the AgilePoint Service Account.
- In the Conform password field, reenter the password for the authentication account.
- In the IIS Manager, in the Connections pane, right-click the Sites.
- Click Add Website....
- On the Add Website screen, in the Site name field, enter the name of the web site.
- In the Application pool, click Select.
- Browse (New AgilePoint web application folder) C:\Program Files\AgilePoint\[YourAgilePointInstanceWebsiteName]\YourPortalWebsiteName.
- Click Connect As.
- On the Connect As screen, in the Specific user, click Set.
- On the Set Credentials screen, in the User name field, enter the user name for the AgilePoint Service Account.
Format:
domain\username
Example:
MYDOMAIN\APServiceUser
- In the Password field, enter the password for the AgilePoint Service Account.
- In the Conform password field, reenter the password for the authentication account.
- In the Port field, specify a unique port number.
The port number must be higher than 10000.
Create an AgilePoint Server Instance
To create a new AgilePoint Server instance, do the procedure in this topic.
How to Start
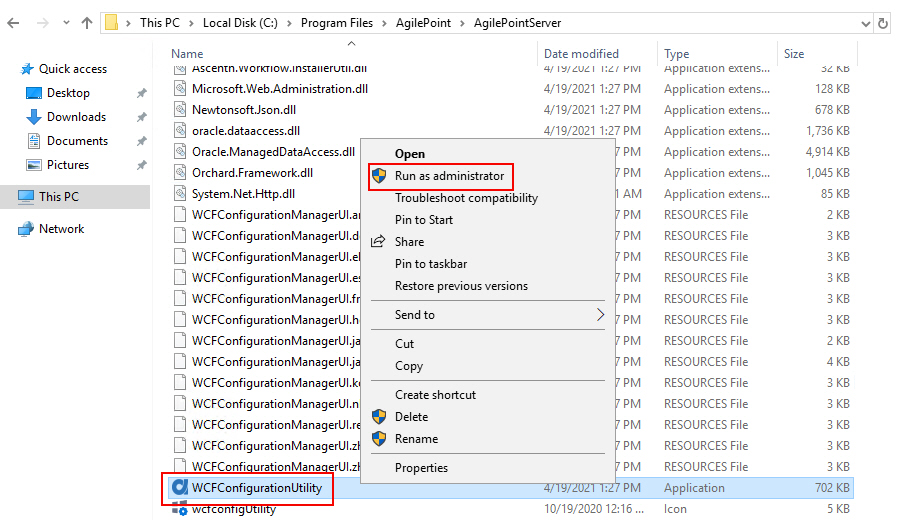
- On the AgilePoint Server machine,
in Windows Explorer, right-click the file
(AgilePoint Server installation folder)
C:\Program Files\AgilePoint\AgilePoint Server\WCFConfigurationUtility.exe,
and click Run as Administrator.
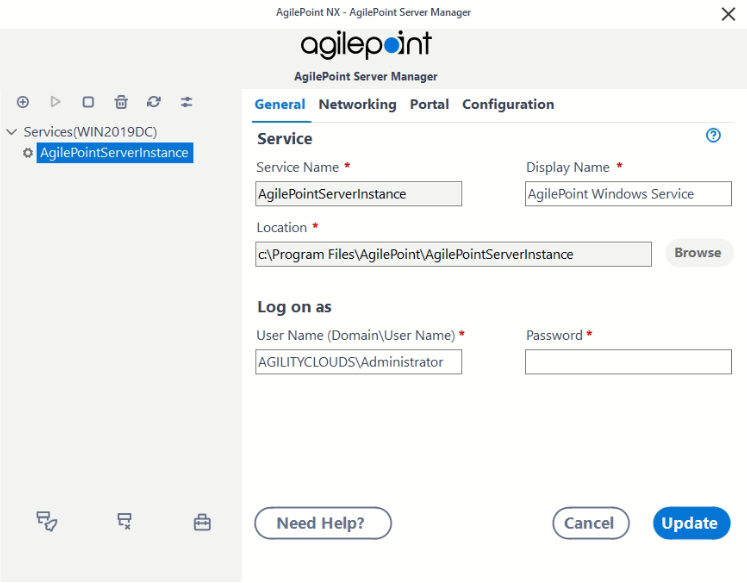
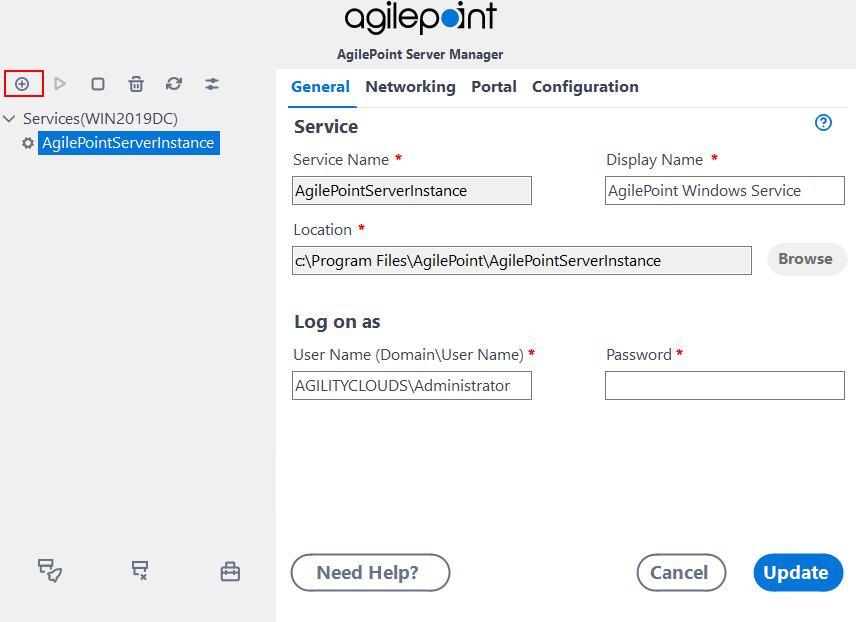
- On the AgilePoint Server Manager screen, click Add New Service Instance
 .
.
Procedure
- In the Service Name field, enter the name to use to identify the Windows service associated with the AgilePoint Server instance.
- In the Display Name field, enter the name to display to show in AgilePoint Server Manager.
- In the Location field, click Browse.
- Select the (Folder for an additional AgilePoint Server instance)
C:\Program Files\AgilePoint\[YourAgilePointServerInstanceName].
This folder contains all the files and folders related to AgilePoint Sever instance.
- In the User Name field, enter the user name for the AgilePoint Service Account.
- In the Password field, enter the password for the AgilePoint Service Account.
- Click the Networking tab.
- On the Networking tab, complete these fields.
Field Name Definition WSHttp Port
- Function:
- A free, unique port AgilePoint Server instance can use for WSHttp binding.
This field is required.
- Accepted Values:
- A port number on your machine for WSHttp binding.
The port number must be unique (not used for any other purpose) and higher than 10000.
- Default Value:
- 13487
TCP Port
- Function:
- A free, unique port AgilePoint Server instance can use for TCP binding.
This field is required.
- Accepted Values:
- A port number on your machine for TCP binding.
The port number must be unique (not used for any other purpose) and higher than 10000.
- Default Value:
- 13488
BasicHttp Port
- Function:
- A free, unique port AgilePoint Server instance can use for BasicHttp binding.
This field is required.
- Accepted Values:
- A port number on your machine for
BasicHttp binding.
The port number must be unique (not used for any other purpose) and higher than 10000.
- Default Value:
- 13489
Web HTTP Port
- Function:
- A free, unique port AgilePoint Server instance can use for Web HTTP binding.
This field is required.
- Accepted Values:
- A port number on your machine for Web HTTP binding.
The port number must be unique (not used for any other purpose) and higher than 10000.
- Default Value:
- 13490
- Click Check Availability of Ports to make sure the ports are free.
- In the Service Factory Binding field, click Browse.
When you click the Browse button, the Global Extended Module screen opens.
- On the Global Extended Module screen, in the Assembly field, click the Ellipses button.
- Select the .dll file that provides server side authentication for REST services.
In some circumstances you must create a custom authentication module.
For more information, refer to Server Side Authentication Using WCF Endpoints for AgilePoint Server.
The default .dll is (AgilePoint Server installation folder) C:\Program Files\AgilePoint\AgilePoint Server\bin\AgilePoint.REST.ServiceBindingFactory.dll
- Click OK.
- Click the Portal tab.
- On the Portal tab, in the Portal Site list, select the name of the web site you created for AgilePoint NX Portal.
For more information, refer to Create a New Website in IIS for an AgilePoint Server Instance.
- In the Application Pool list, select the name of the application pool you created.
For more information, refer to Create a New Website in IIS for an AgilePoint Server Instance.
- In the Portal Master Database field, select the name of your Portal database.
For more information, refer to Set up Databases for a New AgilePoint Server Instance.
- In the Portal Tenant Database field, select the name of your tenant database.
For more information, refer to Set up Databases for a New AgilePoint Server Instance.
- (Optional) If you have a license for Analytics Center, do this procedure.
- In the Analytics Website field, select the website you created for Analytics Center.
For more information, refer to Create a New Website in IIS for an AgilePoint Server Instance.
- In the Application Pool list, select the IIS application pool form the list for the Analytics Center web application to run.
- In the Analytics Database field, select the name of the database that you created for Analytics Center.
For more information, refer to Set up Databases for a New AgilePoint Server Instance.
- (Optional) Click the Configuration tab.
- (Optional) On the Configuration tab, complete these fields.
Field Name Definition Log File Max Size
- Function:
- Specifies the maximum file size for your log file in MB.
To manage storage space for log files, the AgilePoint Server creates a new log file when the current log file reaches the specified maximum file size.
- Accepted Values:
- An integer.
- Default Value:
- 50
Log File Location
- Function:
- Specifies the location for your AgilePoint Server log file.
- Accepted Values:
- An absolute path to your log file folder.
- Default Value:
- (AgilePoint Server instance installation folder) C:\Program Files\AgilePoint\AgilePointServerInstance
Cleanup Temp Files on Server Starts
- Function:
- Specifies whether to delete the temp files from the AgilePoint Server machine when AgilePoint Server starts.
- Accepted Values:
-
- On - Deletes the temporary files to reduce disk storage space, including cache files.
- Off - AgilePoint Server does not automatically delete temporary files.
- Default Value:
- Off
Enable JWT Authentication
- Function:
- Specifies whether to use JSON Web Token (JWT) for Active Directory authentication as an alternative to the basic authentication.
- Accepted Values:
-
- On - Uses JWT authentication for Active Directory.
- Off - Uses basic authentication for Active Directory.
- Default Value:
- Off
- In the Analytics Website field, select the website you created for Analytics Center.
- Click Update.