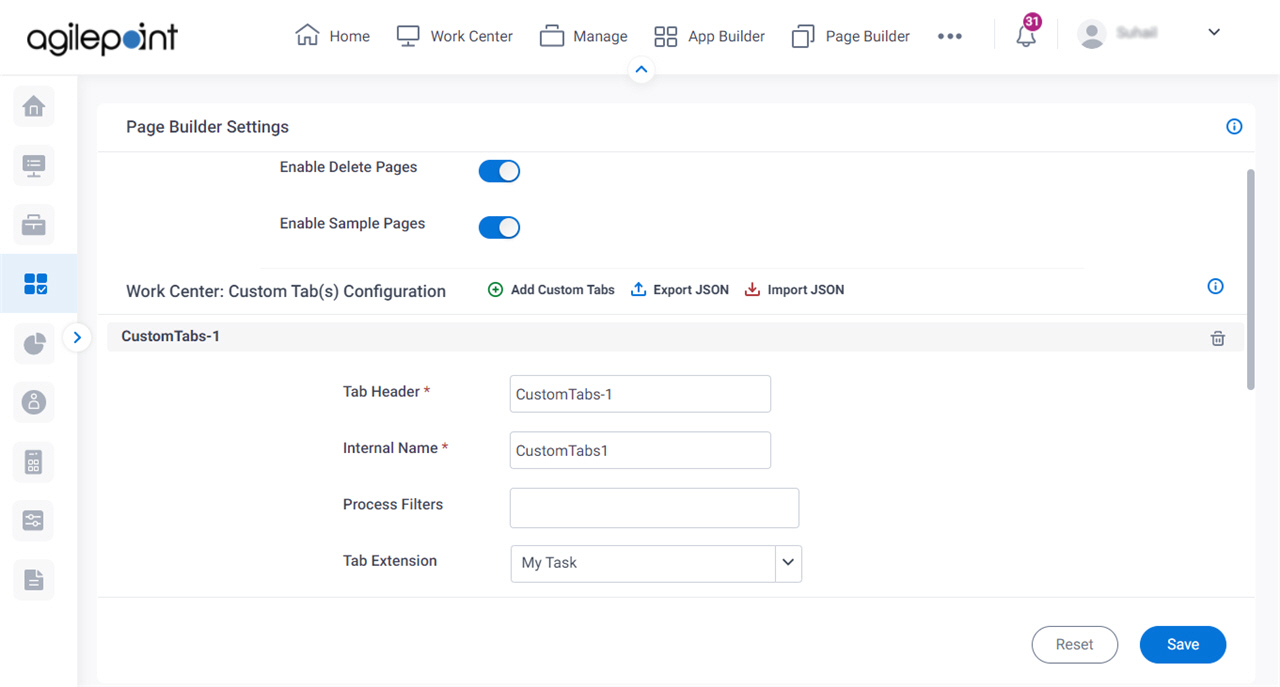
Enable Delete Pages |
- Function:
- Specifies whether users can delete pages in the
Page Builder.
- Accepted Values:
- Yes - Users can delete the pages in the Page Builder.
- No - Users can not delete the pages in the Page Builder.
- Default Value:
- No
|
Enable Sample Pages |
- Function:
- Specifies whether to show the sample pages in the
Page Builder.
- Accepted Values:
-
- Yes - Shows the sample pages in the Page Builder.
- No - Hides the sample pages in the Page Builder.
- Default Value:
- Yes
|
Add Custom Tabs  |
- Function:
- Adds a row to create a custom tab to show
in Work Center.
- Limitations:
-
This field
is available in these releases:
|
Export JSON  |
- Opens this Screen:
- Export Tabs screen
- Function of this Screen:
- Downloads one or more custom tabs and their associated data as a JSON file from Classic Work Center to your local machine.
- Limitations:
-
The option to select the custom tabs is available in these releases:
|
Import JSON  |
- Function:
- Uploads an exported JSON file that has the custom tab and its associated data from your local machine.
- Limitations:
-
This field
is available in these releases:
|
Tab Header |
- Function:
- Specifies the name that shows for the custom tab.
- To Open this Field:
-
- On the Work Center: Custom Tabs Configuration section, click Add Custom Tabs .
- Accepted Values:
- One line of text that can have spaces.
- Default Value:
- None
- Limitations:
-
This field
is available in these releases:
|
Internal Name |
- Function:
- Specifies a unique, technical name for the custom tab.
When you click this field, the field shows the value you entered in Display Name field with no spaces.
You can also specify a custom internal name. After you create the Internal Name, you can not change it. - To Open this Field:
-
- On the Work Center: Custom Tabs Configuration section, click Add Custom Tabs .
- Accepted Values:
- One line of text (a string) with no spaces.
- Default Value:
- None
- Limitations:
-
This field
is available in these releases:
|
Process Filters |
- Function:
- Specifies a list of process models to filter the tasks and process instances to show on your custom tab.
If this field does not have a configured value, the custom tab shows a list of tasks and processes from all process models.
- To Open this Field:
-
- On the Work Center: Custom Tabs Configuration section, click Add Custom Tabs .
- Accepted Values:
- One or more process model names from the list.
- Default Value:
- None
- Limitations:
-
This field
is available in these releases:
|
Tab Extension |
- Function:
- Specifies a standard tab from the list to use as a template for your custom tab.
- To Open this Field:
-
- On the Work Center: Custom Tabs Configuration section, click Add Custom Tabs .
- Accepted Values:
-
- My Tasks
- In Queue
- Processes I Started
- Processes I've Worked
- Default Value:
- My Tasks
- Limitations:
-
This field
is available in these releases:
|
Hide Default Columns |
- Function:
- Specifies a list of standard columns that to hide on your custom tab.
When you select the standard tab from the Tab Extension field, this field shows a list of standard column names associated with the specified standard tab.
- To Open this Field:
-
- On the Work Center: Custom Tabs Configuration section, click Add Custom Tabs .
- Accepted Values:
- One or more standard column names from the list.
- Default Value:
- None
- Limitations:
-
This field
is available in these releases:
|
Enable Dynamic Loading |
- Function:
- Specifies whether the filter and sort options are used in a custom column when you create in your custom tab.
For tasks that use dynamic settings, such as the
eForm Dynamic Task Pool activity,
sorting and filtering can cause long load times in Work Center. In most cases, it is recommended to disable dynamic loading
in custom columns because it is difficult to predict when this issue might occur due to a setting in an app. However, dynamic sorting and filtering is supported.
- To Open this Field:
-
- On the Work Center: Custom Tabs Configuration section, click Add Custom Tabs .
- Accepted Values:
-
The settings are the reverse of how the field label is stated.
- Default Value:
- Deselected
- Limitations:
-
This field
is available in these releases:
|
Is Default Tab |
- Function:
- Specifies whether the custom tab shows as a default view when you open the Dashboard.
- To Open this Field:
-
- On the Work Center: Custom Tabs Configuration section, click Add Custom Tabs .
- Accepted Values:
-
- Selected - Shows the custom tab as the default view when you open the Dashboard.
- Deselected - Shows the first tab in the tab display order as the default view when you open the Dashboard.
- Default Value:
- Deselected
- Limitations:
-
This field
is available in these releases:
|
Delete Tab  |
- Function:
- Deletes the custom tab.
- To Open this Field:
-
- On the Work Center: Custom Tabs Configuration section, click Add Custom Tabs .
- Limitations:
-
This field
is available in these releases:
|
Add New Record |
- Function:
- Adds a row to create a custom column to show on your custom tab.
- To Open this Field:
-
- On the Work Center: Custom Tabs Configuration section, click Add Custom Tabs .
- Limitations:
-
This field
is available in these releases:
|
Process Model |
- Function:
- Specifies a process model to filter the tasks and process instances to show in your custom column.
- To Open this Field:
-
- On the Work Center: Custom Tabs Configuration section, click Add Custom Tabs .
- Click Add New Record.
- Accepted Values:
- A process model name from the list.
- Default Value:
- None
- Limitations:
-
This field
is available in these releases:
|
Column Name |
- Function:
- Specifies the name that shows for the custom column in your custom tab.
- To Open this Field:
-
- On the Work Center: Custom Tabs Configuration section, click Add Custom Tabs .
- Click Add New Record.
- Accepted Values:
- One line of text that can have spaces.
- Default Value:
- None
- Limitations:
-
This field
is available in these releases:
|
Custom Data Path |
- Function:
- Specifies the Xpath of a process data variable.
The value of this variable shows in the custom column.
- To Open this Field:
-
- On the Work Center: Custom Tabs Configuration section, click Add Custom Tabs .
- Click Add New Record.
- Accepted Values:
- An Xpath in your process schema.
The Xpath can not include the characters, ${...}
- Default Value:
- None
- Example:
- /pd:AP/pd:formFields/pd:EmployeeName
- Limitations:
-
Only these user types can change the Xpath field:
This field
is available in these releases:
|
Custom Template |
- Function:
- An HTML code snippet that specifies how to show the value for the Custom Data Path field in your custom column.
- To Open this Field:
-
- On the Work Center: Custom Tabs Configuration section, click Add Custom Tabs .
- Click Add New Record.
- Accepted Values:
- One line of text (a string) that represents an HTML code snippet in this format:
<p>#=this.value#</p>
- You can use any HTML tag in the template value, but it must include the string, #=this.value#.
The string #=this.value# represents the value from the Custom Data Path field. If this string
is not present, no value will display in the column.
- You can use a custom CSS snippet or JavaScript snippet
on the HTML tag to customize the way the value in the column displays.
- You can not use a variable
from an AgilePoint NX app in the HTML or JavaScript code.
- Default Value:
- None
- Example:
- These code samples show how you can write the HTML code to design the column value:
- <a href="https://mysite.com/">#=this.value#</a> - Opens the configured URL when you click the column value.
- <h2 style="color:rgb(51,51,255);background:rgb(255,255,204);font-weight:bold;font-size:100%;">#=this.value#</h2> -
Uses a custom CSS snippet to change the look and feel of the column value.
- <a href="https://mysite.com/" onclick="alert('Do you want to continue in View Only mode?')">#=this.value#</a> -
Uses a custom JavaScript snippet to show a message when the runtime app user clicks the column value.
- Limitations:
-
This field
is available in these releases:
|
Width (px) |
- Function:
- Specifies the width of the column to show on the custom tab.
- To Open this Field:
-
- On the Work Center: Custom Tabs Configuration section, click Add Custom Tabs .
- Click Add New Record.
- Accepted Values:
- A positive integer.
- Default Value:
- None
- Limitations:
-
This field
is available in these releases:
|
Index |
- Function:
- Specifies the order of the column on the custom tab.
- To Open this Field:
-
- On the Work Center: Custom Tabs Configuration section, click Add Custom Tabs .
- Click Add New Record.
- Accepted Values:
- A positive integer.
- Default Value:
- None
- Limitations:
-
This field
is available in these releases:
|
Visibility |
- Function:
- Specifies whether to show the column on your custom tab.
- To Open this Field:
-
- On the Work Center: Custom Tabs Configuration section, click Add Custom Tabs .
- Click Add New Record.
- Accepted Values:
-
- Yes - Shows the column on your custom tab.
- No - Does not show the column on your custom tab.
- Default Value:
- Deselected
- Limitations:
-
This field
is available in these releases:
|
Add  |
- Function:
- Adds a column to your custom tab.
- To Open this Field:
-
- On the Work Center: Custom Tabs Configuration section, click Add Custom Tabs .
- Click Add New Record.
- Limitations:
-
This field
is available in these releases:
|
Delete |
- Function:
- Deletes the specified column from your custom tab.
- To Open this Field:
-
- On the Work Center: Custom Tabs Configuration section, click Add Custom Tabs .
- Click Add New Record.
- Limitations:
-
This field
is available in these releases:
|