|
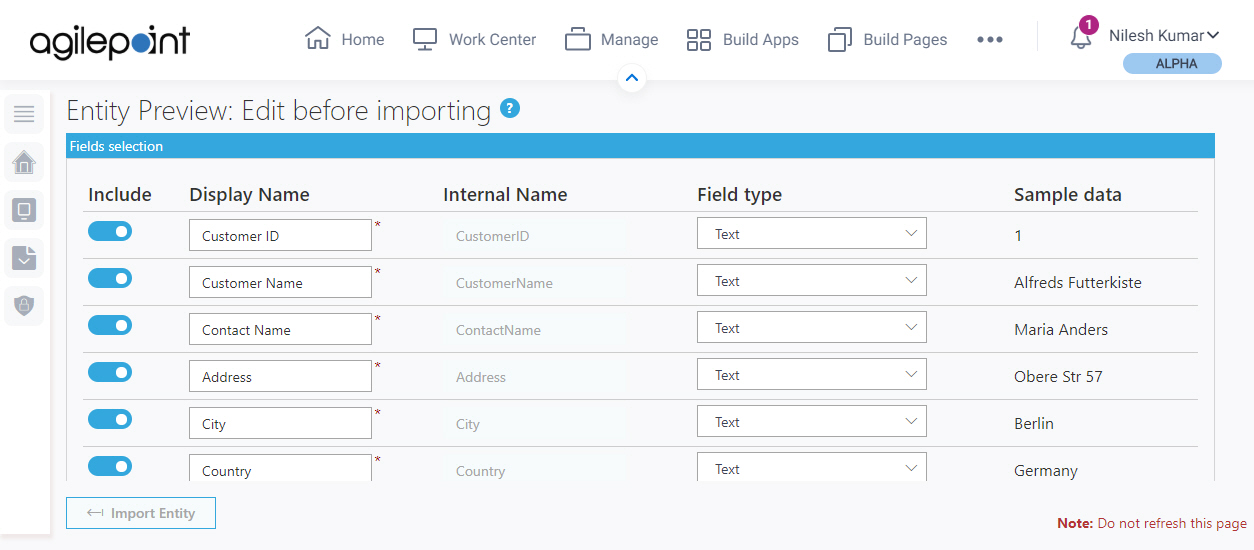
Include
|
- Function:
- Specifies whether to add the
entity fields to the
custom entity.
- Accepted Values:
-
- On - The entity fields are added to the custom entity.
- Off - The entity fields are not added to the custom entity.
- Default Value:
- On
|
|
Display Name
|
- Function:
- Specifies the name that shows for the
custom entity in AgilePoint NX.
- Accepted Values:
- One line of text that can have spaces.
- Default Value:
- The column names specified in the imported Excel file.
|
Internal Name |
- Function:
- Shows a unique name for the
custom entity.
- Accepted Values:
- Read only.
|
|
Field Type
|
- Function:
- Specifies the type of data that the
entity field contains.
- Accepted Values:
-
- Sequence Number - Creates a unique, sequential number for each new
record of the
entity field.
- Boolean - A value that supports True and False. In a checkbox, usually selected is
True, deselected is False.
- Date - A date. A runtime app user can enter a date or select a date from a calendar.
- DateTime - A date and time of day. A runtime app user can enter a date or pick a date from a calendar, and enter a time of day.
The time of day uses AM or PM notation.
- Decimal - A numeric value with a specified number of decimal places.
- Email - One line of text (a string) in email address format.
- Guid - A GUID.
- Numeric - A numeric value, up to 18 characters
- Percentage - A whole number that represents a percentage
- People Picker - Shows a list of users,
groups, or
roles
- Phone - A phone number with up to 20 numbers or special characters.
- Picklist - Uses a picklist
to populate a list of values. A runtime app user
can select a value from the list
- Range - A value that must be no lower than a minimum specified value,
and no higher than a maximum specified value
- Rich Text - Rich text in HTML format.
You can set a maximum length, up to 4000 characters.
- Text - Any combination of letters, numbers, or special characters in a single line of text.
You can set a maximum length, up to 4000 characters..
- Text Area - Any combination of letters, numbers, or special characters, with line breaks, up to 4000 characters.
- URL - A web site address of up to 4000 characters.
When a runtime app user clicks on the field, the URL opens in a separate browser window.
- Yes/No - A variation on a Boolean field type that allows the values Yes or No. You can use Yes for selected values
and No for deselected values.
- Default Value:
- Shows the data type for each field specifed in the imported Excel file.
|
Sample Data |
- Function:
- Shows a preview of the records
from 1 row of the imported Excel file.
- Accepted Values:
- Read only.
|
|
Include data records while importing entity
|
- Function:
- Specifies whether to import all records
from the imported Excel file to the
custom entity.
- Accepted Values:
-
- On - The records are imported from the Excel file.
- Off - The records are not imported from the Excel file.
- Default Value:
- On
|
Record Internal Field Type |
- Function:
- Specifies the type of data that is accepted in the Record Display Name field.
- Accepted Values:
-
- Text - The Select Record Field field accepts a column name from the list.
The list shows all column names from the imported Excel file.
- Auto-Increment - The Record Display Name field accepts one
line of text that can have spaces.
Each time a record is created for the entity,
Data Entities creates a value for the Record Display Name field with an automatically incremented
integer.
When a new record is created, these rules apply to
the Record Display Name field:
- The Record Display Name field value for the first record that is created for the entity is 1. Each
new
record is created with an auto-incremented number — 2, 3, 4, and so on.
- You can not give a custom value for the Record Display Name field.
- In eForms that use this entity as a data source, the Record Display Name field is not required.
- Default Value:
- Text
- Example:
- For more information, including examples of how this field is used in
Data Entities and apps, refer to
Record Display Names, Record IDs, and Primary Fields in Data Entities.
|
Record Display Name |
- Function:
- Specifies the display name for the field that
uniquely identifies
a
record in your
entity.
This field is similar
to a primary key in a database.
A
value for this field is
required for every record. The type of value this field accepts,
and how it is handled in your app, depends on the
option you select in the Record Internal Field Type list.
When you create a custom entity, the value for the Record Display Name field is
the name that appears in the AgilePoint NX UI to identify the unique, identifying field
at
design time
— for example, in
Data Entities
or the
App Builder.
It is a label that
describes the type of data that a user or
app
enters when a record is created
at
runtime,
but this label is not an instance of that data.
For example, if you want to use an e-mail address as the Record Display Name, the
value for this field should be Email Address, not a literal e-mail
address.
- To Open this Field:
-
- On the Entity Preview screen, in the Record Internal Field Type,
select Auto Increment.
- Accepted Values:
- One line of text that can have spaces.
- Default Value:
- None
- Example:
- Email Address
For more information, including examples of how this field is used in
Data Entities and apps, refer to
Record Display Names, Record IDs, and Primary Fields in Data Entities.
|
Record Internal Name |
- Function:
- Specifies a unique, technical name for the Record Display Name field.
This is simply a technical identifier for the Record Display Name field. It is not a separate
field from Record Display Name. It is a technical label for the same
field.
AgilePoint recommends you use a value that is similar to the Record Display Name
field, only without spaces, so you can easily identify this field.
- To Open this Field:
-
- On the Entity Preview screen, in the Record Internal Field Type,
select Auto Increment.
- Accepted Values:
- One line of text (a string) with no spaces.
- Default Value:
- None
- Example:
- EmailAddress
For more information, including examples of how this field is used in
Data Entities and apps, refer to
Record Display Names, Record IDs, and Primary Fields in Data Entities.
|
|
Select Record Field
|
- Function:
- Specifies a unique column name from the list.
This field shows all column names from the imported Excel file.
- To Open this Field:
-
- On the Entity Preview screen, in the Record Internal Field Type,
select Text.
- Accepted Values:
- A column name from the list.
- Default Value:
- None
|
Record Description |
- Function:
- Specifies an optional text description for the
record.
- To Open this Field:
-
- On the Entity Preview screen, in the Record Internal Field Type,
select
do one of these:
- Select Text.
- Select Auto Increment.
- Accepted Values:
- More than one line of text.
- Default Value:
- None
|
Display Name |
- Function:
- Specifies the name that shows for the
custom entity in AgilePoint NX.
- Accepted Values:
- One line of text that can have spaces.
- Default Value:
- The name of the first sheet specified in the imported Excel file.
|
Plural Name |
- Function:
- Specifies the name that shows for the
custom entity
when there is more than one. In other words, this is the plural version of the entity name.
- Accepted Values:
- One line of text that can have spaces.
- Default Value:
- None
|
Internal Name |
- Function:
- Specifies a unique, technical name for the.
custom entity.
When you click this field, the field shows the value you entered in Display Name field with no spaces.
This internal name becomes a table name in the database. After you create the Internal Name, you can not change it.
- Accepted Values:
- One line of text (a string) with no spaces
- Default Value:
- The name specified in the Display Name filed.
|
Description |
- Function:
- Specifies an optional text description for your custom entity.
- Accepted Values:
- More than one line of text.
- Default Value:
- None
|
Category |
- Function:
- Specifies a category for your
custom entity.
- Accepted Values:
- A category from the list.
- Default Value:
- None
|
Publish Status |
- Function:
- Specifies whether an entity is ready to use.
- To Open this Field:
-
- On the Entity Preview screen, turn on Show advanced configuration.
- Accepted Values:
-
- On - An entity is ready to use.
- Off - An entity is in draft.
- Default Value:
- On
|
Record Limit |
- Function:
- Specifies the maximum number of
records to get from an
entity.
- To Open this Field:
-
- On the Entity Preview screen, turn on Show advanced configuration.
- Accepted Values:
- A positive integer up to 1000000.
- Default Value:
- 1000000
|
Active |
- Function:
- Specifies whether an entity
can be used by an app.
- To Open this Field:
-
- On the Entity Preview screen, turn on Show advanced configuration.
- Accepted Values:
-
- On - The entity can be used in apps.
- Off - The entity can be viewed or changed in
Data Entities, but it does not
show in the App Builder.
- Default Value:
- On
|
Use The Default Event Logging For AgilePoint NX Apps / Create Detailed Audit Logs For This Entity |
- Function:
- Specifies the audit level to track and store events that occur for the
custom entity.
- To Open this Field:
-
- On the Entity Preview screen, turn on Show advanced configuration.
- Accepted Values:
-
- On - Tracks and stores all events that occur on the entity.
- Off - Does not store events for the entity except normal error logging for your app.
- Default Value:
- Off
|
Entity Permission is Disabled / Entity Permission is Enabled |
- Function:
- Specifies who can change the
custom entity.
- To Open this Field:
-
- On the Entity Preview screen, turn on Show advanced configuration.
- Accepted Values:
-
- Default Value:
- On
|
Allow Entity Model Export |
- Function:
- Specifies which users can export an entity model.
- To Open this Field:
-
- On the Entity Preview screen, turn on Show advanced configuration.
- Accepted Values:
-
- On - All users who have access can export the entity model.
- Off - Only Administrator
and Entity Owners can export
the entity model.
- Default Value:
- On
|
Allow Entity Model Import |
- Function:
- Lets which users can import entity model to AgilePoint NX
Data Entities.
- To Open this Field:
-
- On the Entity Preview screen, turn on Show advanced configuration.
- Accepted Values:
-
- Default Value:
- On
|
Allow Record Export |
- Function:
- Specifies which users can export the
records
from an entity.
- To Open this Field:
-
- On the Entity Preview screen, turn on Show advanced configuration.
- Accepted Values:
-
- Default Value:
- On
|
Allow Record Import |
- Function:
- Specifies which users can import
records to
an entity.
- To Open this Field:
-
- On the Entity Preview screen, turn on Show advanced configuration.
- Accepted Values:
-
- Default Value:
- On
|
Enable Analytics |
- Function:
- Specifies whether an entity
can be viewed or used for reports in
Analytics Center.
- To Open this Field:
-
- On the Entity Preview screen, turn on Show advanced configuration.
- Accepted Values:
-
- On - The entity can be viewed or used for reports in Analytics Center.
- Off - The entity cannot be viewed or used for reports in Analytics Center.
- Default Value:
- On
- Limitations:
-
This field
is available in these releases:
|