Service Level Agreement activity

An activity that lets you track the time to complete a number of activities in a process instance. Within a process, you can have more than one timer with the same Service Level Agreement activity.


Service Level Agreement activity

Configure the Service Level Agreement activity

To configure the Service Level Agreement activity, do the procedure in this topic.

Good to Know

How to Start

  1. Open Process Builder.

    For information about how to open this screen, refer to Process Builder.
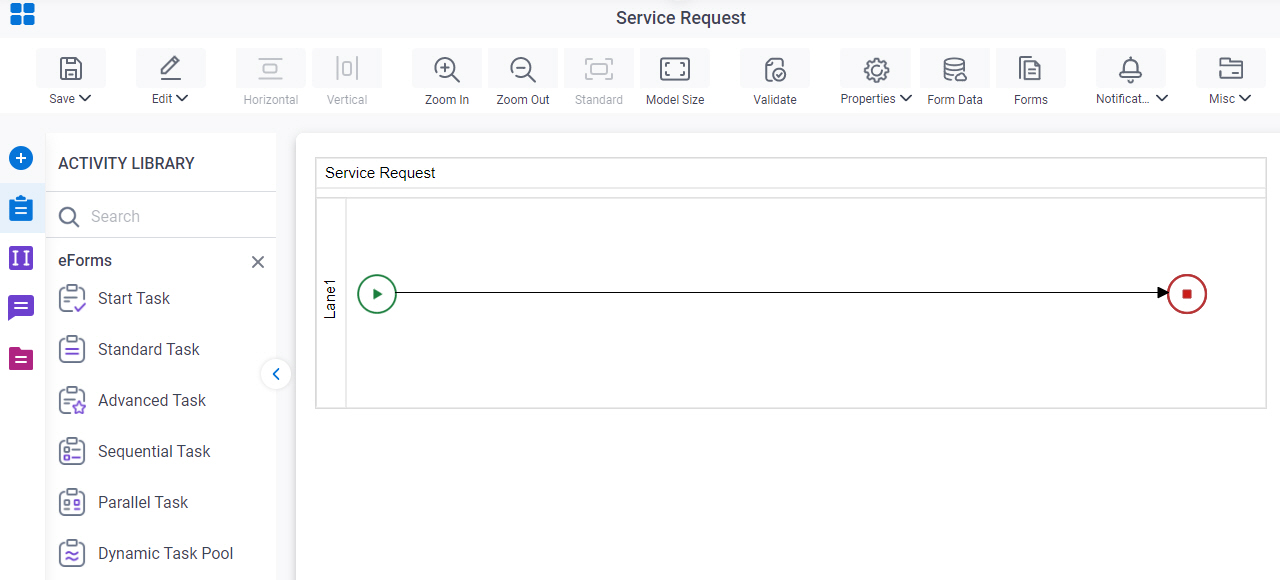

    Open Process Builder
  2. In Process Builder, in the Activity Library, open the Extender tab.
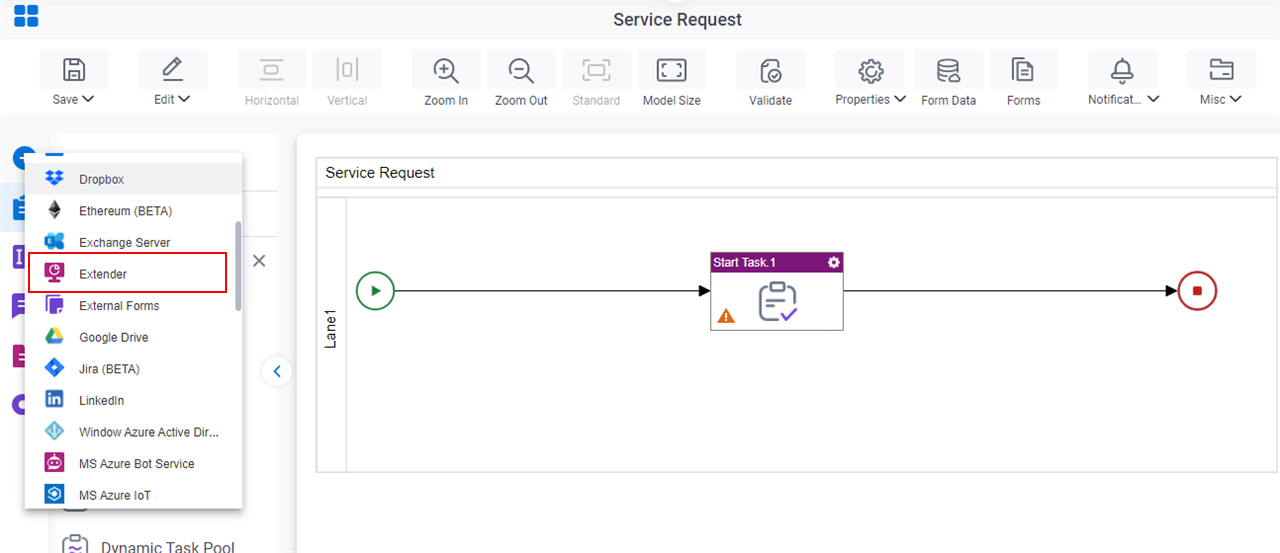
    Open Extender tab
  3. On the Extender tab, drag the Service Level Agreement activity onto your process.
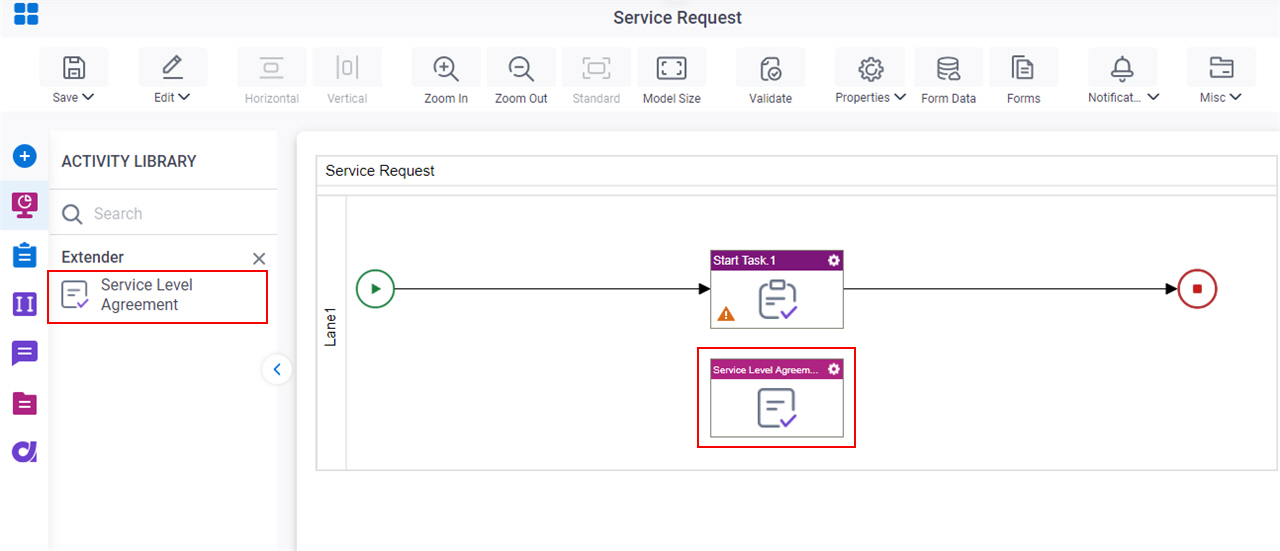
    Drag Service Level Agreement activity

General Configuration

Specifies the basic settings for the Service Level Agreement activity.
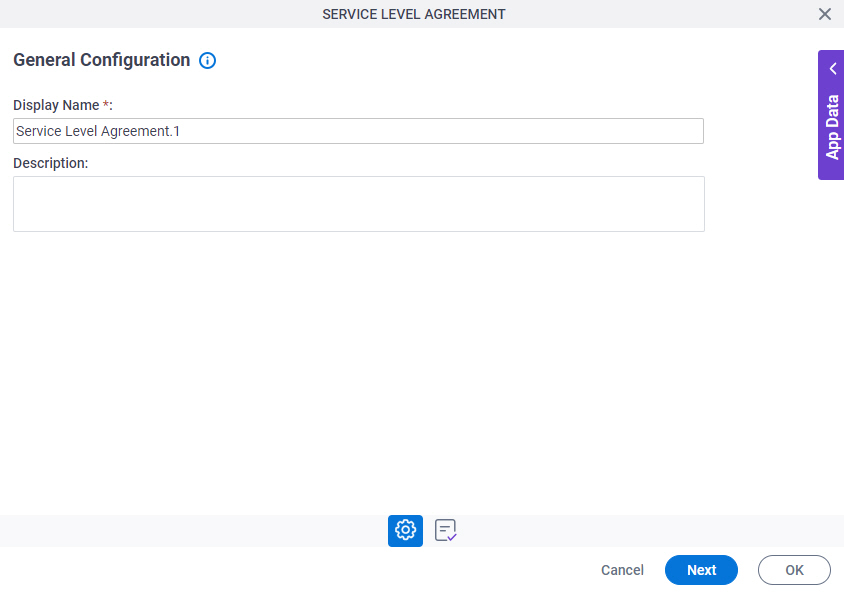
Figure: General Configuration screen

General Configuration screen

Fields

Field NameDefinition

Display Name

Function:
Specifies the activity name that shows in your process.
Accepted Values:
One line of text that can have spaces.
Default Value:
None
Accepts Process Data Variables:
No
Example:
This is a common configuration field that is used in many examples. Refer to:
  • Examples - Step-by-step use case examples, information about what types of examples are provided in the AgilePoint NX Product Documentation, and other resources where you can find more examples.

Description

Function:
Specifies an optional text description for your activity.
Accepted Values:
More than one line of text.
Default Value:
None
Accepts Process Data Variables:
No

SLA Configuration > Schedule tab

Configures the SLA timer, including the set of activities with which you want to use a timer.
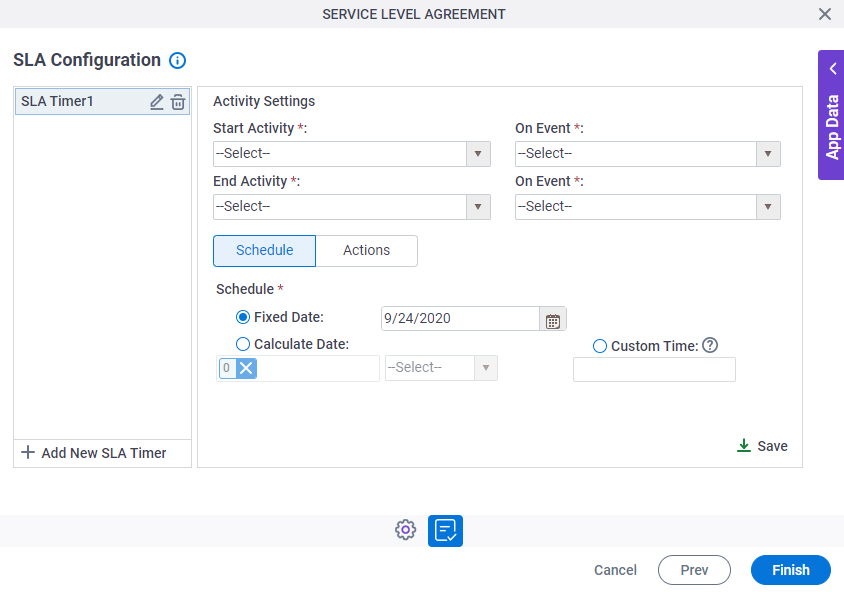
Figure: SLA Configuration > Schedule tab

SLA Configuration                          Schedule tab

Fields

Field NameDefinition

Add New SLA Timer Add New SLA Timer icon

Function:
Creates a timer with a name you specify.

Edit Edit icon

Function:
Changes the selected item.

Delete Delete icon

Function:
Deletes the selected item.
Example:
Refer to:

Start Activity

Function:
Specifies the activity upon which you want to start the timer.
Accepted Values:
An activity in your process.
Default Value:
None

End Activity

Function:
Specifies the activity upon which to end the timer.
Accepted Values:
An activity in your process.
Default Value:
None

On Event

Function:
Specifies the event of the activity you want to start or end the timer.
Accepted Values:
  • Assign Work Item - The timer starts or ends when the task is Assigned to a participant.
  • Complete Work Item - The timer starts or ends when the task is Completed.
  • Cancel Work Item - The timer starts or ends when the work item is Cancelled.
  • Enter Activity Instance - The timer starts or ends when the process starts a specified activity.
  • Leave Activity Instance - The timer starts or ends when the process ends a specified activity.
  • Reassign Work Item - The timer starts or ends when the task is reassigned.
  • Work Item Assigned - The timer starts or ends when the participant gets a task.
  • Work Item Overdue - The timer starts or ends when the task is Overdue.
  • Resolving Pool Members - The timer starts or ends when the participants in the pool are resolved.
Default Value:
None
Example:
For a human task activity, you can choose the AssignWorkItem event.

Fixed Date

Function:
Specifies a date to expire the timer.
Accepted Values:
  • Selected - Specifies to use a date to expire the timer.
  • Deselected - Specifies not to use a date to expire the timer.
Default Value:
Selected

Calculate Date

Function:
Specifies whether to calculate a date to expire the timer based on the information you enter.
Accepted Values:
  • Deselected - Specifies not to calculate a date to expire the timer.
  • Selected - Specifies to calculate a date to expire the timer. This calculation includes the following elements:
    • An integer.

      This represents the frequency of the time unit.

    • A time unit.

      These types of time units are used to calculate the time:

      • Minute
      • Hour
      • Day
      • Week
Default Value:
Deselected
Example:
If the length is set to 3, and the time unit is set to Day, this indicates 3 days. For example, this sets a duration of 3 days after which the timer expires.

Custom Time

Function:
Specifies a variable that identifies a time span for the timer expiration.
Accepted Values:
A process data variable where the value is in the format xD-yW.
  • xD - Specifies x number of days.
  • yW - Specifies y number of weeks.
Default Value:
None
Accepts Process Data Variables:
Yes
Example:
2D-1W

This value specifies 2 days plus 1 week.

Business Time

Function:
Specifies to use your work calendar for date calculations.
Accepted Values:
  • Deselected - Uses your work calendar for calculations.
  • Selected - Does not use your work calendar for calculations.
Default Value:
Deselected
Example:
The Business Time field is set as selected, and business hours of work calendar are configured as 9 AM to 5 PM. If the task with completion time 8 hours is entered at 1 PM on Monday, then the task must be completed by 12 PM on Tuesday.

Save

Opens this Screen:
Saves your changes.

SLA Configuration > Actions tab

Specifies the information to send an email notification, and start a subprocess when the timer expires.
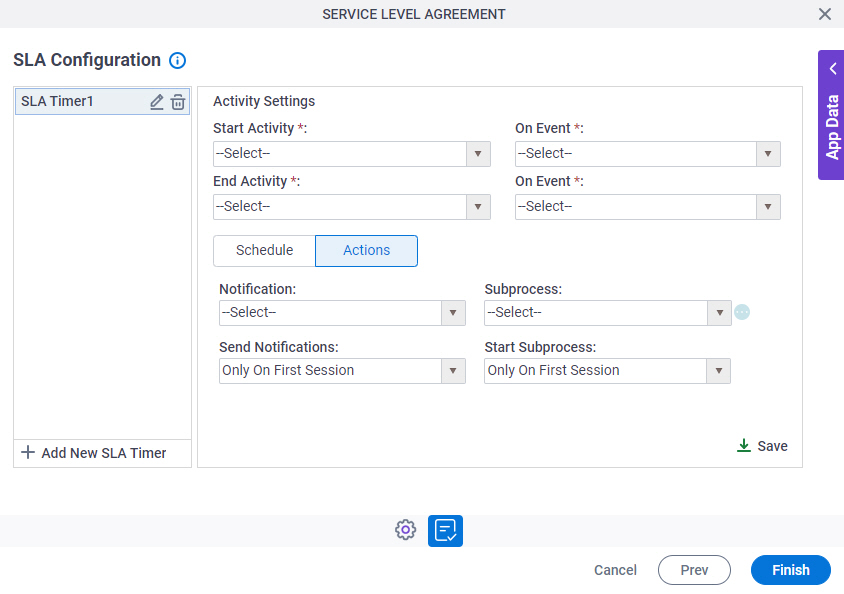
Figure: SLA Configuration > Actions tab

SLA Configuration Actions tab

Fields

Field NameDefinition

Add New SLA Timer Add New SLA Timer icon

Function:
Creates a timer with a name you specify.

Edit Edit icon

Function:
Changes the selected item.

Delete Delete icon

Function:
Deletes the selected item.
Example:
Refer to:

Start Activity

Function:
Specifies the activity upon which you want to start the timer.
Accepted Values:
An activity in your process.
Default Value:
None

End Activity

Function:
Specifies the activity upon which to end the timer.
Accepted Values:
An activity in your process.
Default Value:
None

On Event

Function:
Specifies the event of the activity you want to start or end the timer.
Accepted Values:
  • Assign Work Item - The timer starts or ends when the task is Assigned to a participant.
  • Complete Work Item - The timer starts or ends when the task is Completed.
  • Cancel Work Item - The timer starts or ends when the work item is Cancelled.
  • Enter Activity Instance - The timer starts or ends when the process starts a specified activity.
  • Leave Activity Instance - The timer starts or ends when the process ends a specified activity.
  • Reassign Work Item - The timer starts or ends when the task is reassigned.
  • Work Item Assigned - The timer starts or ends when the participant gets a task.
  • Work Item Overdue - The timer starts or ends when the task is Overdue.
  • Resolving Pool Members - The timer starts or ends when the participants in the pool are resolved.
Default Value:
None
Example:
For a human task activity, you can choose the AssignWorkItem event.

Notification

Function:
Specifies the name of an e-mail template used to send the e-mail notification when the timer expires.
Accepted Values:
An e-mail template name from the list.
Default Value:
None

Send Notifications

Function:
Specifies whether to send the email notifications for all sessions when the timer expires.
Accepted Values:
  • Only On First Session - Sends an e-mail notification for only the first session when the timer expires.
  • For All Sessions - Sends an e-mail notification for all sessions when the timer expires.
Default Value:
Only On First Session
Limitations:

This field is available in these releases:

Subprocess

Function:
Specifies the name of the process template that is started as a subprocess when the timer expires. The list is populated from the subprocesses in your process model.

You can use process data variables to pass data from the parent process to the subprocess.

Accepted Values:
The name of your process template.

If you configure a subprocess, you can set up process data variables to pass data from the parent process to the subprocess, similar to the Subprocess activity.

Click the Ellipses button to open the SLA Configuration > Mapping Variables screen.

Default Value:
None
Accepts Process Data Variables:
Yes
Limitations:

Mapping Variables screen is available in these releases:

Start Subprocess

Function:
Specifies whether to start the subprocess for all sessions of the Subprocess activity when the timer expires.
Accepted Values:
  • Only On First Session - Starts the subprocess for only the first session of a Subprocess activity.
  • For All Sessions - Starts the subprocess for all sessions of a Subprocess activity within a process instance.
Default Value:
Only On First Session
Limitations:

This field is available in these releases:

Save

Opens this Screen:
Saves your changes.

SLA Configuration > Mapping Variables

Specifies how to map variables in a subprocess.
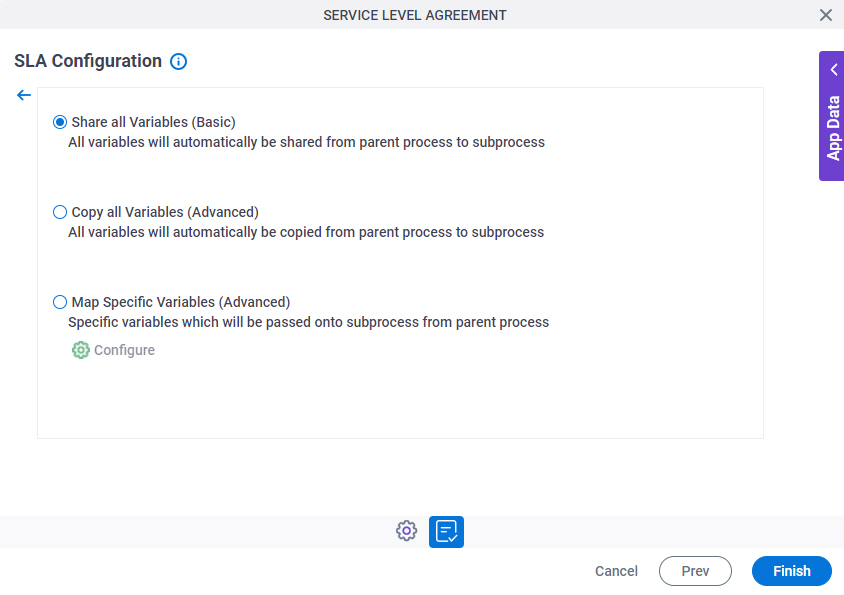
Figure: SLA Configuration > Mapping Variables screen

SLA Configuration Mapping Variables screen

Fields

Field NameDefinition

Share All Variables (Basic) / Copy All Variables (Advanced) / Map Specific Variables (Advanced)

Function:
Specifies whether the parent process shares or copies all the process data variables or only the selected variables with the subprocess.
Accepted Values:
  • Share All Variables (Basic) - Shares all the process data variables from parent process to subprocess.
  • Copy All Variables (Advanced) - Copies all the process data variables from parent process to subprocess.
  • Map Specific Variables (Advanced) - Shares selected process data variables from parent process to subprocess.

    Click the Configure Configuration icon button to open the Specify Initial Attributes screen.

Default Value:
Share All Variables (Basic)
Limitations:

Mapping Variables screen is available in these releases:

Initial Attributes

Specifies a set of process variables to pass to a subprocess. You can share the parent process's variables with the subprocess if the subprocess uses the same data.

The subprocess can have its own data only within the subprocess, or it can share its data with the parent process. For example, a subprocess can access the data of the parent process, such as the reviewer name and review completion date.
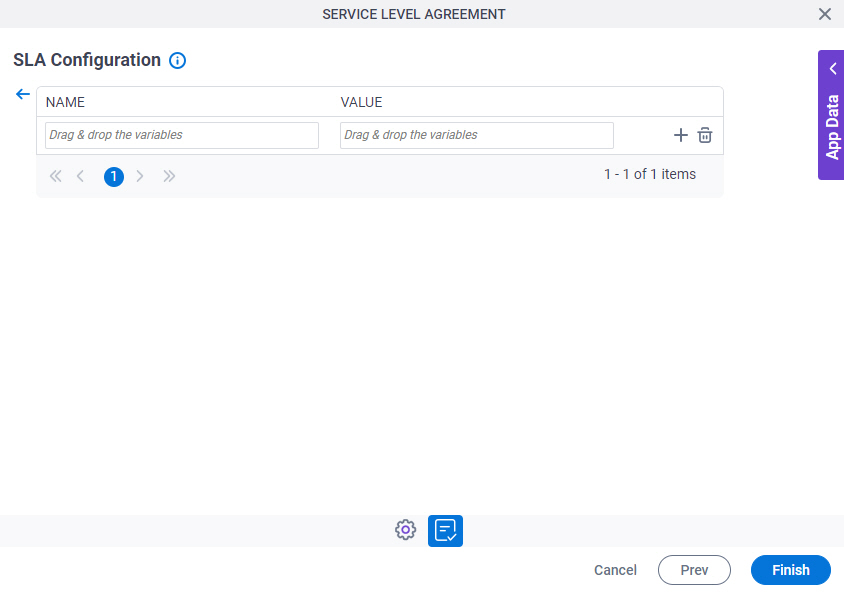
Figure: Initial Attributes screen

Initial Attributes screen

Fields

Field NameDefinition

Name

Function:
The name of a variable you want to connect with the subprocess.
Accepted Values:
One line of text (a string) with no spaces.
Default Value:
None

Value

Function:
The value in the child process to associate with the variable in the parent process.
Accepted Values:
An XML variable in the subprocess.
Default Value:
System.String - Indicates that AgilePoint system accepts the values as String data type only. In itself, this is not a valid value.
Accepts Process Data Variables:
Yes

Add Add icon

Function:
Adds a row.

Delete Delete icon

Function:
Deletes the row.