
Create an Example Human Task Activity
This topic gives an example of how to create a human task activity called AutoCancelAgileWork with the AgileWork project template. This activity cancels the remaining tasks assigned to the participants in a parallel approval, even if one of the participants rejects the request.
To create an AutoCancelAgileWork human task activity, do the procedure in this topic.
Create a New Project for the Example Human Task Activity in AgilePoint NX Developer
To create a new project for the example AutoCancelAgileWork, do the procedure in this topic.
Screen
Prerequisites
Procedure
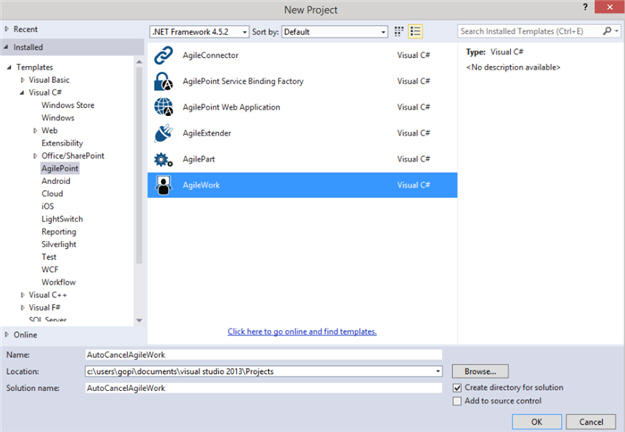
- In Microsoft Visual Studio, click File > New > Project.
- On the New Project screen, click AgileWork.
- In the Name field, enter AutoCancelAgileWork.
- In the Location field, click the Browse, and select the location to create the project.
- Click OK.
Create an Example Human Task Activity Configuration Screen
This topic gives an example of how to create a configuration screen for the example AutoCancelAgileWork human task activity with the AgileWork project template.
Example Configuration Screen
Good to Know
- Make sure the value of the control ID attribute specified in your HTML file must match with the property name specified in the AgilePartDescriptor.cs file.
- The name of your HTML file, JavaScript file, and JSON file must be same.
Procedure
- In the AgileWorkDescriptor.cs, replace all MyAgileWorkDescriptor with AutoCancelAgileWorkDescriptor.
- Replace the Exposed Properties code section with this code.
This code creates a property to accept the variable name at design time for the human task activity.
[ Category("Approval"), Description("Variable to store approval result") ] public string ApprovalVariable { get { return base["ApprovalVariable"] as string; } set { base["ApprovalVariable"] = value; } } - Replace the code in the InitializeShapeProperties()
method with this code:
WFActivityMasterProperties ApprovalVariable= new WFActivityMasterProperties() { Browsable = true, Id = " ApprovalVariable" }; AddActivityProperties(ApprovalVariable); - To create your HTML page to design the configuration screen for your custom human task activity, do this procedure.
- In the project folder Design Time>WebUI, right-click HTML.
- In the item menu, click Add>New Item.
- On the Add New Item screen, in the left pane of Visual C# menu list, select AgilePoint.
- Select AgilePoint html.
- In the Name field, enter AutoCancelWork.html.
- Click Add.
- To design the configuration screen, open the file AutoCancelWork.html.
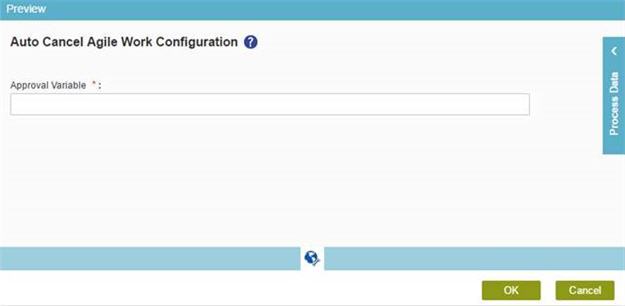
- On the AutoCancelWork.html file, within the <div class="marginLeft15px"> tags, enter this code to show a text box for ApprovalVariable.
<!-- Textbox Approval variable --> <div class="detailsFieldWrapper marginTop15px oneColSpan"> <!-- Label to display the field name (Ex: Approval Variable) --> <label class="lblPadding" data-i18n="labelApprovalVariable"></label> <!-- To show the '*' symbol, which denotes the mandatory mark for the field --> <span class="star"> *</span> <!-- To show a delimiter ':' which separates the field text and the textbox control --> <label class="labelBold">:</label><br /> <!-- Textbox control to get the user input --> <input name="txtTextBox" class="treeNode" id="textboxApprovalVariable" type="text" style="width: 87.2%;" /> <!-- To show the validation error messages --> <span class="k-widget k-tooltip k-tooltip-validation k-invalid-msg" id="errorApprovalVariable" role="alert" style="display: none; width: auto !important"></span> </div> - To create your JavaScript file for the client side validation, do this procedure.
- In the project folder Design Time>WebUI, right-click Scripts.
- In the item menu, click Add>New Item.
- On the Add New Item screen, in the left pane of Visual C# menu list, select AgilePoint.
- Select AgilePoint js.
- In the Name field, enter AutoCancelWork.js.
- Click Add.
- On the AutoCancelWork.js file, in the OnValidate method, enter this script.
This script does the validation for the mandatory fields when the user enters the input in the text box. This script calls the ValidateTextBox JavaScripts function and passes it in the text box ID, error span ID and label ID as the parameters. These IDs are picked from the HTML page you created such as AutoCancelWork.html.
validflag = validflag ? ValidateTextBox("textboxApprovalVariable", "errorApprovalVariable", "labelApprovalVariable") : false; - Enter this script in the OnSubmit method.
This script accesses the text box control and get the value in it. It binds this value to the JSON object when you click Finish on the configuration screen.
JSONDATA = { Data: { Properties: [] } }; var approvalVariable = $("#textboxApprovalVariable").val(); Utility.AddDataToJSONOnSubmit(JSONDATA, "approvalvariable", approvalVariable); Utility.AddDataToJSONOnSubmit(JSONDATA, "textboxApprovalVariable", approvalVariable); return JSONDATA; - Enter this script within the OnLoad method.
This script loads the data when the configuration screen opens in the Process Builder.
Utility.BindDataToControls(t); - To create your JSON file to set the locale and label text for the fields of your human task activity, do this procedure.
- In the project folder Design Time>WebUI>Locale, right-click the language folder to create the project item.
- In the item menu, click Add>New Item.
- On the Add New Item screen, in the left pane of Visual C# menu list, select AgilePoint.
- Select AgilePoint json.
- In the Name field, enter AutoCancelWork.json.
- Click Add.
- On the Select Activity Language Group screen, in the Language list, select a language for your activity — English in this example.
- In the file AutoCancelWork.en-US.json, replace the code with this code.
Note: This JSON code example includes comments to help explain the purpose of the code snippets. However, comments are not supported by the JSON standard, or the JSON parser within the AgilePoint NX software. You must delete these comments before you use this code in AgilePoint NX.
{ // data-i18n id of the configuration window header label. // Displays the localized title of the wizard screen // (refer the id in AutoCancelAgileWork.html). "SampleConfiguration": "Auto Cancel Agile Work Configuration", // data-i18n id of the Approval Variable label, where the localized // value "Approval variable" will be displayed on the // configuration screen (refer the id in AutoCancelAgileWork.html). "labelApprovalVariable": "Approval Variable", // Localized message prefix for the not null or required field // validation (refer the id in AutoCancelAgileWork.js). "TextBoxNullExceptionPrefix": "Please enter " } - To see the preview of your configuration screen, do this procedure.
- On the Microsoft Visual Studio, in the toolbar, click the green play button.
- On the Preview Details screen, click Choose File.
- Select AutoCancelWork.html file.
- Click Preview.
Configure the Runtime Functionality for an Example Human Task Activity
To configure the runtime functionality for the example human task activity called AutoCancelAgileWork with the AgileWork project template, do the procedure in this topic.
Procedure
- In the AgileWork.cs file, replace all MyAgileWork within the MyAgileWork class with AutoCancelAgileWork.
- Change the AgileWork through AgileWork attribute. In this case, name it to AutoCancelAgileWork.
[AgileWork("AutoCancelAgileWork", typeof(AutoCancelAgileWorkDescriptor))] - In the AutoCancelAgileWork class, replace this code in the constructor of this class.
public AutoCancelAgileWork (WFProcessInstance instance, WFManualActivityInstance activity) : base(instance, activity) { base.CompleteWorkItem += new EventHandler(AutoCancelAgileWork_CompleteWorkItem); } - Enter this code within the AutoCancelAgileWork_CompleteWorkItem
method in TODO placeholder.
This code creates the complete work item event handler. The event handler checks the approval status. If the status is rejected, it automatically selects the task Cancelled.
private void AutoCancelAgileWork_CompleteWorkItem(Object sender, System.EventArgs e)
{
  WFManualWorkItemEventArgs args = e as WFManualWorkItemEventArgs;

  // TODO
  IWFAPI api = base.m_ProcessInstance.WFApi;
  NameValue[] parameters = api.GetAgileWorkParameters(base.m_ProcessInstance.DefID,
                                                      base.m_ActivityInstance.Name);
  Hashtable properties = ToHashtable(parameters);
  string approvalVariable = properties["ApprovalVariable"].ToString();
  bool approved = Convert.ToBoolean(api.GetCustomAttr(base.m_ProcessInstance.WorkObjectID,
                                                      approvalVariable, false));

  if (!approved)
  {
    string sql = " wf_manual_workitems.ACTIVITY_INST_ID = '" + base.m_ActivityInstance.ID
                                                             + "'";
    WFManualWorkItem[] workItems = api.QueryWorkList(sql);
    foreach (WFManualWorkItem item in workItems)
    {
      if (item.Status != "Completed")
      {
        api.CancelWorkItem(item.WorkItemID, "");
      }
    }
  }
  Logger.WriteLine(base.m_ProcessInstance.WFApi.TenantID, MessageType.Information,
                  "MyAgileWork_CompleteWorkItem, Activity Instance={0}",
                   base.m_ActivityInstance.DisplayName);
}
Change the Properties of Activity Group and Activity for the Example Human Task Activity
To change the properties of an activity group and activity with the correct data to show your human task activity for the example AutoCancelAgileWork , do the procedure in this topic..
Screen
Good to Know
- For more information, refer to Change the Properties of an Activity Group and Activity.
Procedure
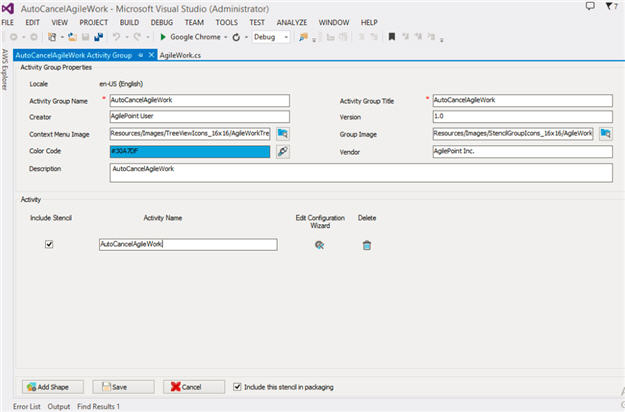
- On the Activity Group screen, in the Activity Group Name field, enter AutoCancelAgileWork.
- In the Activity Group Title field, enter AutoCancelAgileWork.
- To configure the activity, in the Activity section, click Edit Configuration Wizard
 .
. - On the Activity Configuration Wizard Details screen, click the Activity Configuration tab.
- To show the activity in the first place in the tab, on the Activity Configuration tab, in the Activity Display Order field, enter 1.
- In the System Activity list, select AutoCancelAgileWork.
- In the Activity field, enter AutoCancelAgileWork.
- In the Title field, enter AutoCancelAgileWork.
- Click the Activity Wizard Configuration tab.
- On the Activity Wizard Configuration tab, in the HTML field, click Browse
 , and select the file DesignTime/WebUI/HTML/AutoCancelAgileWork.html file.
 - In the Script field, click Browse to browse DesignTime/WebUI/Scripts/AutoCancelAgileWork.js file.
- On the Localization Resources section, in the Language list, select English.
- In the File Location field, click Browse to browse DesignTime/WebUI/Locale/en-US/AutoCancelAgileWork.en-US.json file.
- Click Add to add the activity properties to the activity list.
- On the Activity Group screen, click Save to save the changes.
Create a Deployment Package for the Example Human Task Activity
To create a deployment package for the example AutoCancelAgileWork project do the procedure in this topic.
Good to Know
- The deployment package is created with the name [project folder]\bin\ AutoCancelAgileWork.zip.
Procedure
- In Microsoft Visual Studio, on the Solution Explorer pane, right-click the project name AutoCancelAgileWork.
- Click Create AgilePoint Deployment Package.
Deploy the Example Human Task Activity Package in AgilePoint NX
To deploy the example AutoCancelAgileWork project in AgilePoint NX, do the procedure in this topic.
Screen
Screen
How to Start
- On the AgilePoint Server Manager screen,
click AgilePoint Deployment Utility
 .
.
Procedure
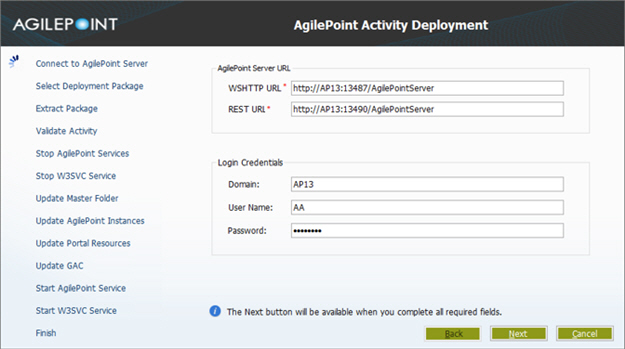
- On the AgilePoint Activity Deployment screen, complete these fields.
Field Name Definition WSHTTP URL
- Function:
- Specifies the WsHttp URL for your
AgilePoint Server.
For more information, refer to Find Your AgilePoint Service URL in AgilePoint NX.
- Accepted Values:
- A valid WsHttp URL in this format:
https://[AgilePoint Server instance host name]:[WsHttp Port]/AgilePointServer
- Default Value:
- None
- Example:
- https://myapserver.com:1451/AgilePointServer
REST URL
- Function:
- Specifies the REST URL for your
AgilePoint Server.
For more information, refer to Find Your AgilePoint Service URL in AgilePoint NX.
- Accepted Values:
- A valid REST URL in this format:
https://[AgilePoint Server instance host name]:[Rest Port]/AgilePointServer
- Default Value:
- None
- Example:
- https://myapserver.com:1541/AgilePointServer
Domain
- Function:
- The authentication domain for the AgilePoint Service Account.
- Accepted Values:
- An alphanumeric string with no spaces that represents an authentication domain in your environment.
- Default Value:
- None
- Example:
- Demo3
User Name
- Function:
- Specifies the user name for the AgilePoint Service Account.
- Accepted Values:
- A valid user name.
- Default Value:
- None
Password
- Function:
- The password for the authentication account.
- Accepted Values:
- An alphanumeric string that represents a password.
- Default Value:
- None
- Click Next.
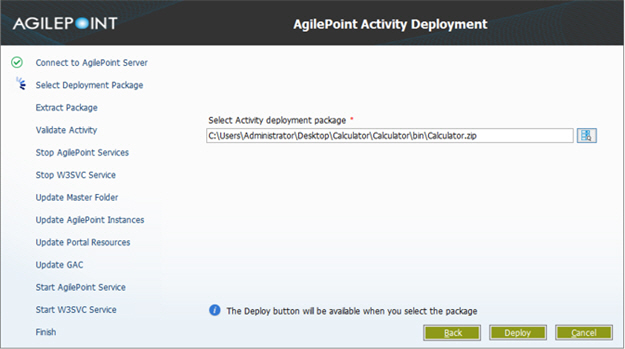
- In the Select Activity Deployment Package field, click Browse
 .
. - Select AutoCancelAgileWork.zip package.
- Click Deploy.
- Click Finish.