Navigate To Other Entity 
|
- Opens this Screen:
- Navigate To Entity screen.
- Function of this Screen:
- Shows the list of AgilePoint NX entities. You can click the entity names to see or configure the entity.
|
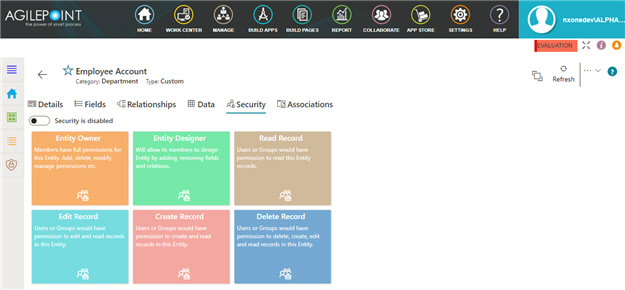
Security is disabled / Security is enabled |
- Function:
- Specifies the permissions for users
or groups for an
entity.
- Accepted Values:
-
- On - Lets you configure specific permissions for users or groups for the entity.
- Off - Specifies that all permissions are configured for users and groups for the entity.
- Default Value:
- On
- Example:
- Refer to:
|
Delete Entity  |
- Function:
- Deletes your custom entity.
To delete an entity, set Allow Entity Deletion to Yes on the
Data Entities Settings screen > Settings tab.
You can not delete a standard entity.
- To Open this Field:
-
- On the right side of the screen, click the Ellipses (...).
- Example:
- Refer to:
|
Refresh 
|
- Function:
- Updates the information on the screen.
|
Clone Entity 
|
- Opens this Screen:
- Clone Entity screen.
- To Open this Field:
-
- On the right side of the screen, click
Ellipses (...).
- Function of this Screen:
- Creates a copy of an
entity..
- Example:
- Refer to:
|
Export Template
|
- Opens this Screen:
- Export Template screen.
- To Open this Field:
-
- On the right side of the screen, click
Ellipses (...).
- Function of this Screen:
- Downloads an entity template from AgilePoint NX
Data Entities to your local machine
as an
XML file or JSON file.
- Example:
- Refer to:
|
Export Data
|
- Opens this Screen:
- Export Data screen.
- To Open this Field:
-
- On the right side of the screen, click
Ellipses (...).
- Function of this Screen:
- Downloads
records from an
entity as an
XML file or JSON file to your local machine.
- Example:
- Refer to:
|
Import Data
|
- Opens this Screen:
- Import Data screen.
- To Open this Field:
-
- On the right side of the screen, click
Ellipses (...).
- Function of this Screen:
- Uploads a collection of exported records from your local machine, and adds it to an entity in AgilePoint NX Data Entities.
- Example:
- Refer to:
|
Entity Owner
|
- Opens this Screen:
- Entity Owner > Manage Security screen
- To Open this Field:
- On the Security screen > Security tab screen, turn on the Security is disabled field.
- Function of this Screen:
- Specifies the users and groups who are
entity owners.
|
Entity Designer
|
- Opens this Screen:
- Entity Designer > Manage Security screen
- To Open this Field:
- On the Security screen > Security tab screen, turn on the Security is disabled field.
- Function of this Screen:
- Specifies the users and groups who are
entity designers.
|
Read Record
|
- Opens this Screen:
- Read Record > Manage Security screen
- To Open this Field:
- On the Security screen > Security tab screen, turn on the Security is disabled field.
- Function of this Screen:
- Specifies the users and groups to give
permission to read records.
|
Edit Record
|
- Opens this Screen:
- Edit Record > Manage Security screen
- To Open this Field:
- On the Security screen > Security tab screen, turn on the Security is disabled field.
- Function of this Screen:
- Specifies the users and groups to give
permission to change and read records.
|
Create Record
|
- Opens this Screen:
- Create Record > Manage Security screen
- To Open this Field:
- On the Security screen > Security tab screen, turn on the Security is disabled field.
- Function of this Screen:
- Specifies the users and groups to give
permission to create and read
records.
|
Delete Record
|
- Opens this Screen:
- Delete Record > Manage Security screen
- To Open this Field:
- On the Security screen > Security tab screen, turn on the Security is disabled field.
- Function of this Screen:
- Specifies the users and groups to give
permission to delete, create, change, and read
records.
|