Install and Configure the AgilePoint Intelligent Process Automation App for Microsoft 365
Background and Setup
Examples
- (External) AgilePoint Intelligent Process Automation App for SharePoint Online
- Examples - Step-by-step use case examples, information about what types of examples are provided in the AgilePoint NX Product Documentation, and other resources where you can find more examples.
Prerequisites
- The AgilePoint Intelligent Process Automation app.
- SharePoint for Microsoft 365.
- AgilePoint NX OnDemand (public cloud), AgilePoint NX PrivateCloud, or AgilePoint NX OnPremises v9.0 Software Update 1 or higher.
- To add the AgilePoint Intelligent Process Automation app to a site collection, you must be signed in to SharePoint as a Global Administrator.
- To add the AgilePoint Work Center web part to a SharePoint site, you must be signed in to SharePoint as a Site Collection Administrator.
- The AgilePoint Work Center web part requires the following permissions to run:
- Create or delete document libraries or lists in the site collection.
- Full control of the site.
- Share permissions with other users.
- Access basic information about site users.
- If you use AgilePoint NX OnPremises, the REST URL for your AgilePoint Server instance must be configured to use the default HTTPS port number 443 to associate AgilePoint workflows with SharePoint lists and libraries in the AgilePoint Intelligent Process Automation app for Microsoft 365. When AgilePoint NX OnPremises is installed, the default REST port is 13490. However, the endpoint for the Intelligent Process Automation app must be accessible through the default port number used for HTTPS communication by Microsoft 365.
- In SharePoint for Microsoft 365, the web part does not support the Safari web browser.
- This Documentation is for Modern Work Center in SharePoint for Microsoft 365. For information about earlier versions of the SharePoint app, refer to Microsoft 365 SharePoint Integration for AgilePoint NX v8.0.
Good to Know
- The AgilePoint Work Center web part for SharePoint can be added to a SharePoint web part page or wiki page in any supported version of SharePoint. The AgilePoint Work Center web part can be added to modern pages in SharePoint for Microsoft 365, but not in on-premises SharePoint.
- The AgilePoint Work Center web part communicates with one or more servers — for example, AgilePoint, SharePoint, and/or database servers — whenever they are viewed or refreshed. This interaction is necessary and unavoidable in most cases, and is part of the AgilePoint system's expected usage patterns.
- In some environments, the location in which the AgilePoint Work Center web part is placed may have unintended effects on the system's performance.
For example, in an environment where there are many thousands of
SharePoint users, but only a fraction of those users interact
with AgilePoint, placing the AgilePoint Work Center web part on an
entry or top level site page that is frequently accessed by the
entire group of SharePoint users may place additional
unnecessary load on the AgilePoint system when the page is
accessed by users that don't need access to the web part.
In this situation, it can be better to place the web part on a sub site location that is only accessed by a more appropriate group of AgilePoint users or that is only accessed when necessary.
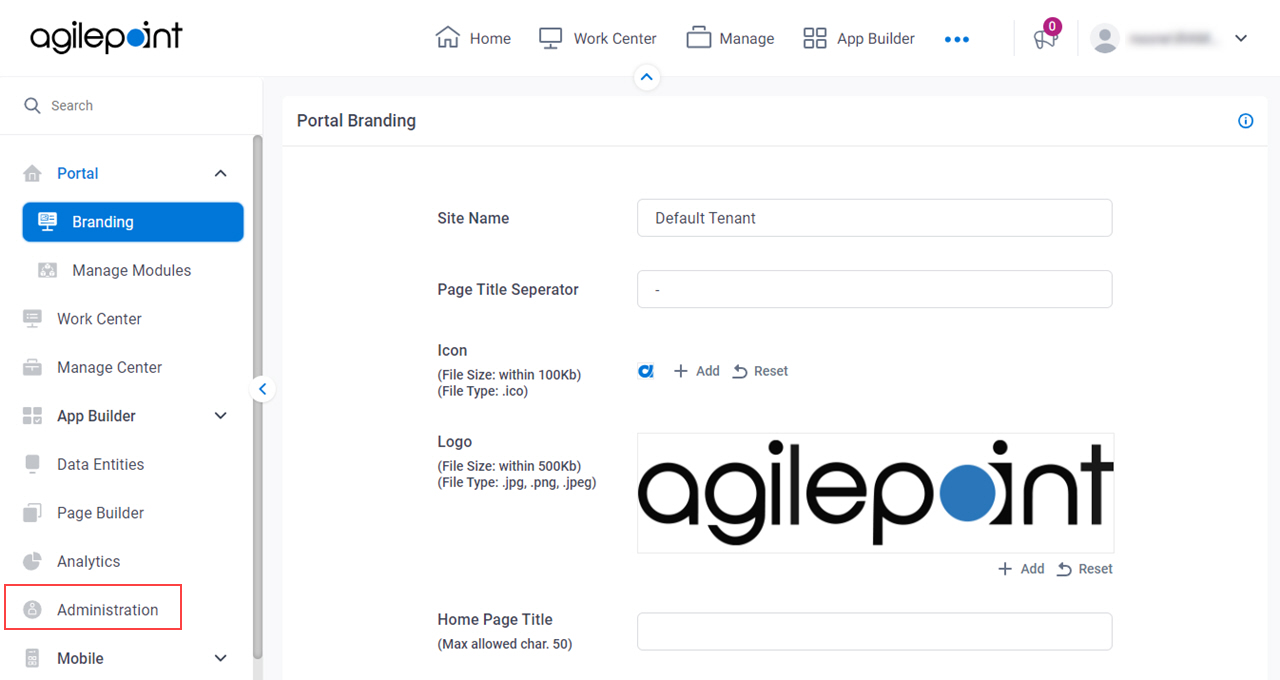
Step 1: (Optional) Enable the Microsoft Entra ID for AgilePoint NX
To enable the Microsoft Entra ID account authentication for AgilePoint NX, do the procedure in this topic.
Prerequisites
- Sign in with an AgilePoint NX account that has one of these account types:
Good to Know
- This procedure is optional. You do not follow this procedure if you have already enabled Microsoft Entra ID account authentication for AgilePoint NX.
Procedure
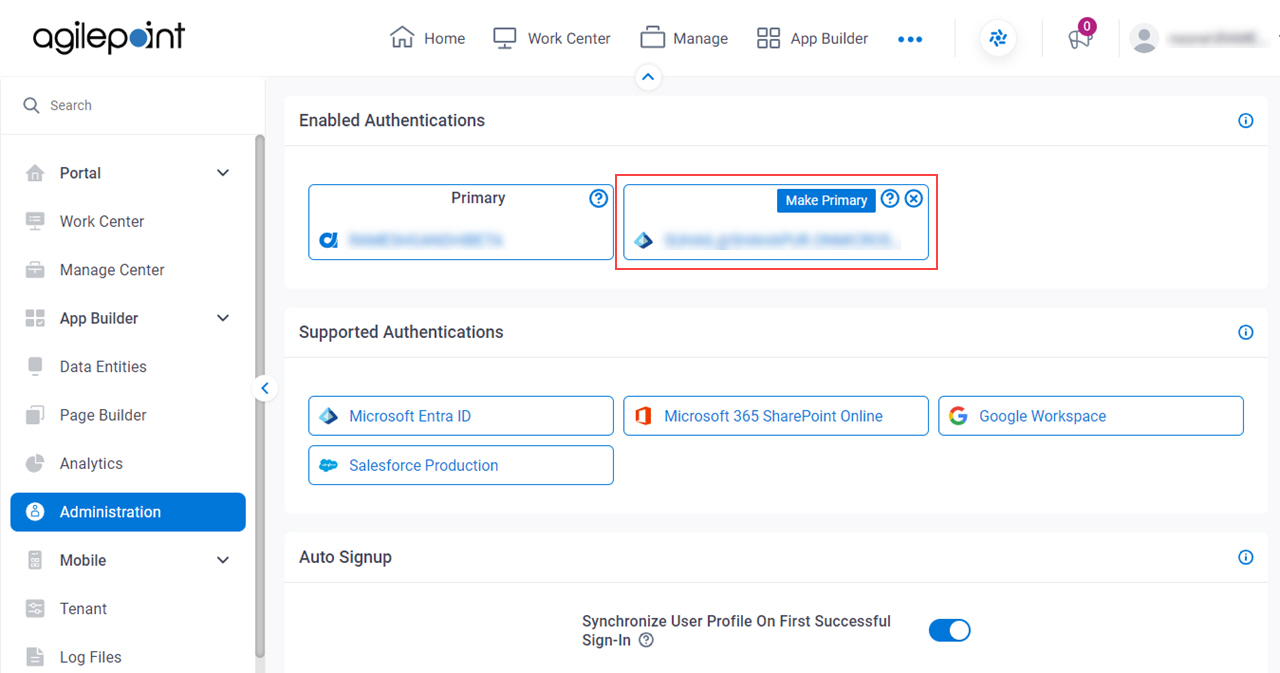
- Click Settings.

- Click Administration.
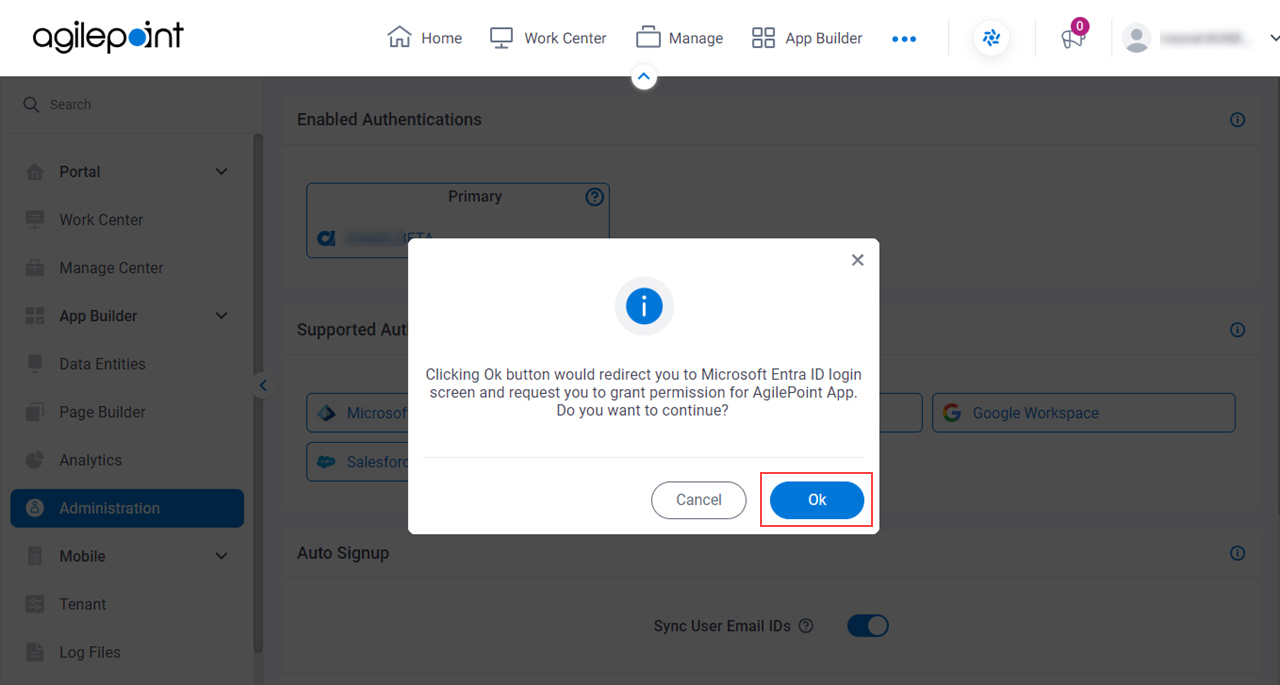
- On the Adminstration screen, in the Supported Authentications section, click Microsoft Entra ID.
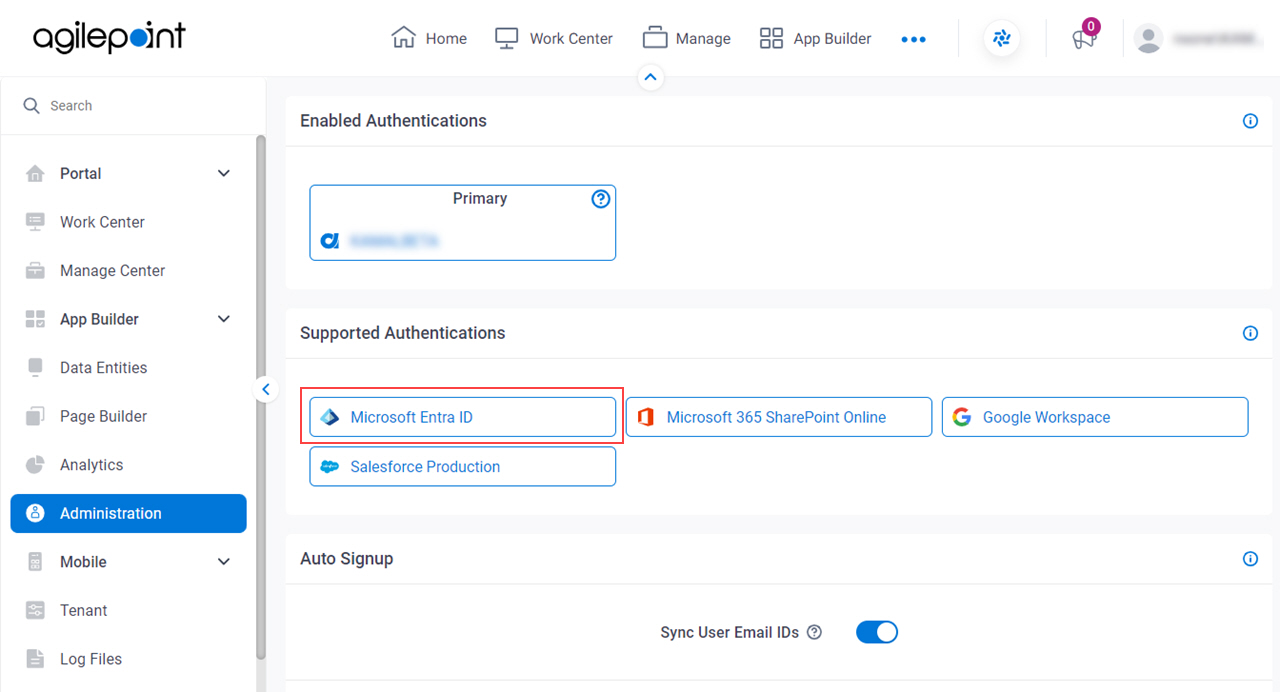
- On the information screen, click Ok.
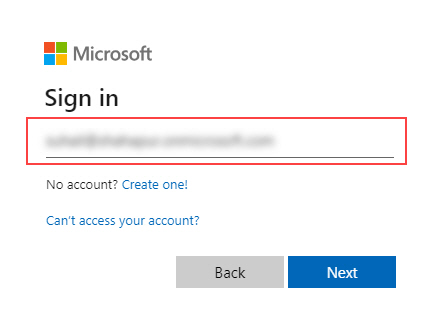
- On the Sign in screen, enter the Microsoft account credentials.
- In the Enter Password field, enter the password.

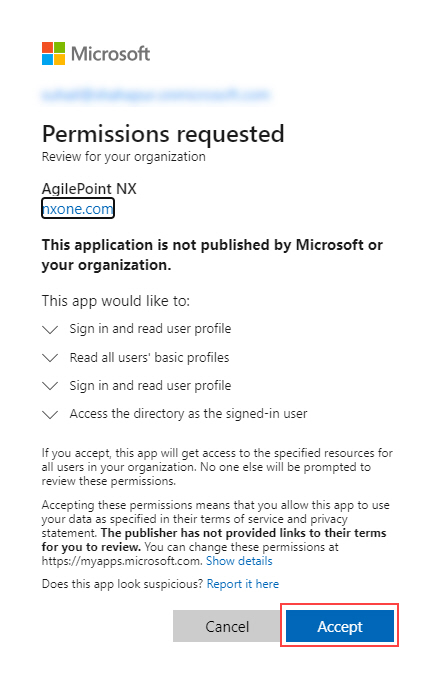
- On the Permission Requested screen, click Accept
- On the Pick an account screen, select the signed in account.

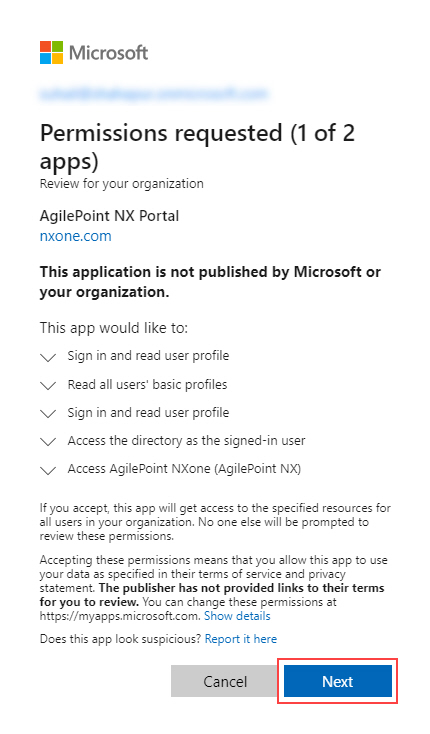
- On the Permissions requested screen, click Next
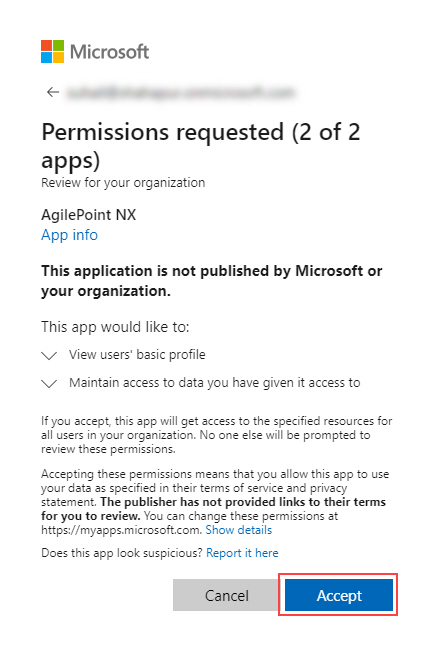
- Click Accept.
The Microsoft Entra ID authentication is enabled.
Step 2: Sign In to AgilePoint NX with Microsoft Entra ID
To sign in to AgilePoint NX with a Microsoft Entra ID account, do the procedure in this topic.
Prerequisites
- Enable Microsoft Entra ID account authentication.
To enable Microsoft Entra ID account authentication, refer to Step 1: (Optional) Enable the Microsoft Entra ID for AgilePoint NX.
- Sign in with a Microsoft Entra ID account that has the Administrators role.
How to Start
Procedure
- On the Welcome back screen, click Sign In with Microsoft Entra ID.
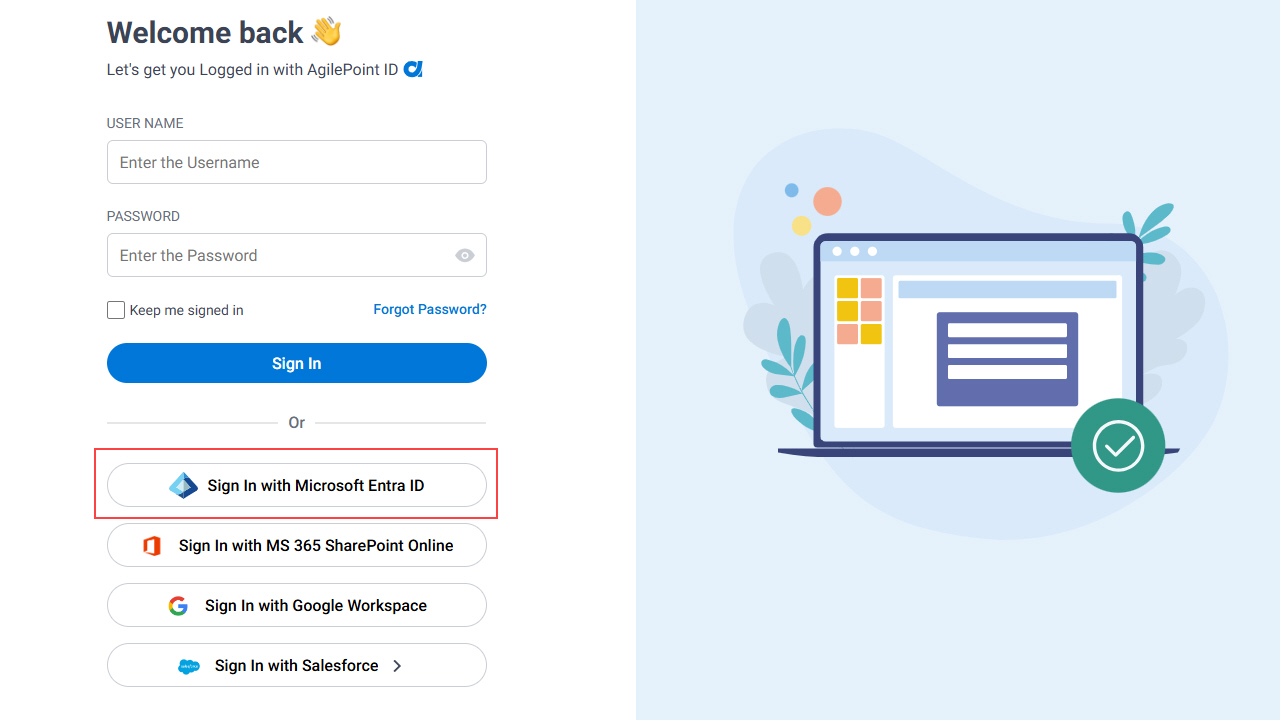
- On the Pick an account screen, select the Microsoft Entra ID account.
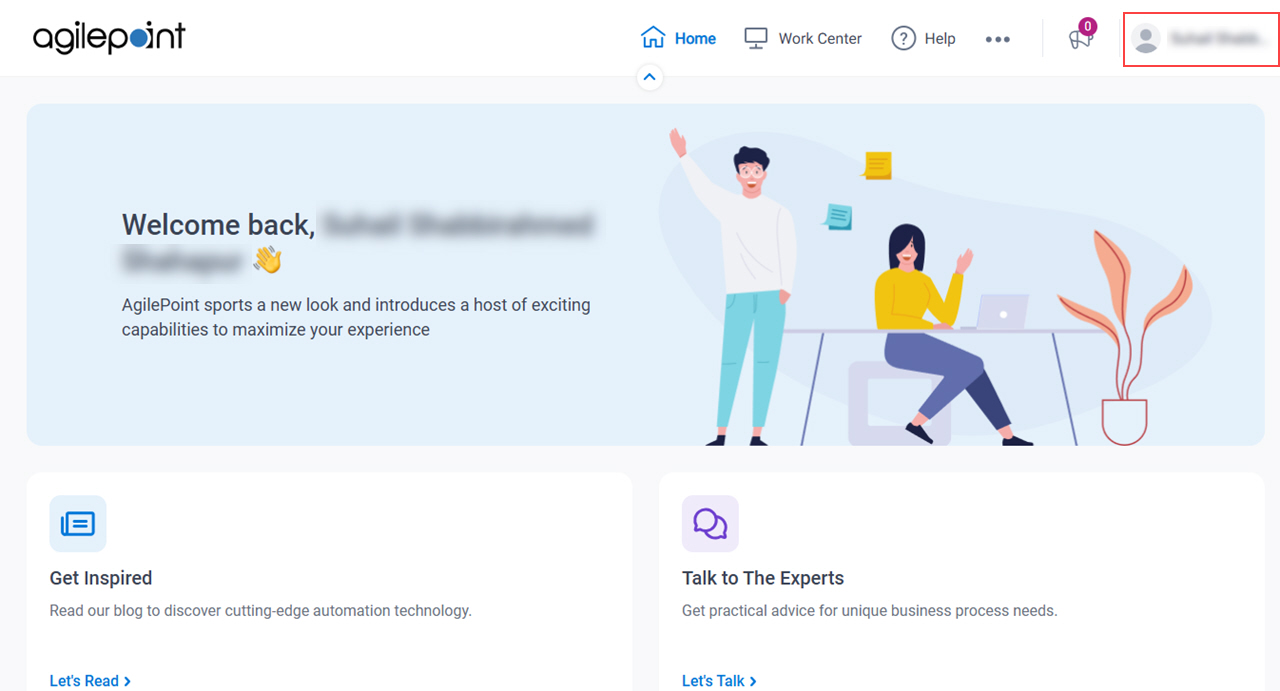
AgilePoint NX Portal opens with the Microsoft Entra ID account.
Step 3: Add the AgilePoint Intelligent Process Automation App to Your SharePoint Site Collection
How to Start
- In SharePoint for Microsoft 365, open the SharePoint site where you want to add the AgilePoint Intelligent Process Automation app.

Procedure
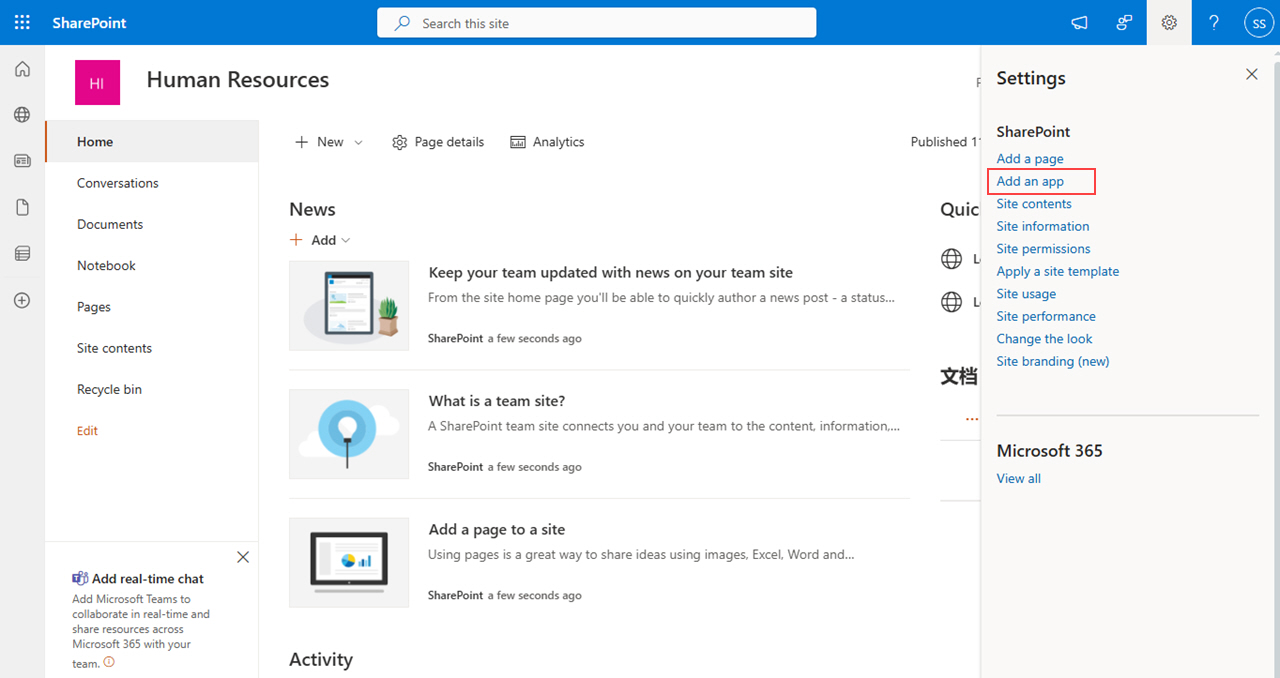
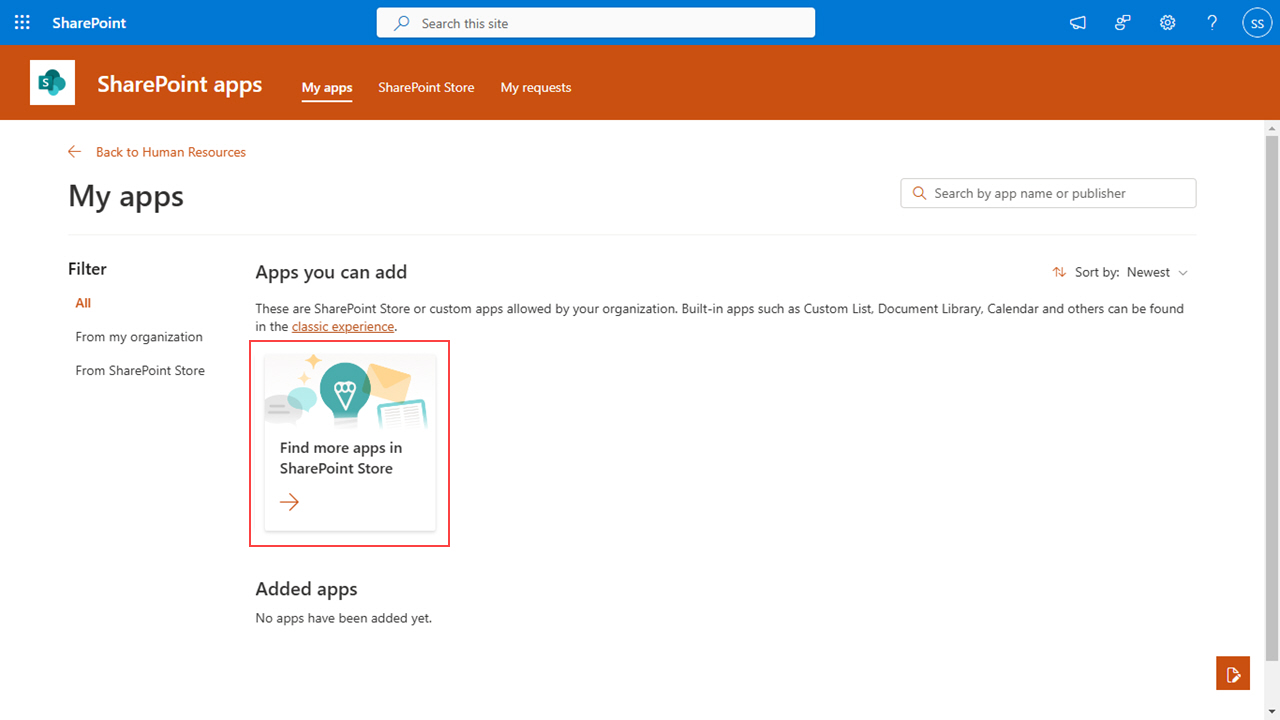
- On the SharePoint site, click Settings > Add an app.
- On the My Apps screen, click Find more apps in SharePoint Store.
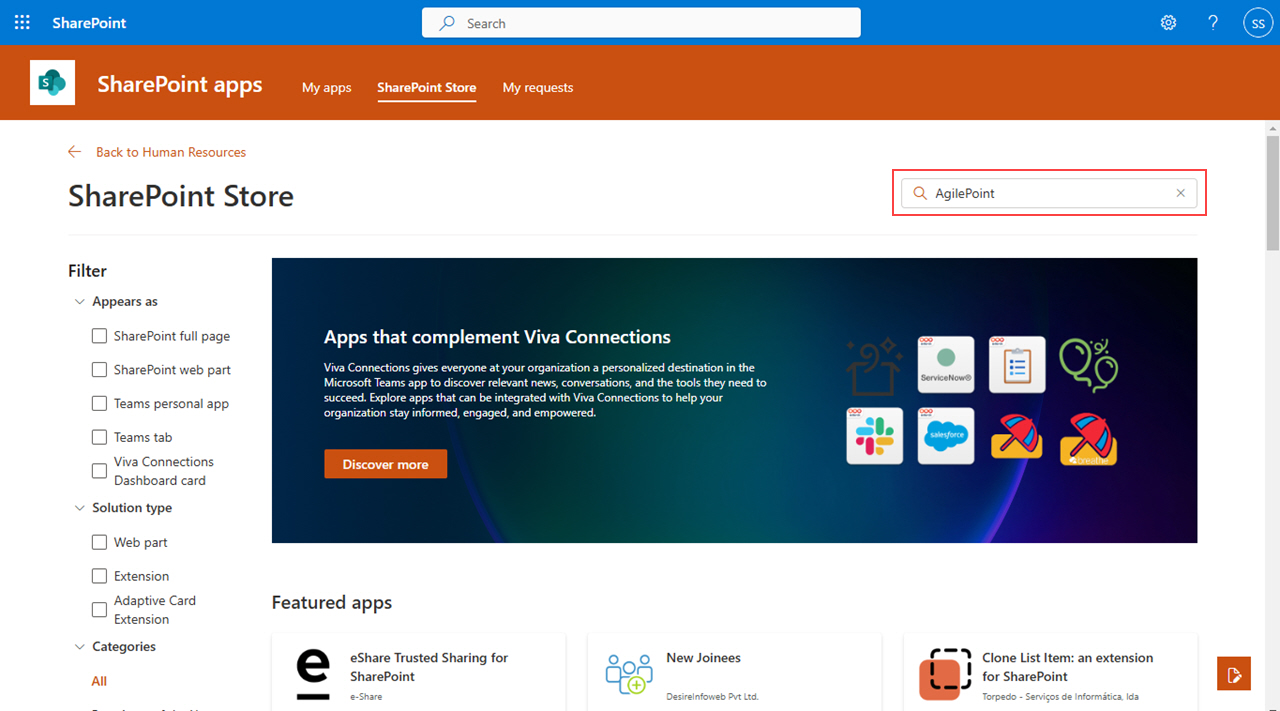
- On the SharePoint Store screen, in the search box, enter AgilePoint.
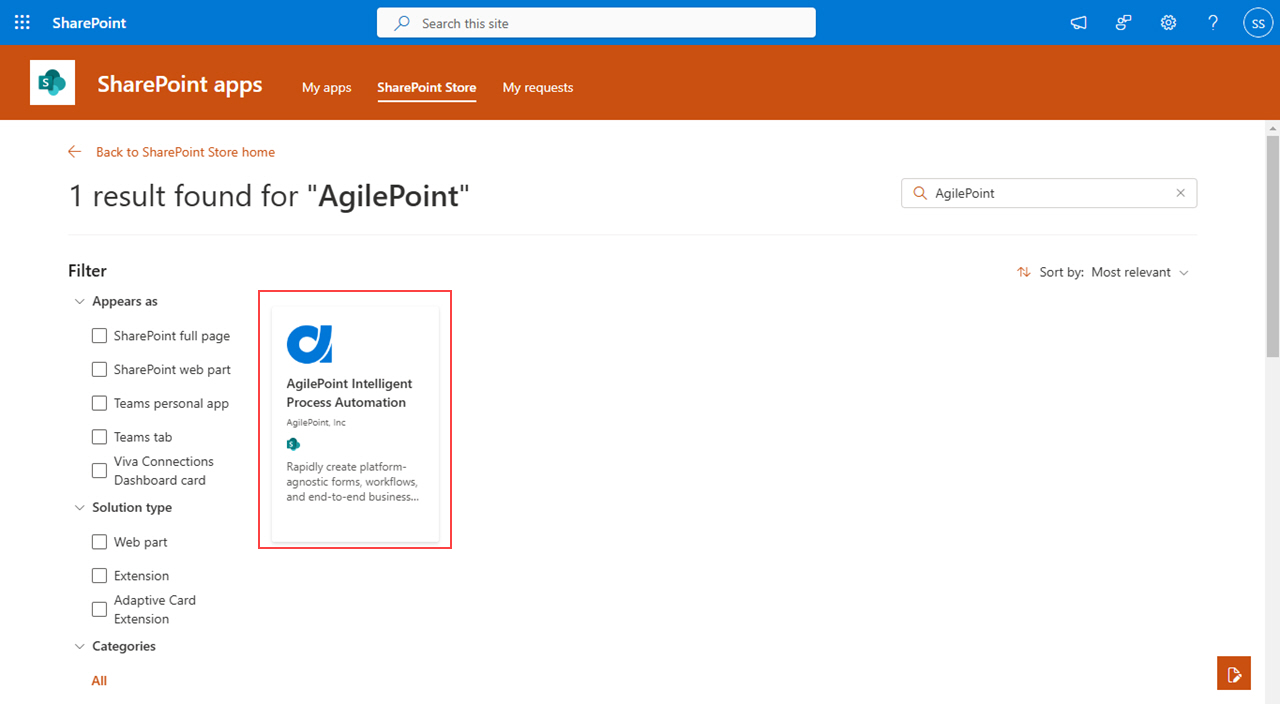
- Click AgilePoint Intelligent Process Automation.
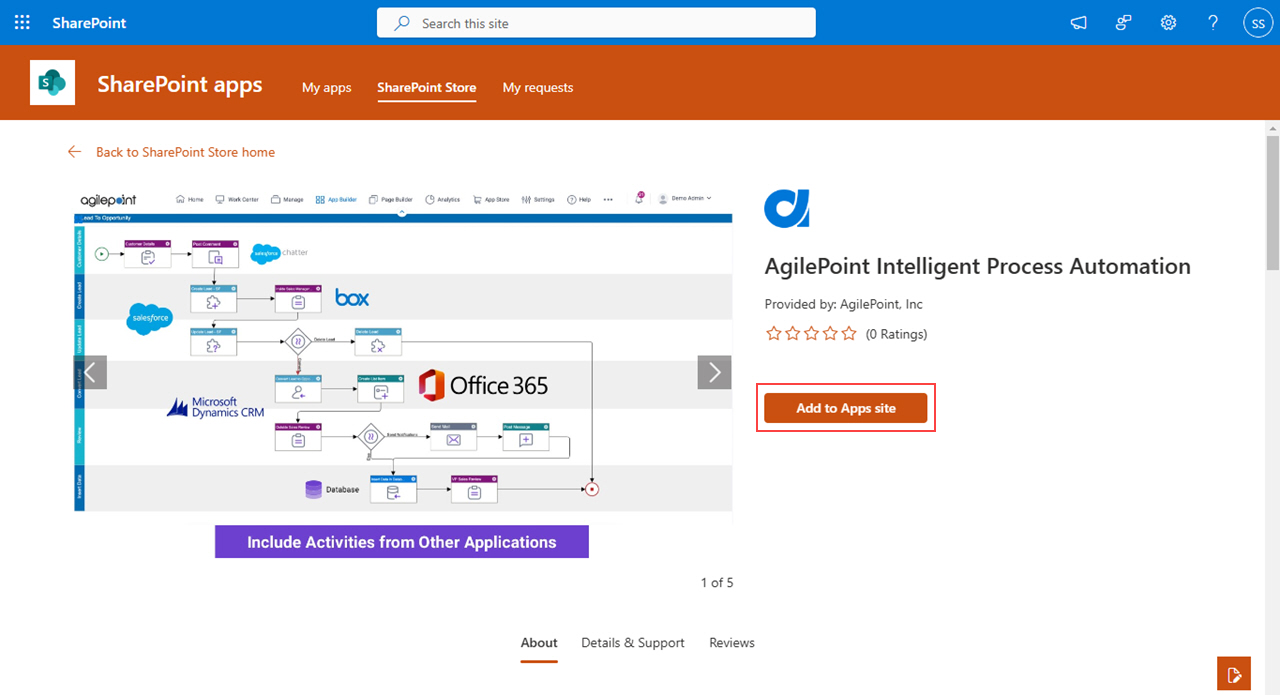
- On the AgilePoint Intelligent Process Automation app, click Add to Apps site.
- On the Confirm data access screen, select Enable this app and add it to all sites.
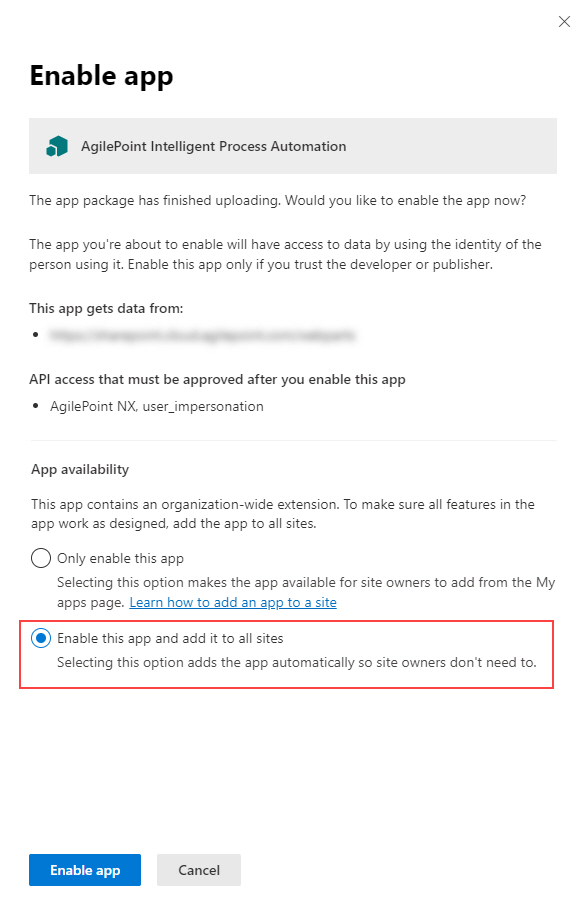
- Click Add.

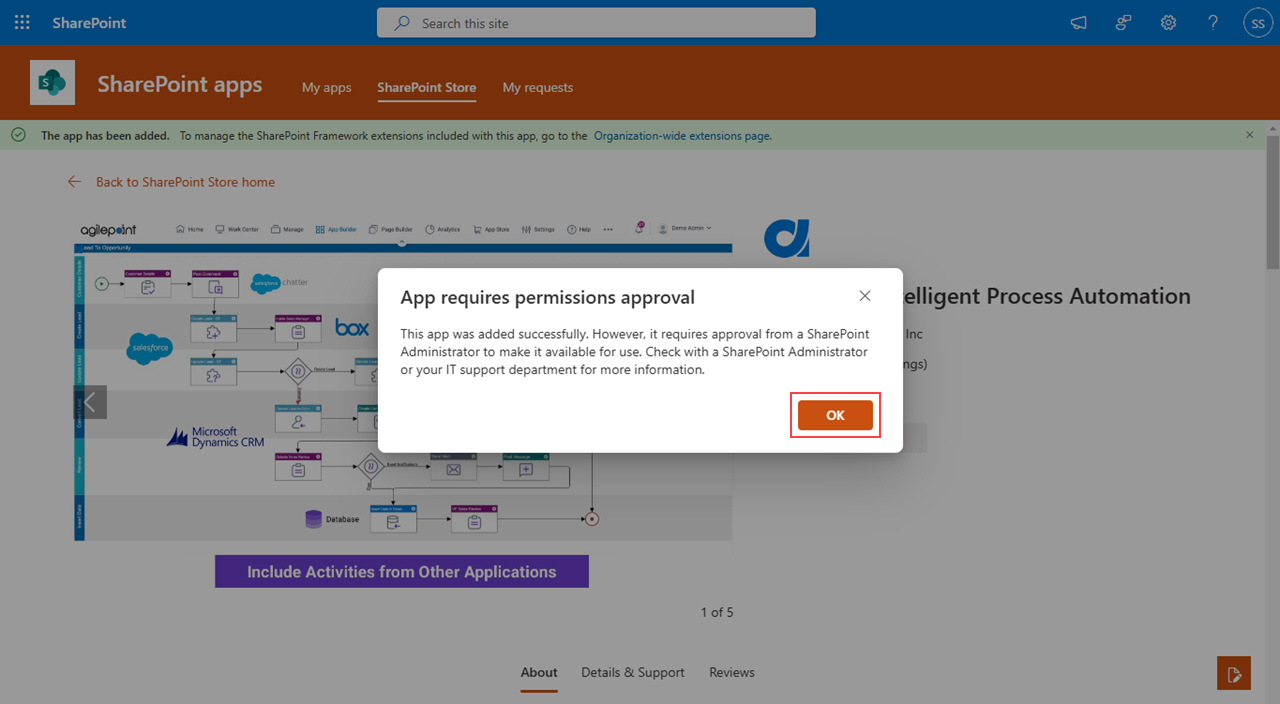
- On the App requires permissions approval screen, click OK.
Step 4: (AgilePoint NX OnDemand) Configure the API Permissions for the AgilePoint Intelligent Process Automation App
To configure the API permissions for the AgilePoint Intelligent Process Automation app to connect to AgilePoint NX OnDemand, do the procedure in this topic.
Good to Know
- This procedure is for AgilePoint NX OnDemand (public cloud). For AgilePoint NX OnPremises and AgilePoint NX PrivateCloud, refer to Step 5: (AgilePoint NX OnPremises) Configure the API Permissions for the AgilePoint Intelligent Process Automation App.
Procedure
- On the AgilePoint Intelligent Process Automation app, click App launcher > Admin.
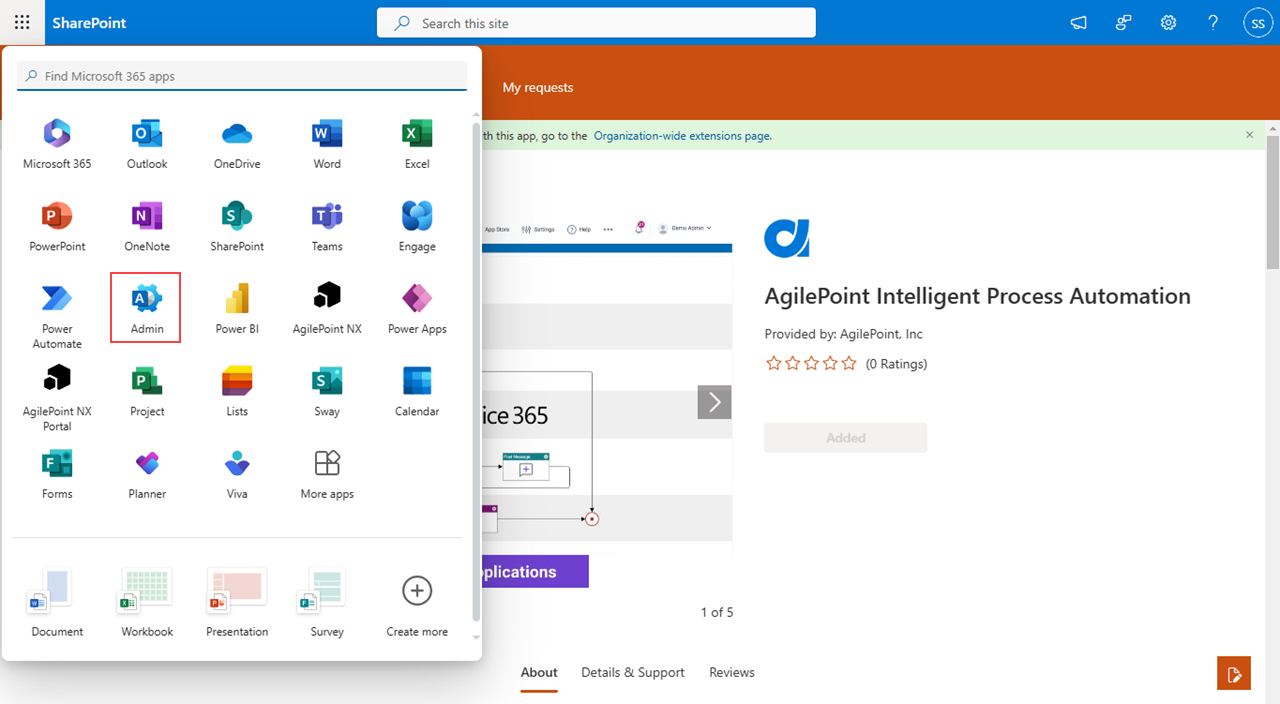
The Microsoft 365 admin center screen opens in a new tab.
- On the Microsoft 365 admin center screen, click Show all.
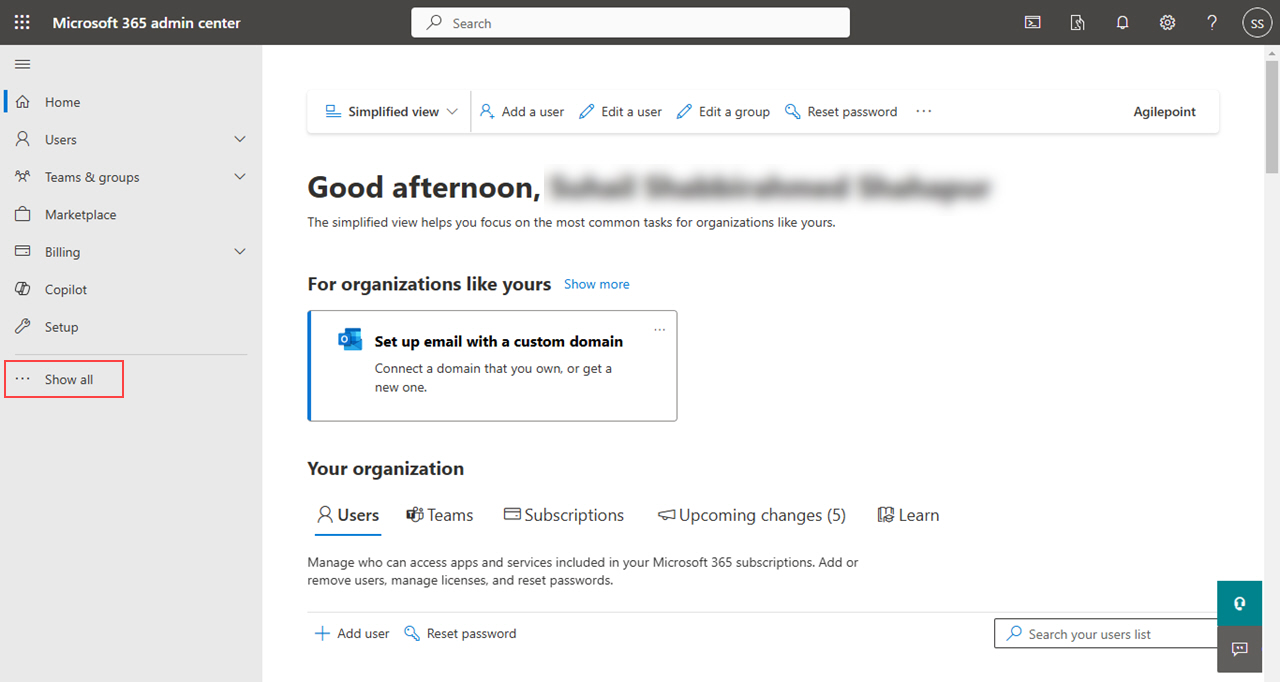
- Click SharePoint.
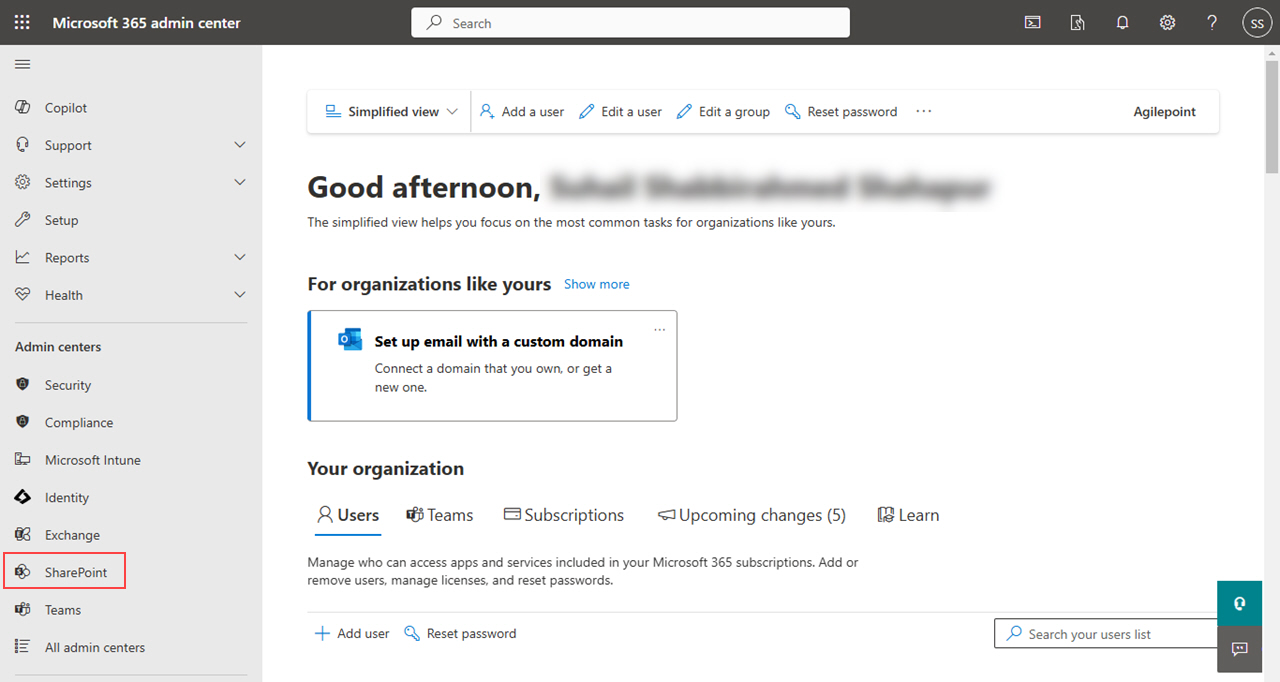
The SharePoint admin center screen opens in a new tab.
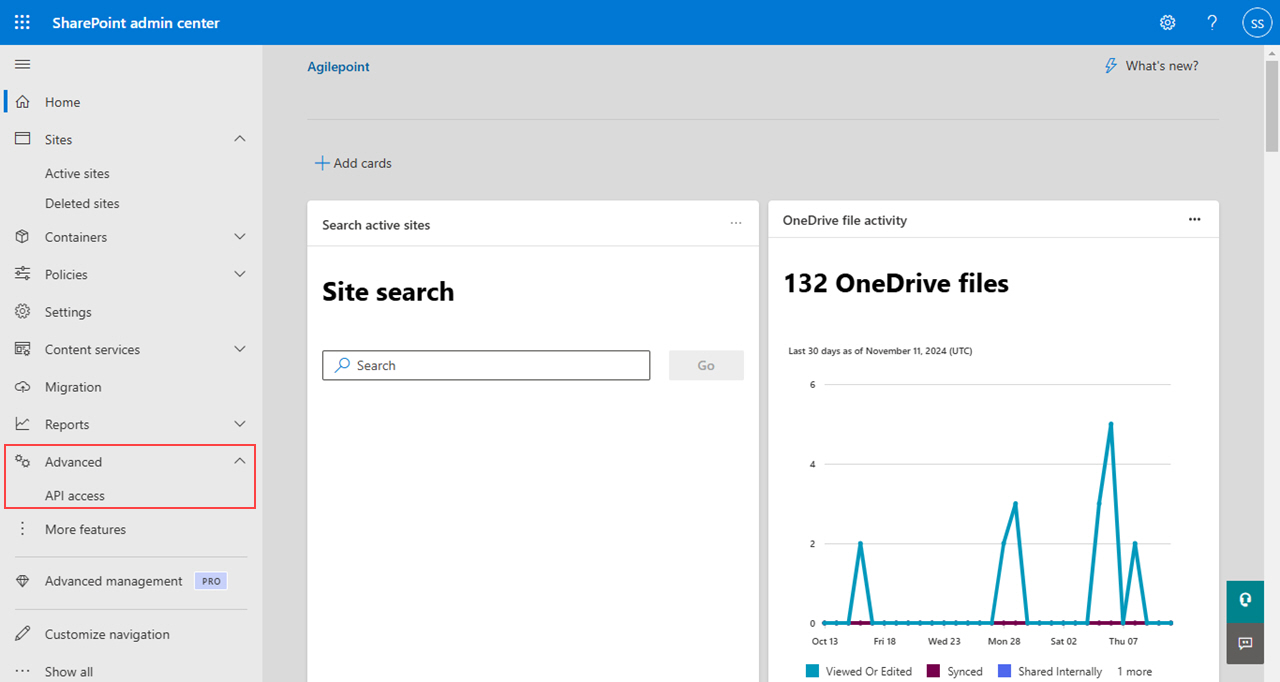
- On the SharePoint admin center screen, click Advanced > API access.
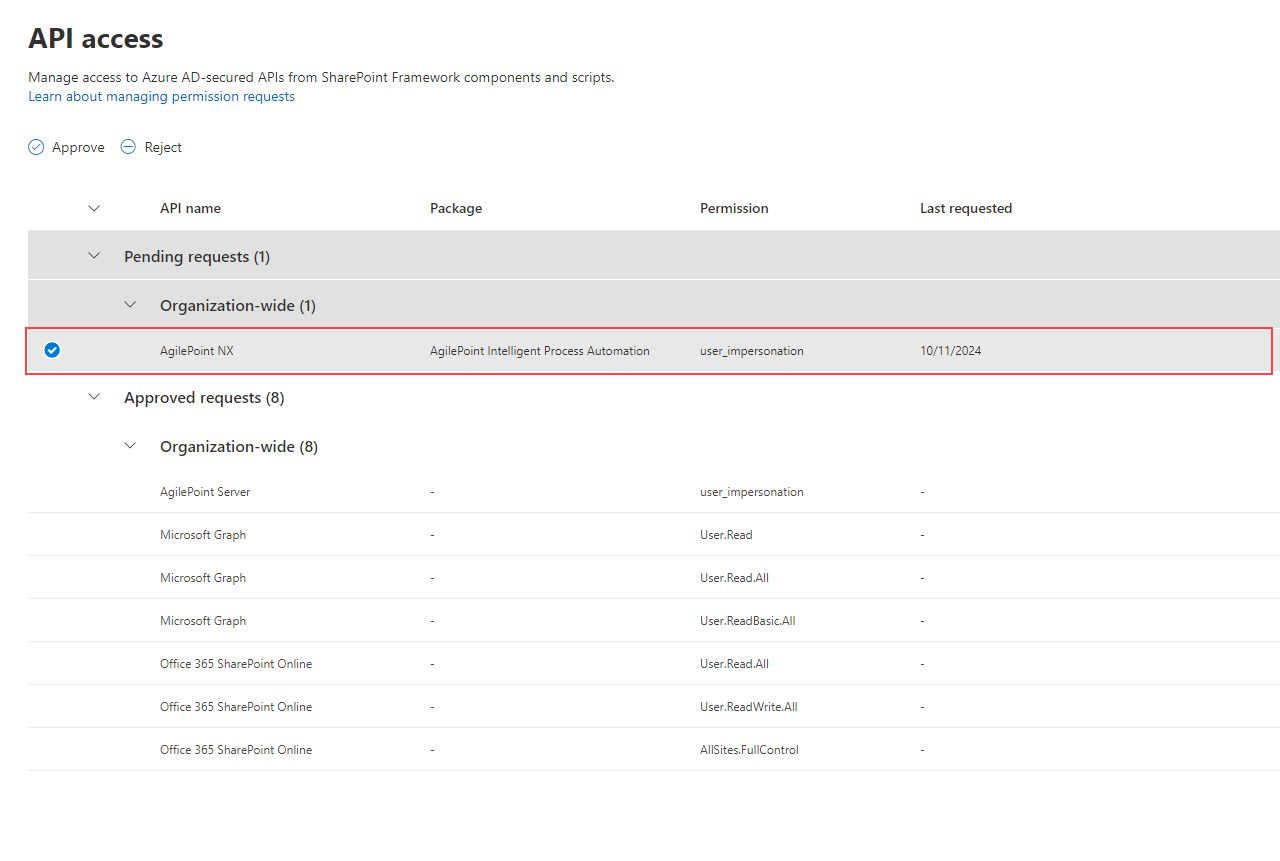
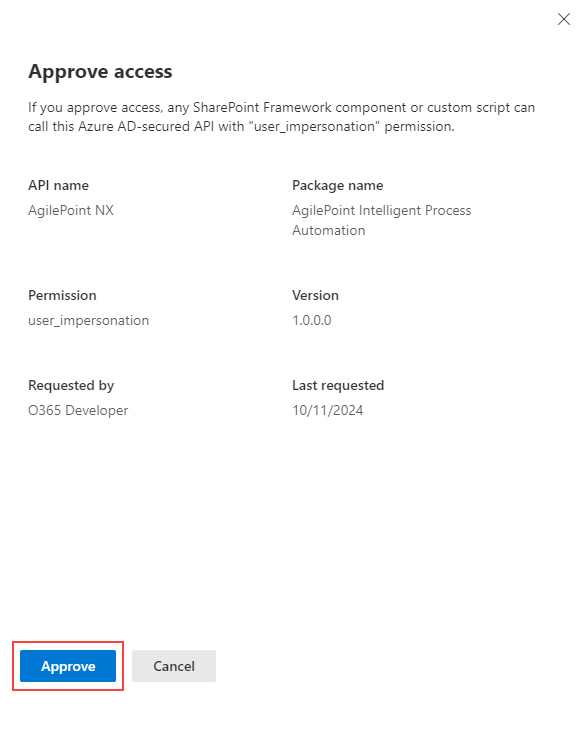
- On the API access screen, in the Pending requests section, select AgilePoint NX.
- Click Approve.
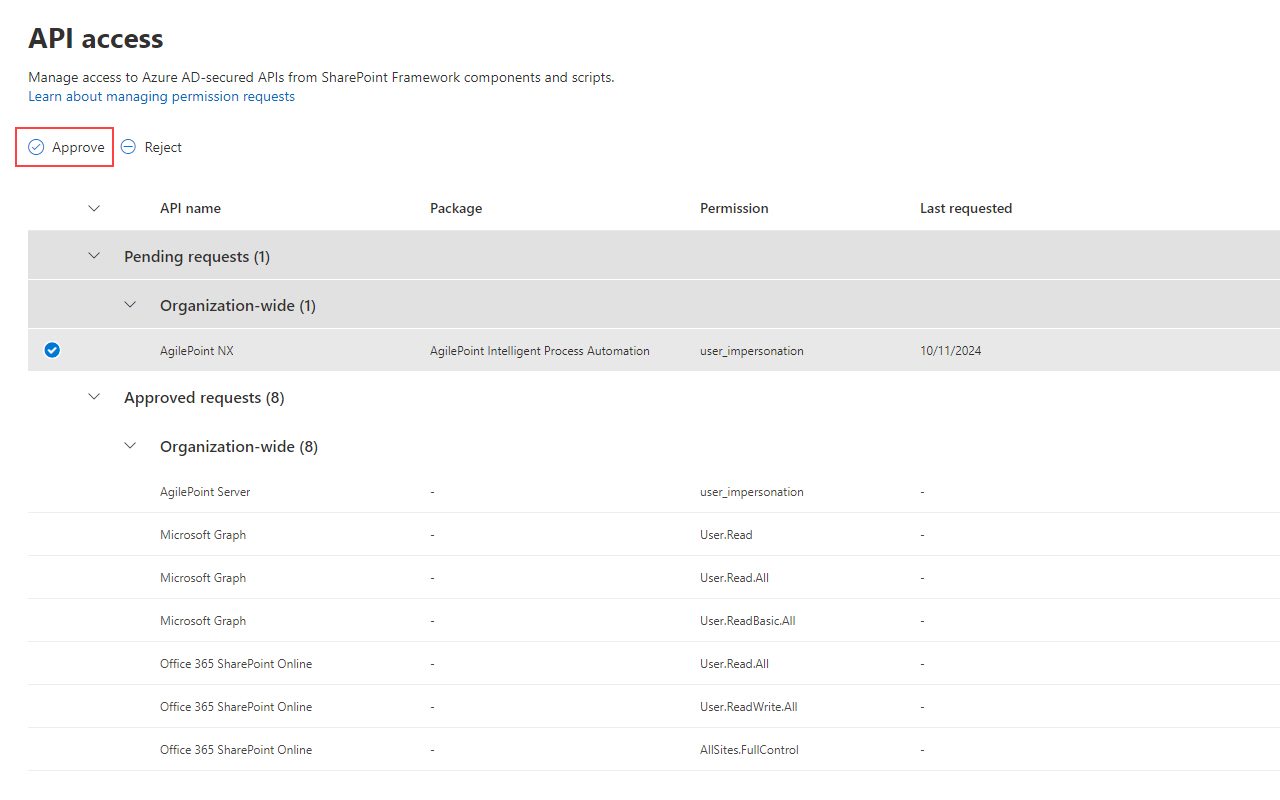
- On the Approve access screen, click Approve.
 The API access screen shows the AgilePoint NX API in the Approved requests section.
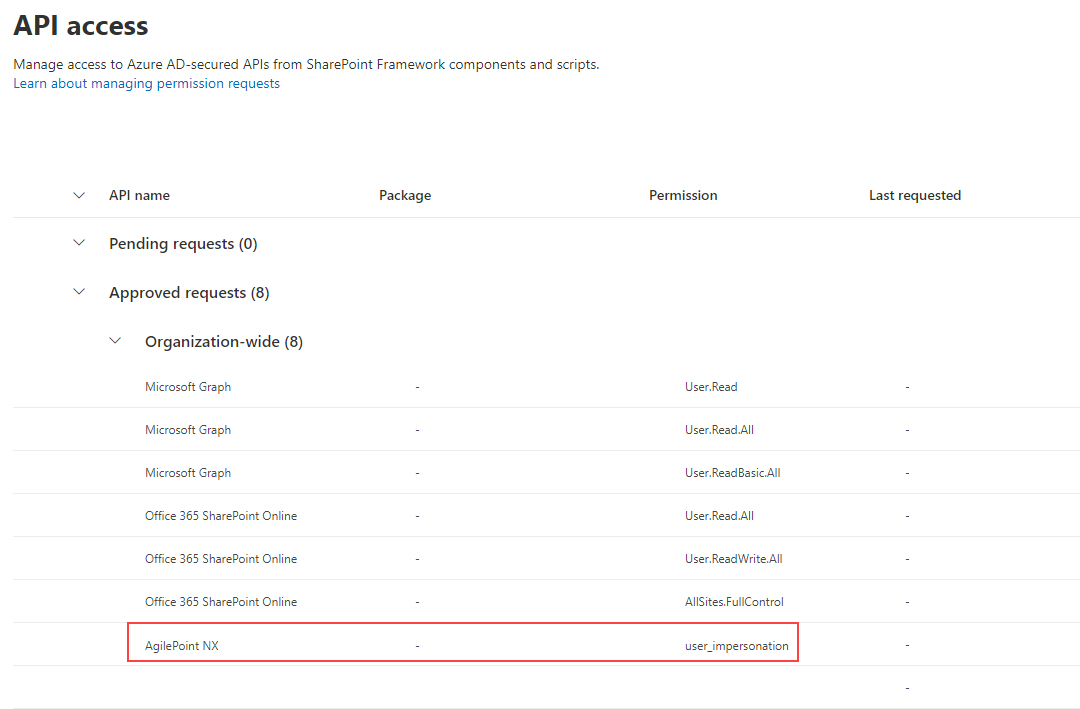
Step 5: (AgilePoint NX OnPremises) Configure the API Permissions for the AgilePoint Intelligent Process Automation App
To configure the API permissions for the AgilePoint Intelligent Process Automation app to connect to AgilePoint Server in an AgilePoint NX OnPremises environment, Microsoft recommends running a PowerShell script to grant the API Permission for the AgilePoint Intelligent Process Automation app. To run the PowerShell script, do the procedure in this topic.
Good to Know
- This procedure is for AgilePoint NX OnPremises and AgilePoint NX PrivateCloud. For AgilePoint NX OnDemand (public cloud), refer to Step 4: (AgilePoint NX OnDemand) Configure the API Permissions for the AgilePoint Intelligent Process Automation App.
Procedure
- On the AgilePoint Server machine, in a text editor, copy and paste this PowerShell command:
$appID = "[app ID for AgilePoint SSO Entra ID Authentication]" $scope = "user_impersonation" $SPFxAppID = "08e18876-6177-487e-b8b5-cf950c1e598c" $objectGrant = $null Connect-MgGraph -Scopes "Application.ReadWrite.All", "Directory.ReadWrite.All" -NoWelcome try { $sPFxSP = Get-MgServicePrincipal -Filter "appid eq '$sPFxAppID'" -ErrorAction Stop $resourceSP = Get-MgServicePrincipal -Filter "appid eq '$appID'" -ErrorAction Stop $oGrants = Get-MgServicePrincipalOauth2PermissionGrant -ServicePrincipalId $sPFxSP.Id -ErrorAction Stop foreach ($item in $oGrants) { if ($item.ResourceId -eq $resourceSP.Id) { $objectGrant = $item break } } if ($null -ne $objectGrant) { if ($objectGrant.Scope | Select-String $scope -Quiet) { throw "Scope has already been granted" } $objectGrant.Scope += " $scope" Update-MgOauth2PermissionGrant -OAuth2PermissionGrantId $objectGrant.Id -Scope $objectGrant.Scope -ErrorAction Stop | Out-Null } else { $params = @{ clientId = $sPFxSP.Id ConsentType = "AllPrincipals" ResourceId = $resourceSP.Id scope = $scope } New-MgOauth2PermissionGrant -BodyParameter $params -ErrorAction Stop | Out-Null } Write-Host "Permissions set for SPFx app with ID $appID" } catch { Write-Host "The following error occurred: $($_.Exception.Message)" -ForegroundColor Red } finally { Disconnect-MgGraph Write-Host "Command completed." } - Change the value for the variable $appID.
Specify the app ID for the AgilePoint Server app registered in Microsoft Entra ID for AgilePoint SSO Entra ID Authentication.
Example:
$appID = "a7565719-ecad-4d79-a3eb-abc15360g2a4"
- Open the PowerShell command line tool.
- Copy the modified PowerShell command, and paste it in the PowerShell command line.
- In PowerShell, click Run.
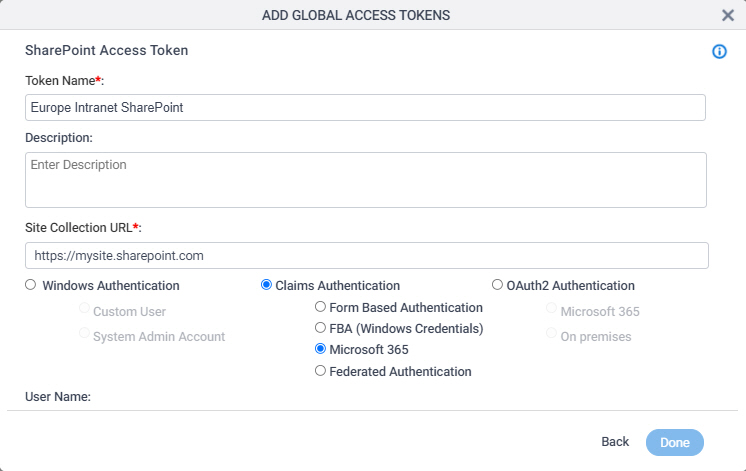
Step 6: Create an Access Token for SharePoint
To connect the AgilePoint Intelligent Process Automation app to AgilePoint NX, an access token is required. You must create an access token for SharePoint.
Step 7: Add the AgilePoint Configuration List to the SharePoint Site
To add the SharePoint site to AgilePoint NX, do the procedure in this topic. When you add the SharePoint site, it creates the AgilePoint Configuration List on your SharePoint site.
Good to Know
- You can add the AgilePoint Work Center web part to a SharePoint site before or after you add the Configuration List in AgilePoint NX. However, the web part will not work until the Configuration List is added to the site in AgilePoint NX. It is recommended to add the Configuration List first, but this is not required.
How to Start
- Click Settings.
- Click SharePoint Online App.

Procedure
- On the SharePoint Online Sites screen, click Add.
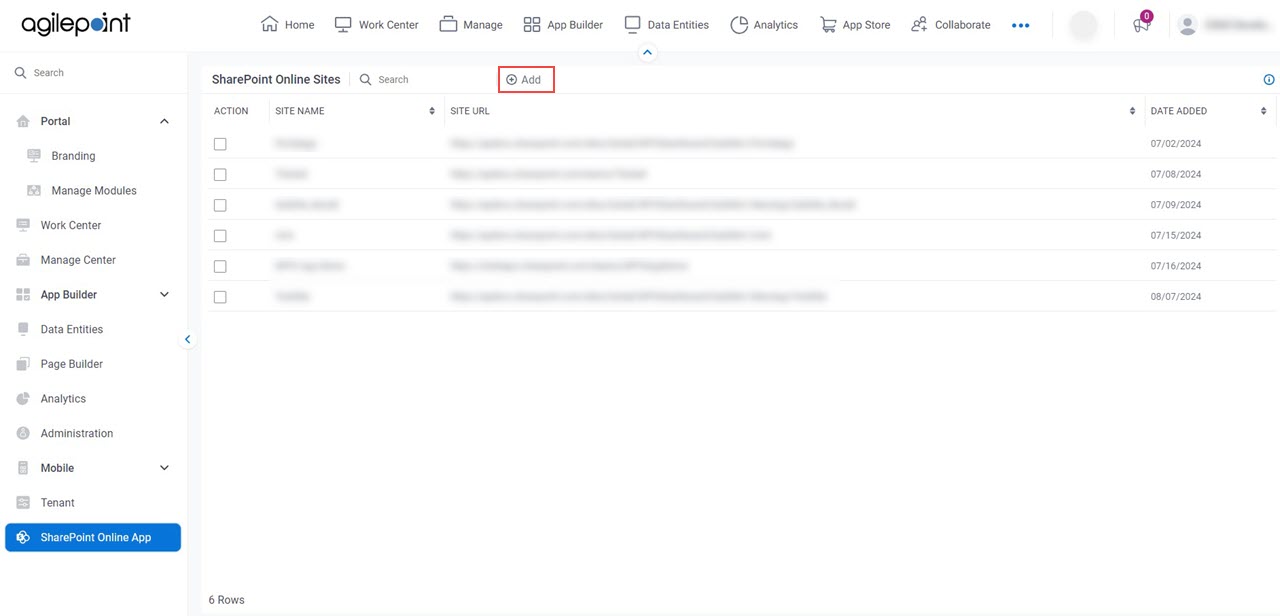
- On the Site Configuration screen, in the Site URL field, enter the URL for the SharePoint site that uses the AgilePoint Intelligent Process Automation app.
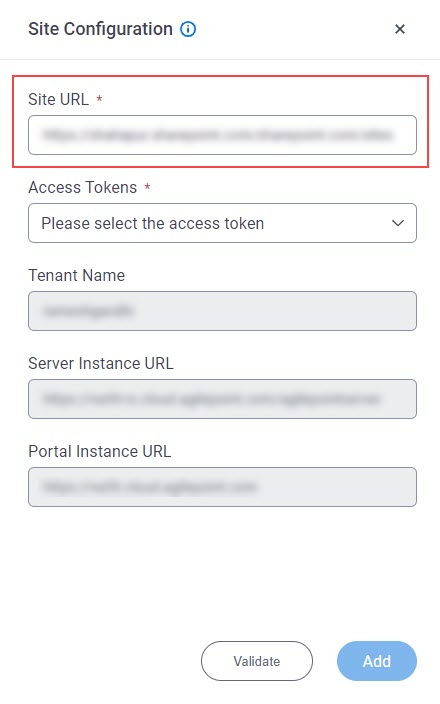
- In the Access Tokens field, select the access token you created to connect the AgilePoint Intelligent Process Automation app to AgilePoint NX.
For more information, refer to Step 2: Create an Access Token for SharePoint.
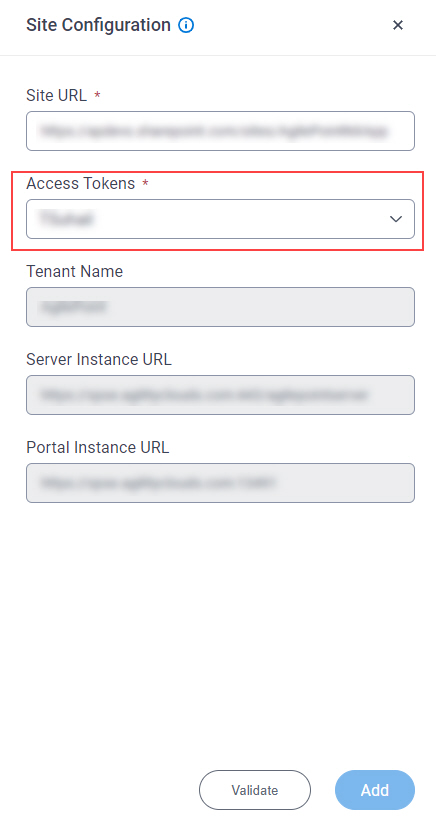
- Click Validate.
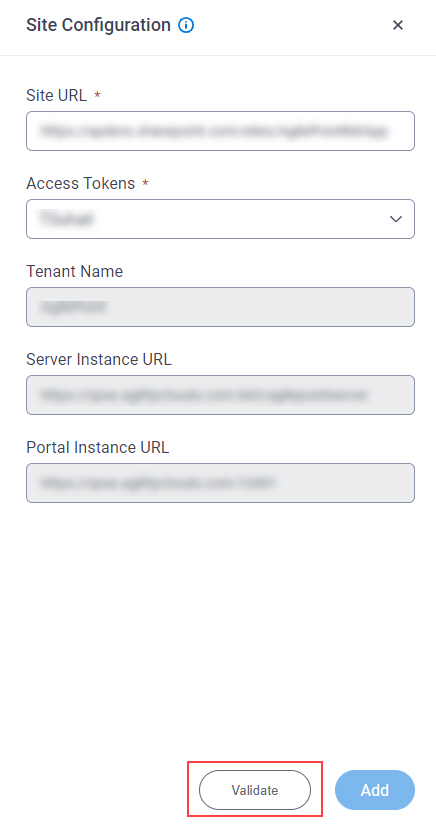
If there are no errors in the connection, the message Access token validated successfully shows.
- Click Add.
 The SharePoint Online Sites screen shows the SharePoint site.
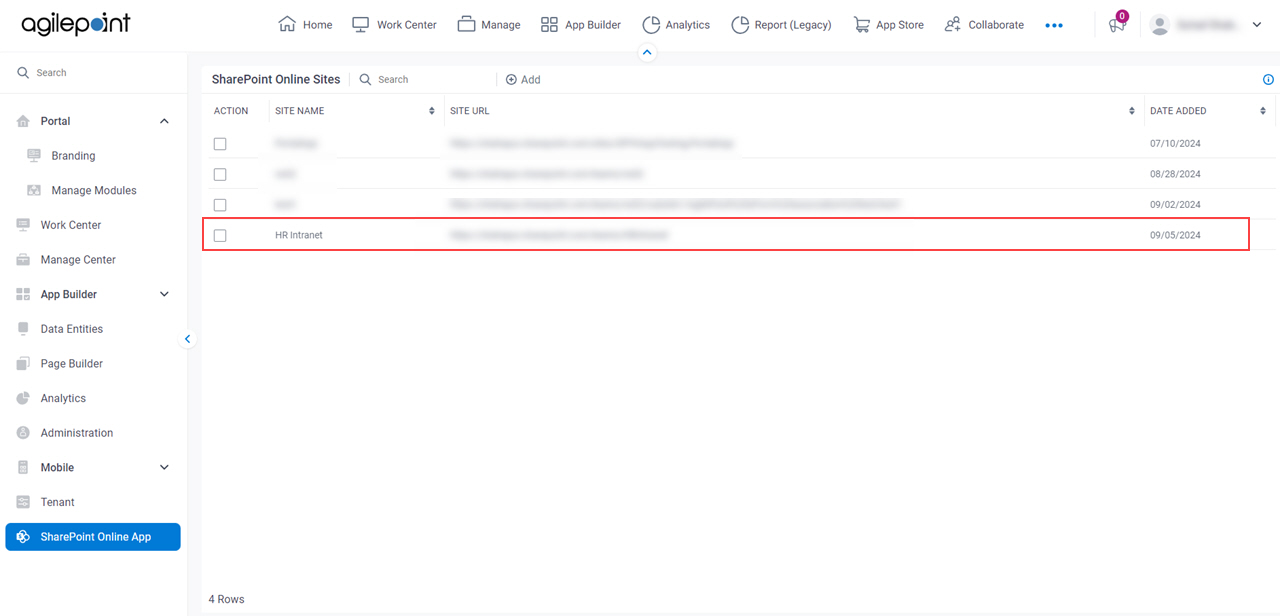
Step 8: (Optional) Configure the AgilePoint Configuration List
When you add the SharePoint site to AgilePoint NX, a new SharePoint list is created called the AgilePoint Configuration List, which configures the settings for the AgilePoint Intelligent Process Automation app for Microsoft 365.
To configure the AgilePoint Configuration List, refer to AgilePoint Configuration List for SharePoint (Microsoft 365, Modern).
Good to Know
- When the AgilePoint Configuration List is added to Microsoft 365 because it is created within the AgilePoint NX Portal, the main configuration values, such as Server Instance URL, and Tenant Name, are configured by default.
Step 9: Add the AgilePoint Work Center Web Part To The SharePoint Site
How to Start
- In SharePoint for Microsoft 365, open the SharePoint site where you want to add the web part.
Procedure
- On the SharePoint site, click New > Page.
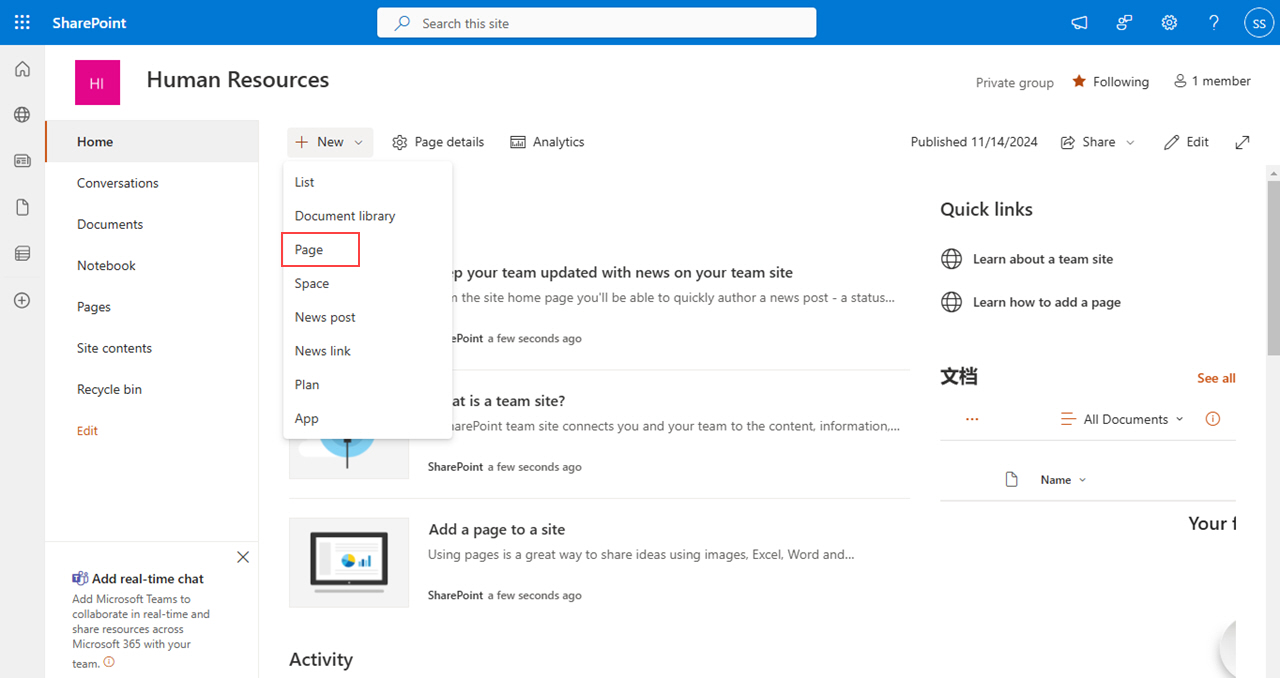
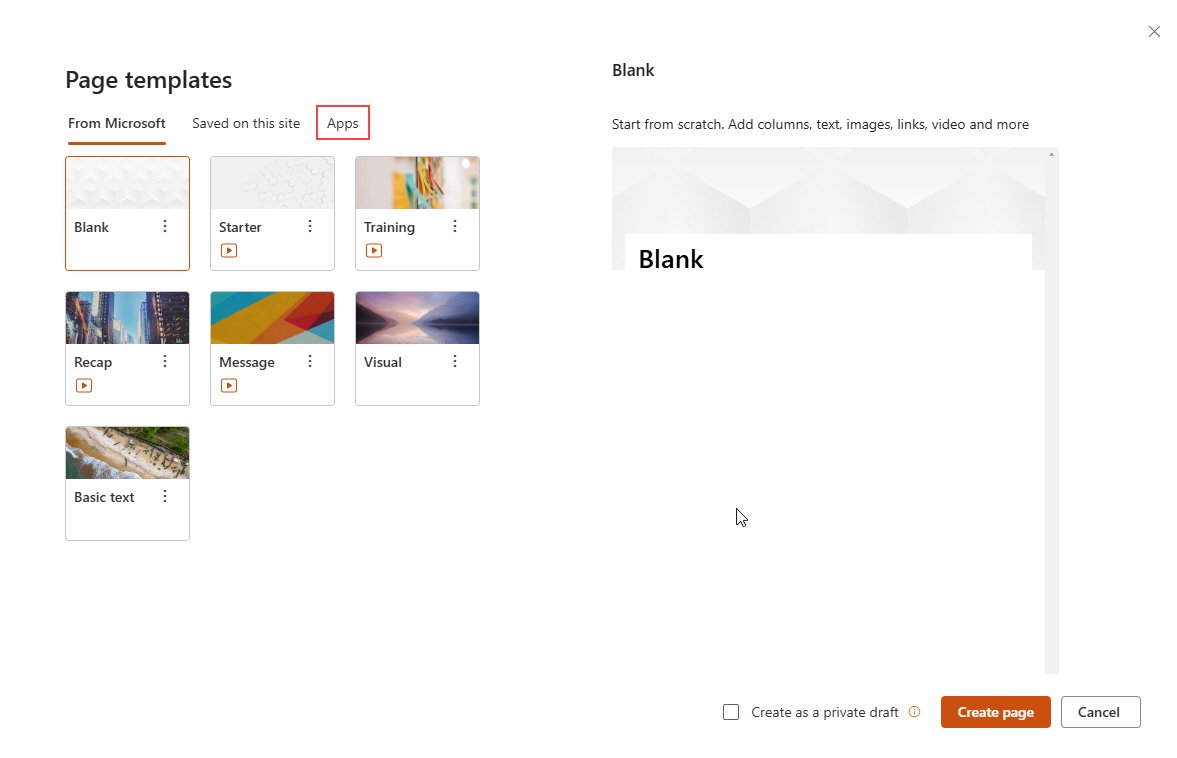
- On the Page templates, click Apps.
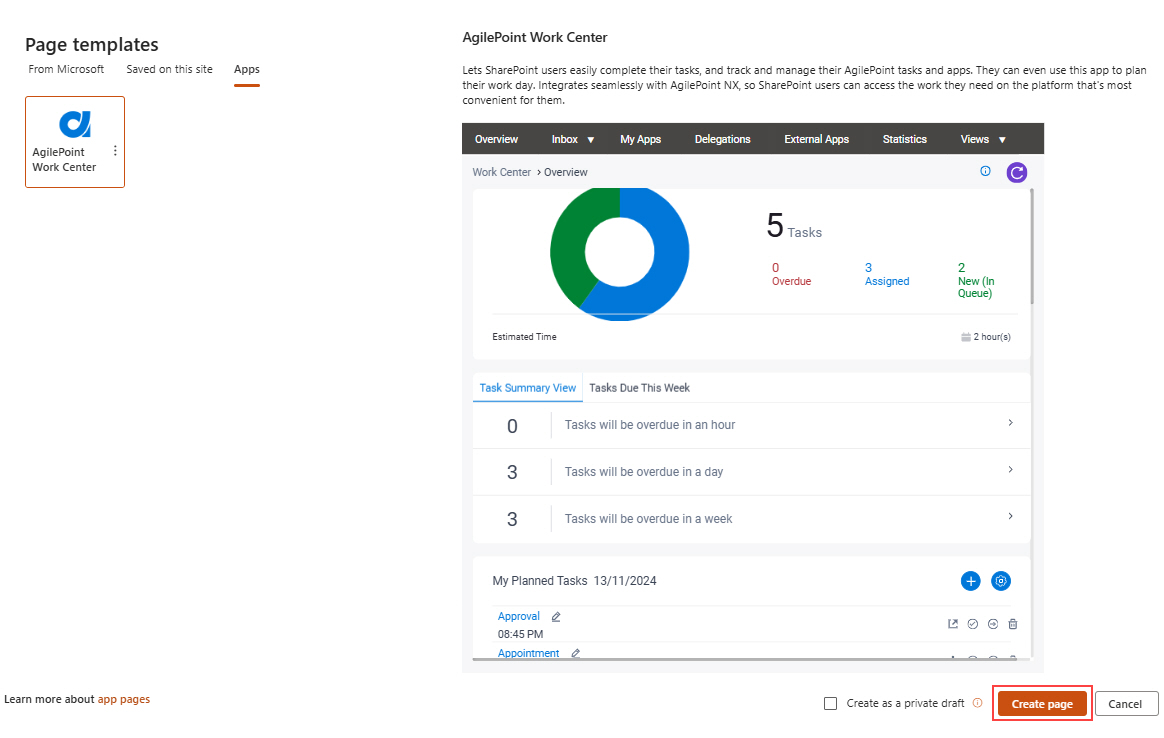
- Click AgilePoint Work Center.

- Click Create Page.
- On the App page details screen, in the Title field, enter the name for the SharePoint web page.
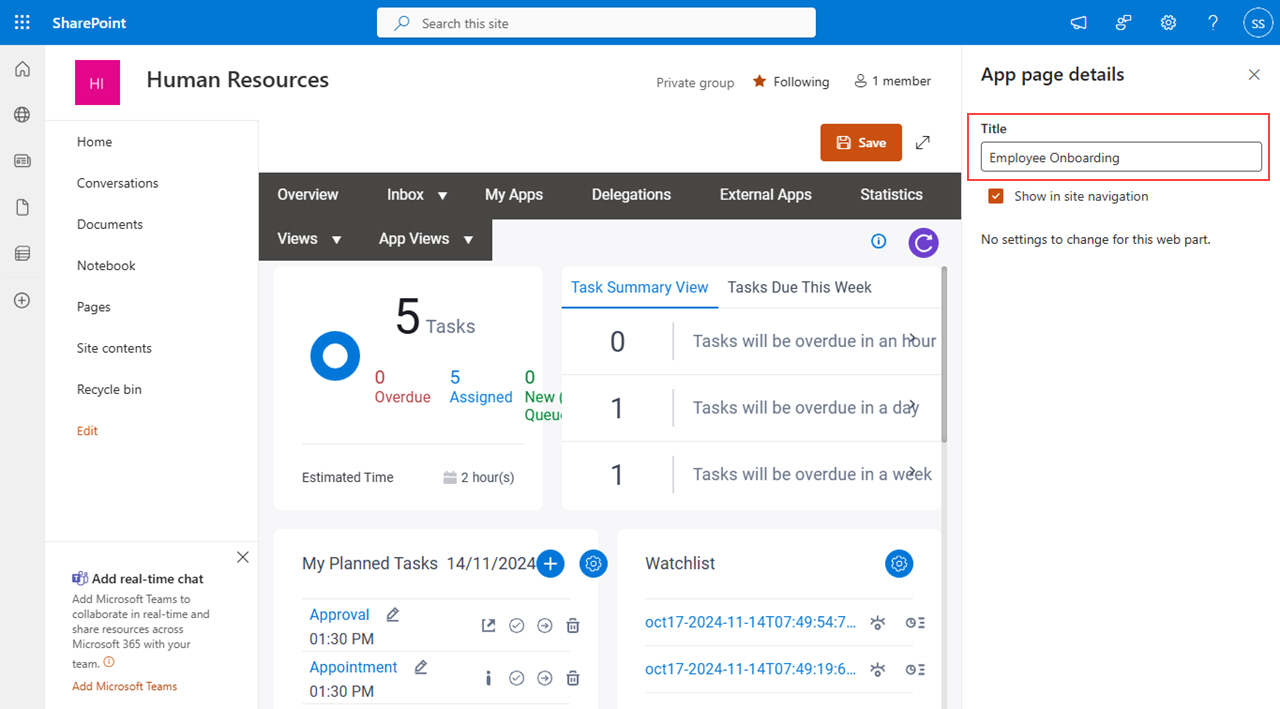
- Click Save.
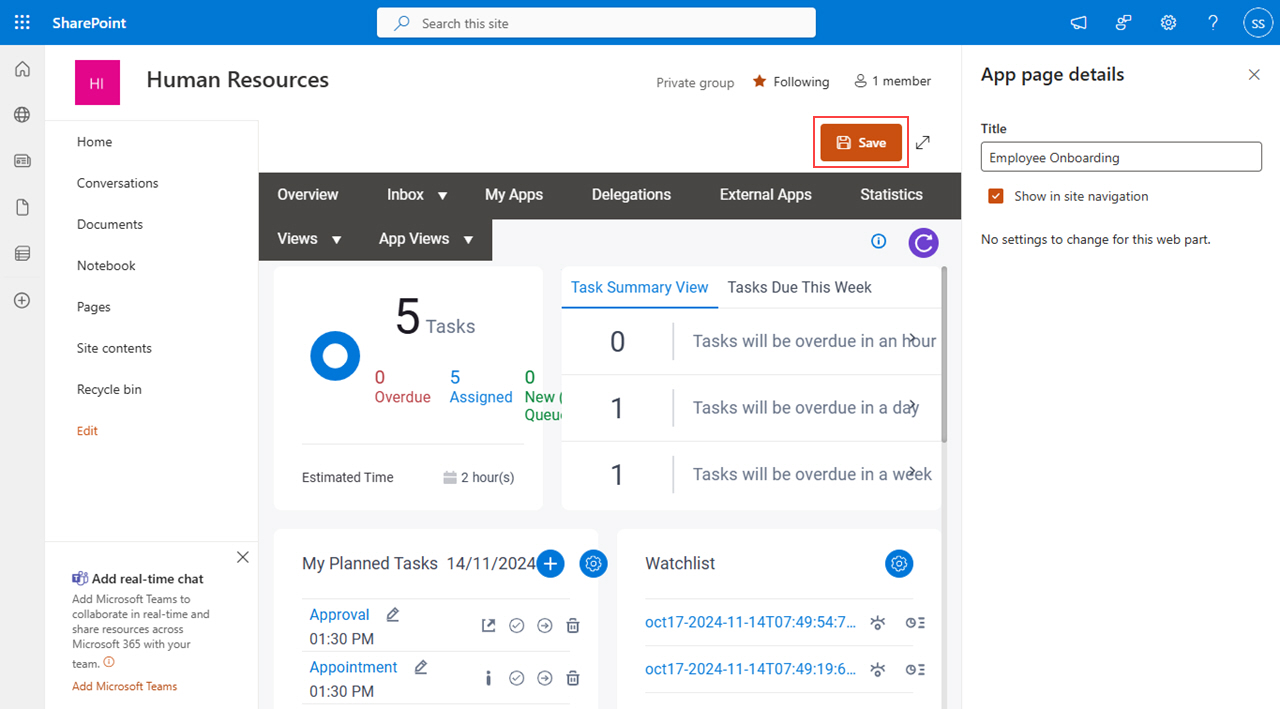
The SharePoint site shows the AgilePoint Work Center web part.
- If you have added the AgilePoint Configuration List to your SharePoint site, the Work Center data shows.
- If you have not added the Configuration List to your SharePoint site, an error shows.
For more information, refer to Step 7: Add the AgilePoint Configuration List to the SharePoint Site.

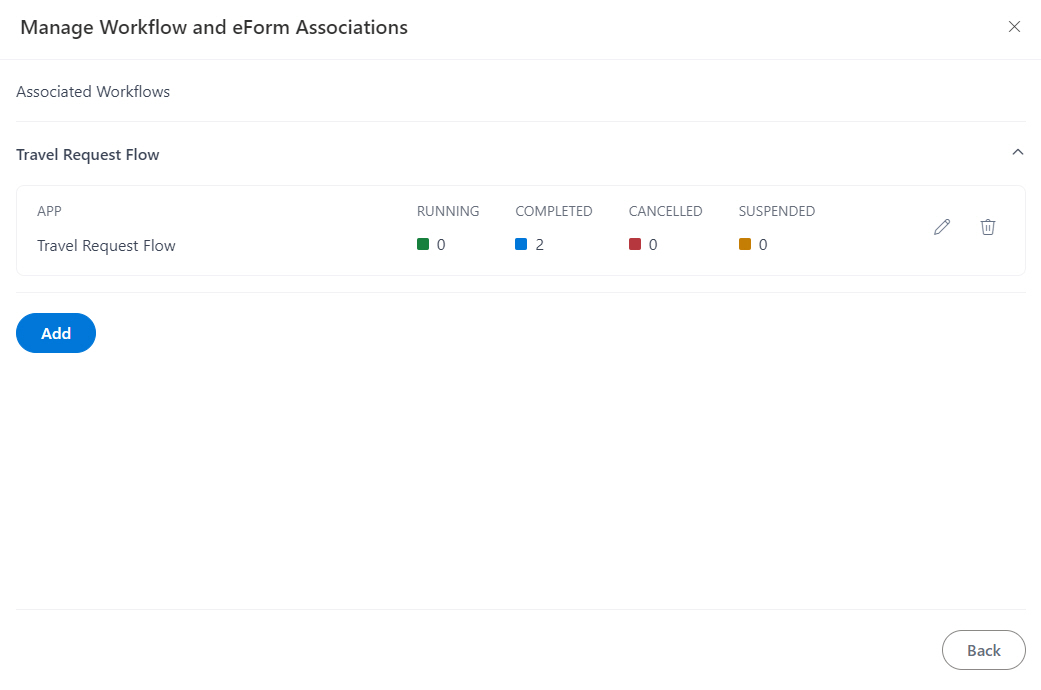
Step 10: (Optional) Associate a Workflow with an AgilePoint NX App (Process-Based App)
To use a process-based app in SharePoint, you must associate the app with a SharePoint list. To associate the app with a SharePoint list, do the procedure in this topic.
Examples
- (External) AgilePoint Intelligent Process Automation App for SharePoint Online
- Examples - Step-by-step use case examples, information about what types of examples are provided in the AgilePoint NX Product Documentation, and other resources where you can find more examples.
Good to Know
- When you associate a process-based app with a SharePoint list, it enables the app to start when you create a new item or change an item on your SharePoint site.
- This procedure is for process-based apps. To associate a workflow with form-based apps, refer to Step 11: (Optional) Associate a Workflow with an AgilePoint NX App (Form-Based App).
How to Start
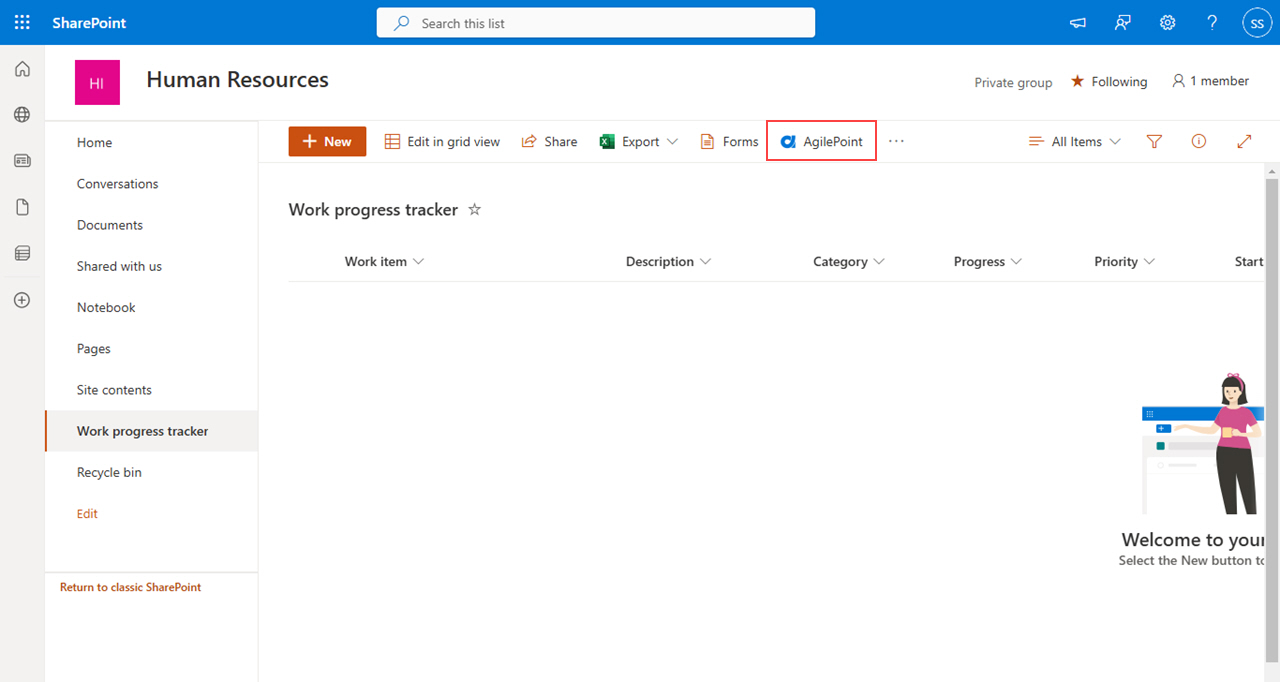
- In SharePoint for Microsoft 365, open the SharePoint site to associate a process-based app with a SharePoint list.
- In the left pane, click Documents.
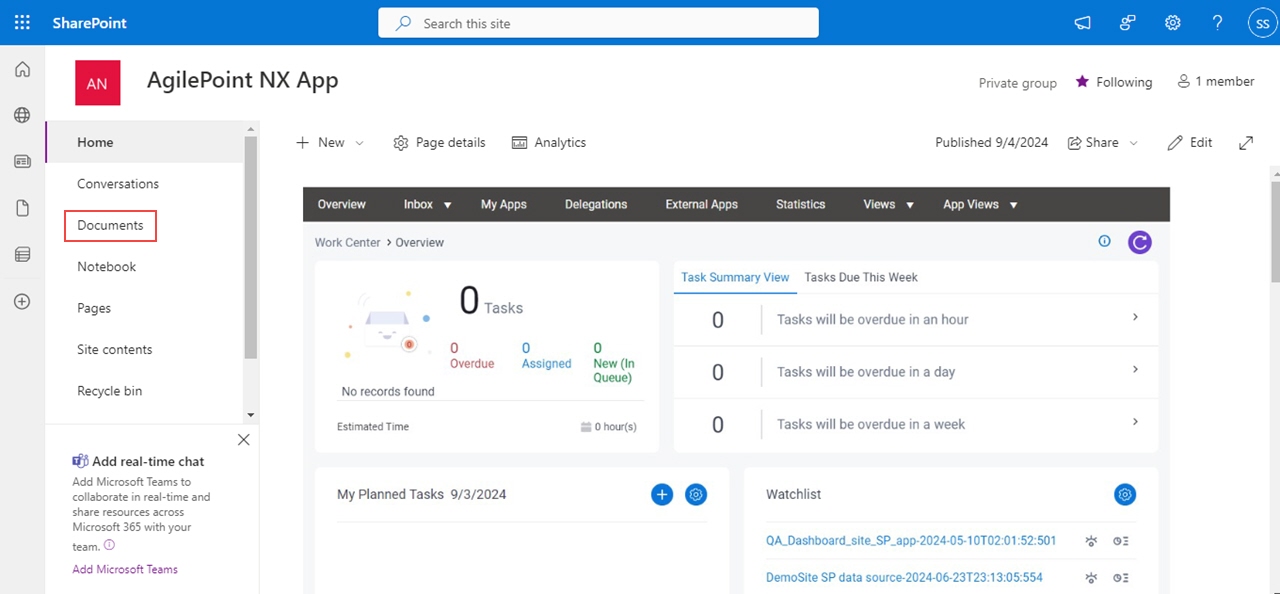
- On the Documents tab, click AgilePoint.
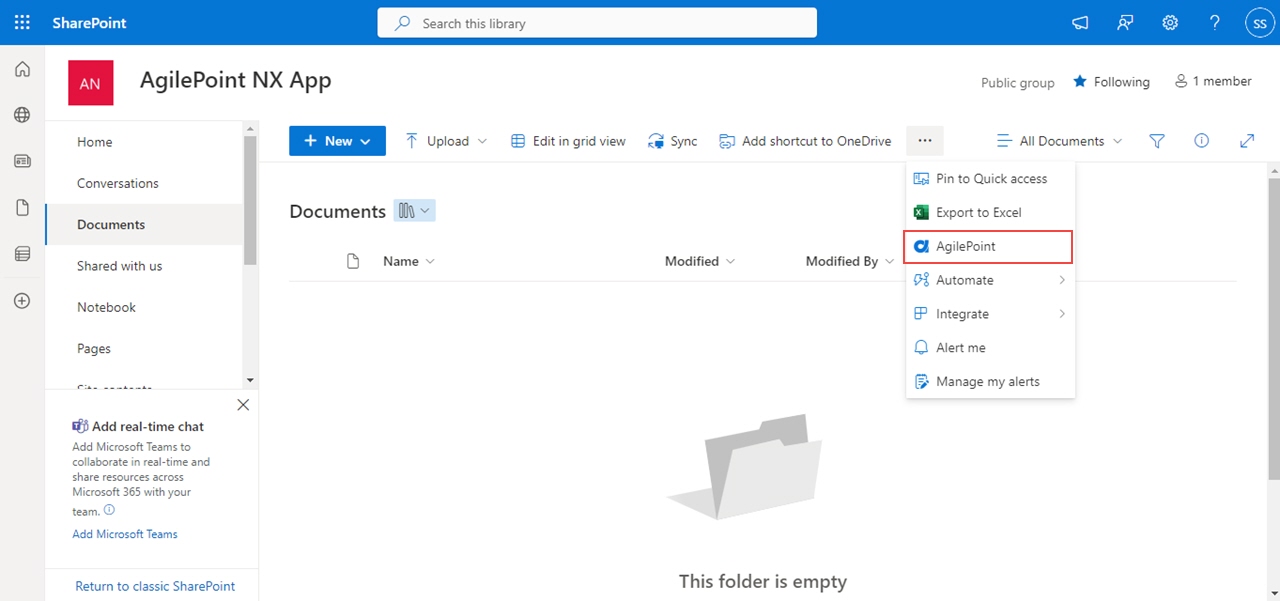
Procedure
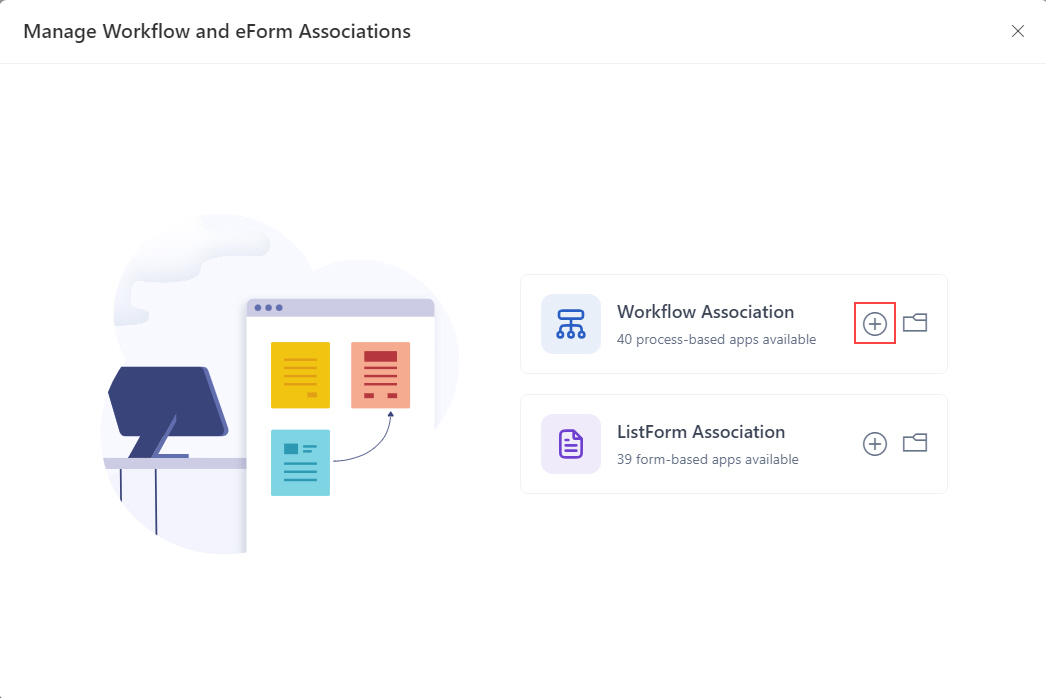
- On the Manage Workflow and eForm Associations screen, in Workflow Association, click Add New Workflow Association
 .
.
- In the Workflow Status Column Name field, enter the name of the SharePoint workflow to create on your site.
SharePoint uses this workflow to connect the AgilePoint NX app to the associated SharePoint list.
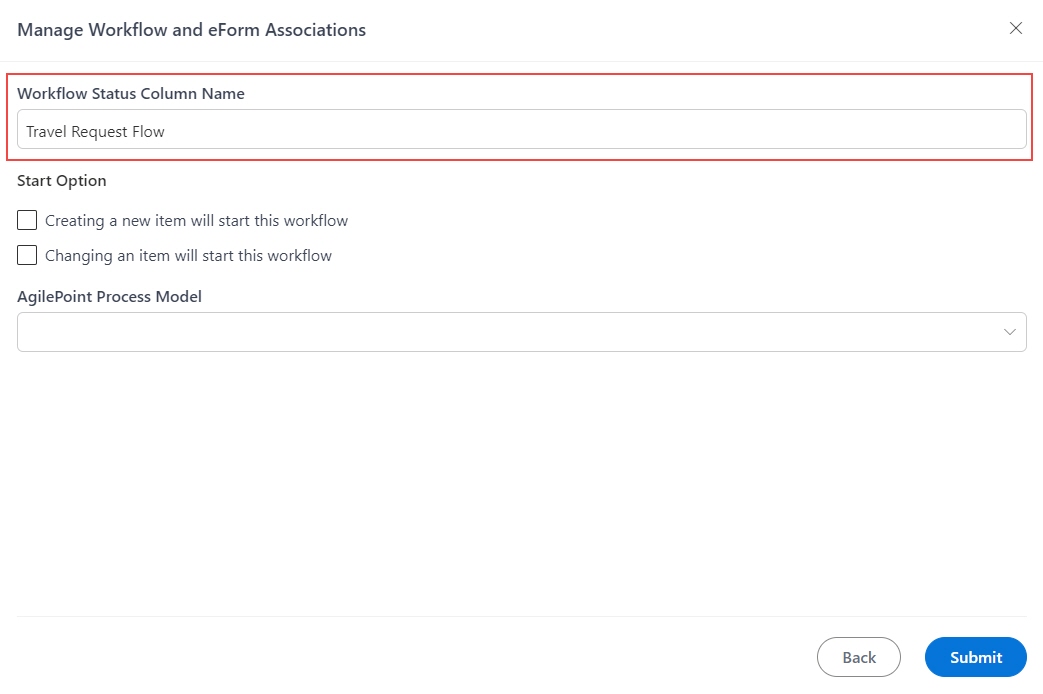
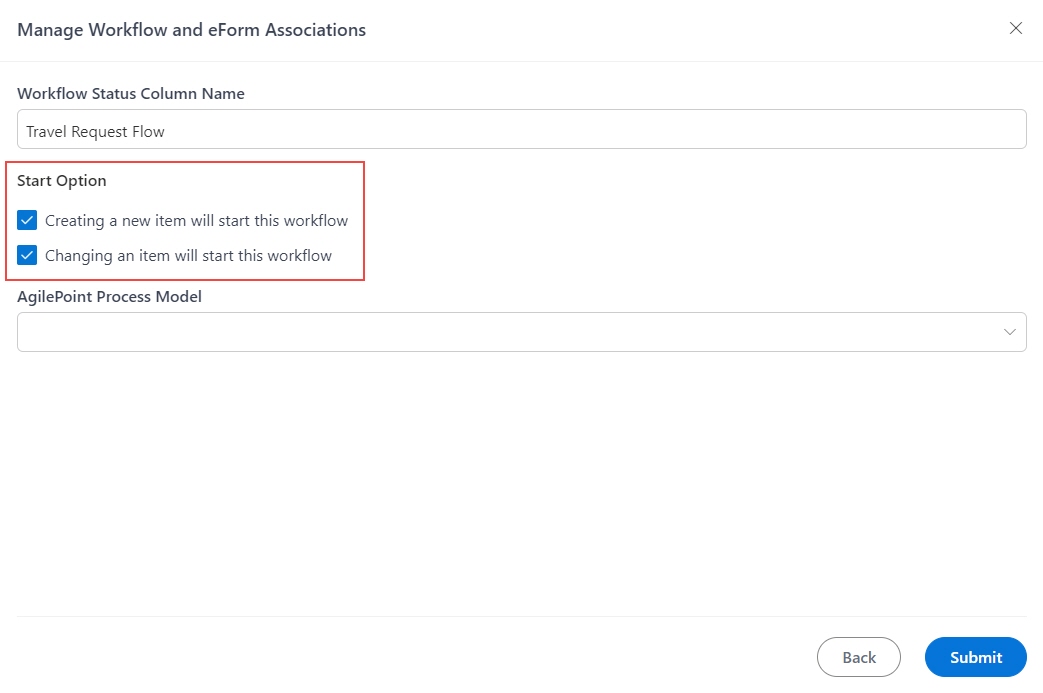
- In the Start Option section, select the events in the SharePoint list that will to start an instance of the AgilePoint NX app.
- Creating a new item will start this workflow
- Changing an item will start this workflow
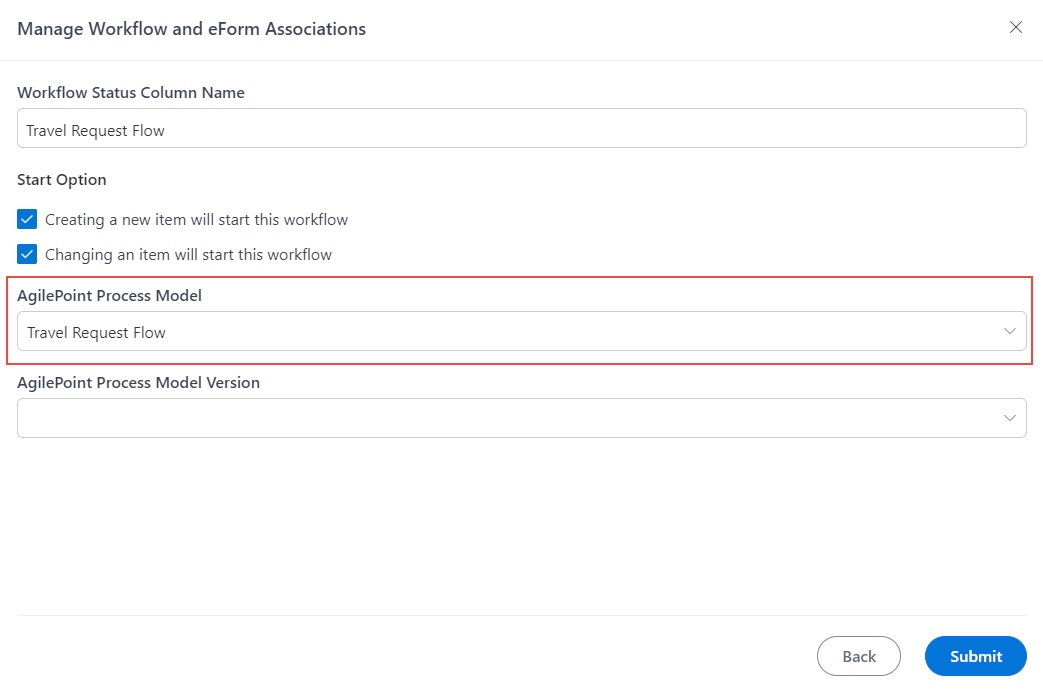
- In the AgilePoint Process Model field, select a process model from the list.
- In the AgilePoint Process Model Version field, select the process model version to use for your SharePoint workflow.
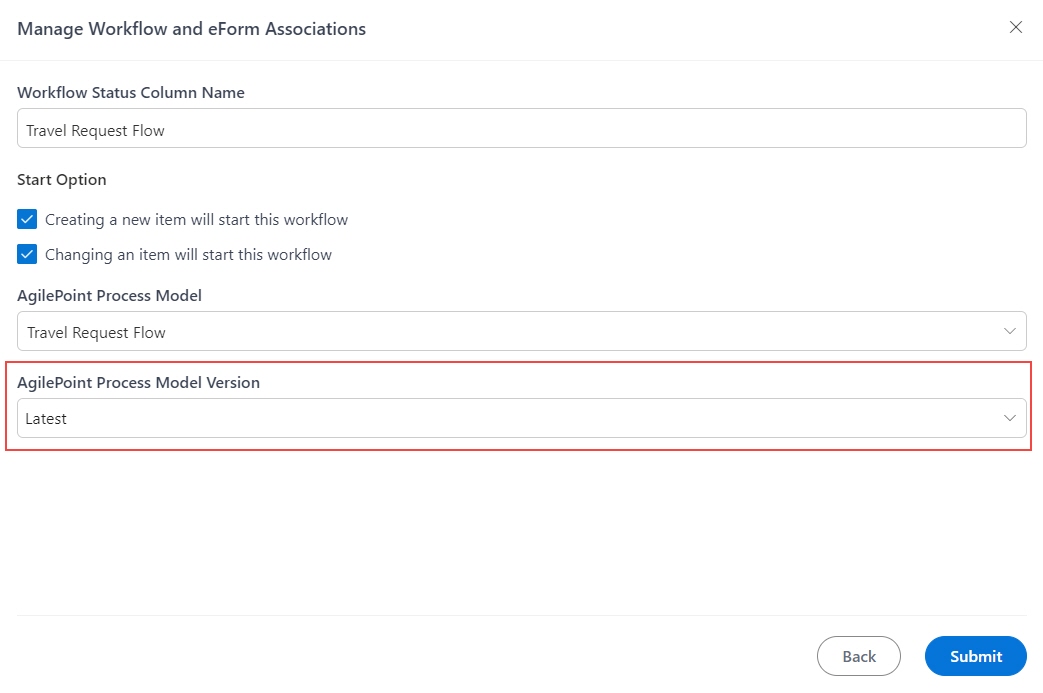
- Click Submit.
The Manage Workflow and eForm Associations screen shows a confirmation message.
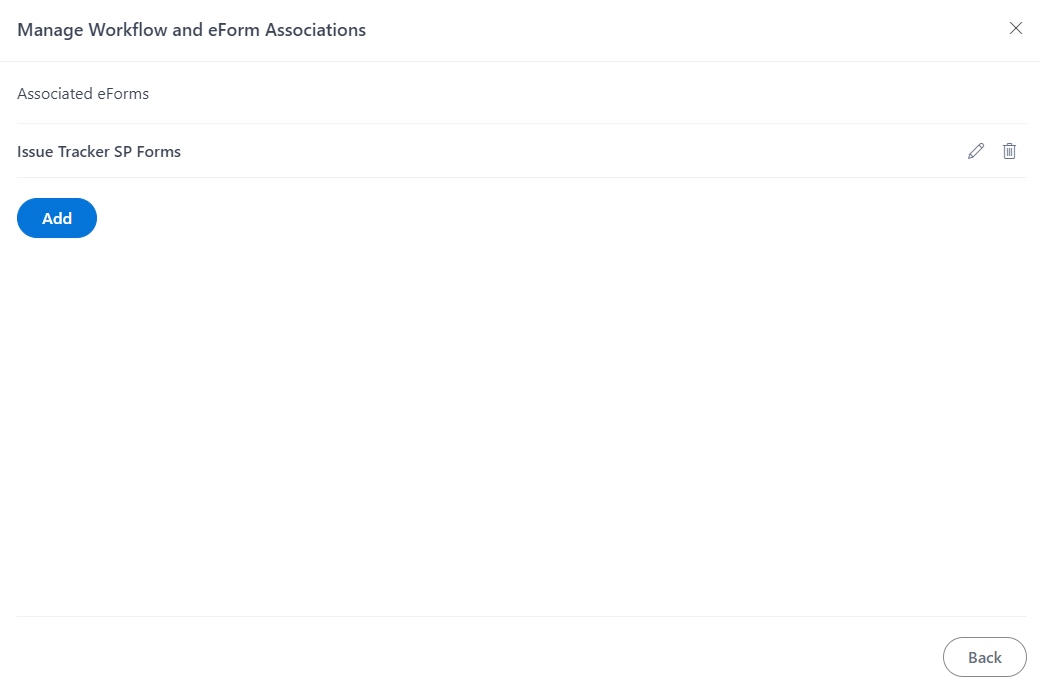
Step 11: (Optional) Associate a Workflow with an AgilePoint NX App (Form-Based App)
To use a form-based app in SharePoint, you must associate the app with a SharePoint list. To associate the app with a SharePoint list, do the procedure in this topic.
Prerequisites
- A SharePoint list.
Examples
- (External) AgilePoint Intelligent Process Automation App for SharePoint Online
- Examples - Step-by-step use case examples, information about what types of examples are provided in the AgilePoint NX Product Documentation, and other resources where you can find more examples.
Good to Know
- When you associate a form-based app with a SharePoint list, it replaces the default SharePoint list forms to use in your SharePoint site.
- This procedure is for form-based apps. To associate a workflow with process-based apps, refer to Step 10: (Optional) Associate a Workflow with an AgilePoint NX App (Process-Based App).
How to Start
- In SharePoint for Microsoft 365, open the SharePoint list to associate a form-based app.

- On the SharePoint list, click AgilePoint.
Procedure
- On the Manage Workflow and eForm Associations screen, in ListForm Association, click Add New Listflow Association .

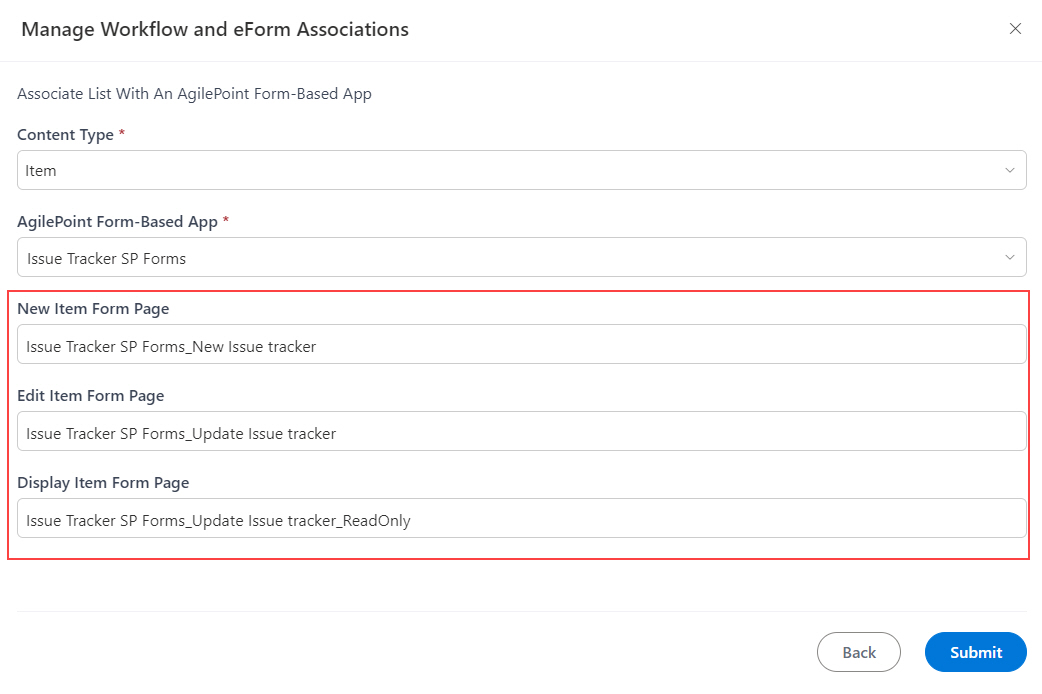
- In the Content Type field, select the content type for the SharePoint list
to organize, manage, and control the content across your SharePoint sites.
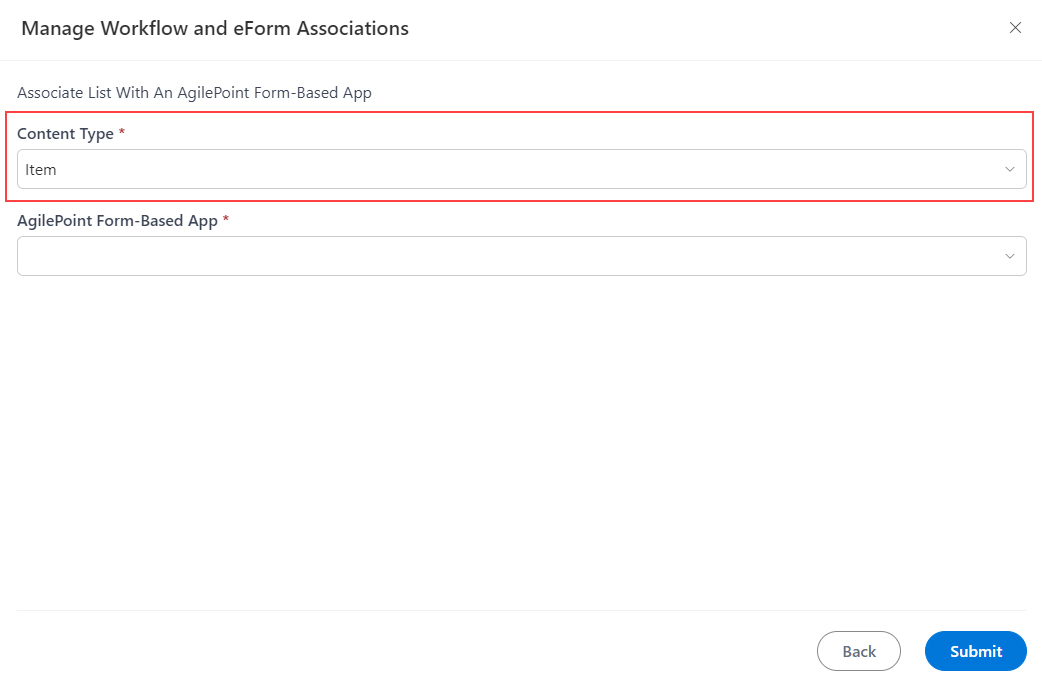
- In the AgilePoint Form-Based App field, select the form-based app to associate with the SharePoint list
and use in place of the default SharePoint list form.
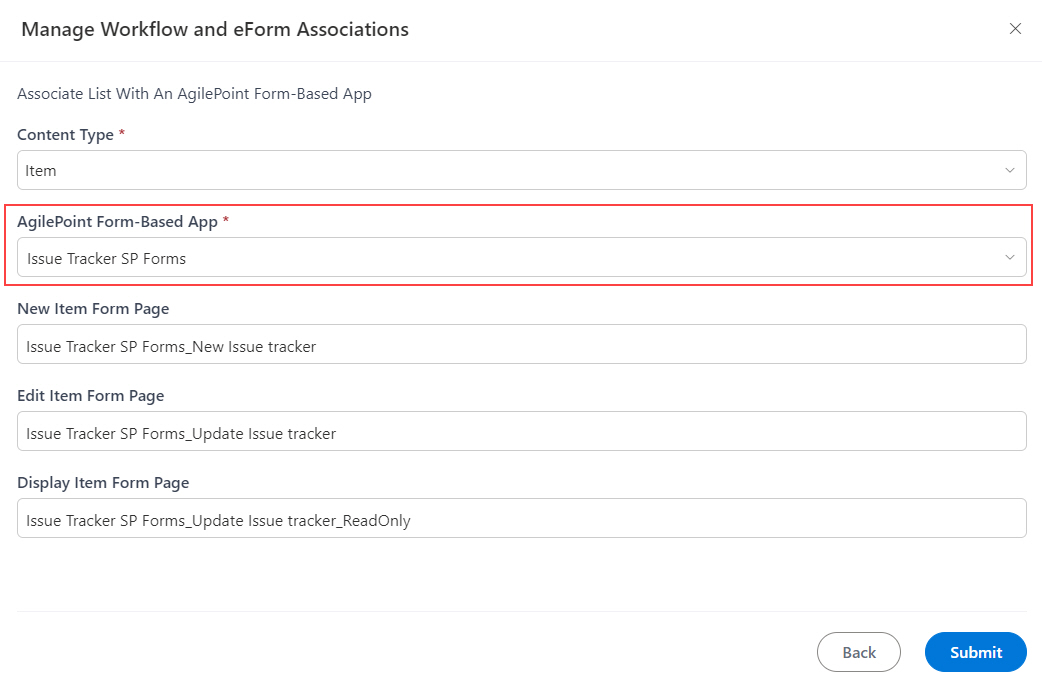 When you select the form-based app in the Agilepoint eForms App field, these fields are populated with these read-only values:
- The New Item Form Page field shows with the New form associated with the form-based app that replaces the default SharePoint list form to create a new list item.
- The Edit Item Form Page field shows with the Update form associated with the form-based app that replaces the default, editable SharePoint list form.
- The Display Item Form Page field shows with the View form associated with the form-based app that replaces the default SharePoint list form.
- Click Submit.
The Manage Workflow and eForm Associations screen shows a confirmation message.