Manage Validation Mask screen

Creates expressions that validate user input in form fields. You can create a validation expression for a specific field, such as comparing the input against specific values. You can also create a validation expression a category of fields, like a telephone number format that is valid for your region or organization.
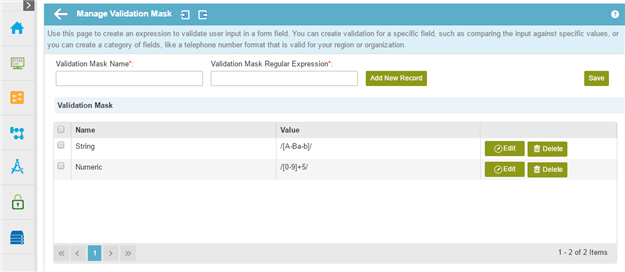
Figure: Manage Validation Mask screen

Manage Validation Mask screen

Video: Manage Your Organization

How to Start

  1. In the Manage Center, click App Builder App Builder icon > eForms Settings.
  2. On the eForms Settings screen, click Validation Mask Validation Mask icon

Fields

Field Name Definition

Import File Import File icon

Opens this Screen:
Import Validation Mask screen
Function of this Screen:
Imports a validation mask specified in an XML file.

Export File Export File icon

Opens this Screen:
Export Validation Mask screen
Function of this Screen:
Exports an XML file with the specified validation mask.

Validation Mask Name

Function:
Specifies the name of the validation mask used to compare form data.
Accepted Values:
One line of text that can have spaces.
Default Value:
None

Validation Mask Regular Expression

Function:
Specifies the regular expression to make sure the user input is correct.
Accepted Values:
A valid regular expression.
Default Value:
None

Delete Delete icon

Function:
Deletes the record from the Name and Value column.

Add New Record

Function:
Adds a new record in the Name and Value columns.

Edit Edit icon

Function:
Changes the name and value of the record.

Update Update icon

Function:
Changes the name and value of the record.
To Open this Field:
  1. Click Edit Edit icon.