Set up AgilePoint Process History in Salesforce
To setup the AgilePoint NX process history for a Salesforce object, do the procedure in this topic.


Prerequisites
- AgilePoint NX App for Salesforce is installed.
How to Start
- In your Salesforce tenant, click Setup.
- In the Build pane, select your Salesforce object.
Procedure
- On the Build pane, in your Salesforce object, click Button, Links and Actions.
- Click New Button or Link.
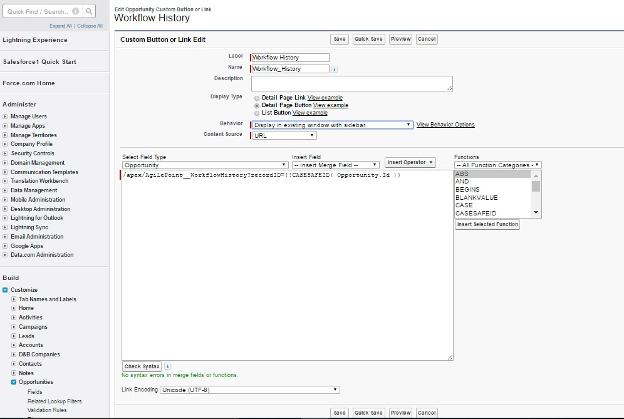
- On the Custom Button or Link Edit screen, in the Label field, enter the label to show on the button.
- In the Name field, enter the name for your button.
- In the Display Type list, select Detail Page Button.
- In the Behavior list, select Display in existing window with sidebar.
- In the Content Source list, select URL.
- In the Formula field, enter this formula.
/apex/AgilePoint__WorkflowHistory?recordID={!CASESAFEID([object ID])}
Example:
/apex/AgilePoint__WorkflowHistory?recordID={!CASESAFEID(Opportunity.Id)}
- Click Check Syntax button to validate the formula.
- Click Save.
- On the Build pane, in your Salesforce object, click Page Layouts.
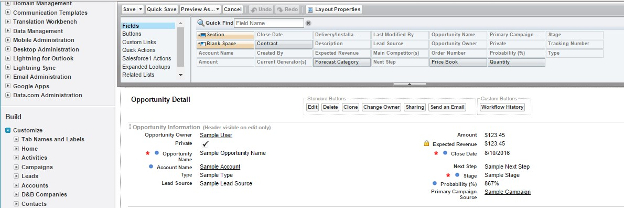
- In the Object Page Layouts screen, click Edit for the page layout in which to show the button.
- In the Page Layout Editor, in the Fields pane, click Buttons.
- Drag your button from the Mobile & Lightning Actions pane and
drop it in the Salesforce Mobile and Lightning Experience Actions field.
This step applies to the Lightening Layout in Salesforce. For the Classic Layout:
- Drag your button from the Buttons pane and drop it in the Custom Buttons field.
- Click Save.


