The following are the steps to design and configure Custom Actions:
- Code the Custom Actions.
The user defined custom class needs to be derived from ICustomTaskListActions and needs to implement the AddCustomActions method.
Sample:
public class CustomTaskListActions : ICustomTaskListActions
    {
    public StringBuilder AddCustomActions(StringBuilder sb, WFManualWorkItem wi, string currentUser)
    {
    string formRenderUrl = "FormRender.aspx";
    try
    {
    formRenderUrl = ConfigurationSettings.AppSettings["FormRenderURL"].ToString();
    }
    catch
    { }
    if (wi.UserID.ToLower() == currentUser && (wi.Status == WFManualWorkItem.ASSIGNED || wi.Status == WFManualWorkItem.OVERDUE) && wi.Name == "FormRender")
    {
    sb.Append(AddMenuItem("Fill in", "window.open('" + formRenderUrl + "?WID=" + wi.WorkItemID + "')", "_layouts/images/edit.gif"));
    }

    return sb;
    }

    private string AddMenuItem(string text, string actionUrl, string imageUrl)
    {
    if (imageUrl == null || imageUrl == string.Empty)
    {
    imageUrl = "/_layouts/AP/Image/warn16.gif";
    }
    string menuHtml = "<ie:menuitem id=\"" + Guid.NewGuid().ToString() + "\" type=\"option\" iconSrc=\"" + imageUrl + "\" onMenuClick=\"" + actionUrl + ";\" text=\"" + text + "\" title=\"" + text + "\" menuGroupId=\"2147483647\"></ie:menuitem>";
    return menuHtml;
    }
    }
The AddCustomActions method takes three input parameters:
- Stringbuilder
- WFManualWorkItem
- Currentuser
WFManualWorkItem is the WorkItem for which the task needs to perform the action.
- The custom Assembly should have a strong name.
- Drop the custom Assembly in the GAC as well as the bin directory of the SharePoint Web application.
Configuring the Custom Action within the Task List Web Part
There are two different ways for which you can bind your custom Assembly to the AgilePoint Task List:
- Registering the custom Assembly in the GAC:
Add a new setting in the appSettings node where the key is “CustomAgilePointTaskActions” and the value is “Class name, Assembly name” Sample:
<add key="CustomAgilePointTaskActions" value="SPCustomAction.CustomTaskListActions,SPCustomAction" />
- Registering the custom Assembly in the AgilePoint Configuration List:
Add a new entry in the AgilePoint Configuration List with the name as CustomAgilePointTaskActions, where the value is class name, assembly name
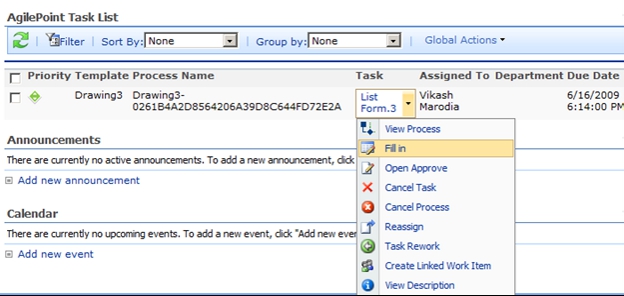
Once the custom Assembly is properly registered, it will be available in your task list as shown below:

