To set up Data Population, do the following.
Prerequisites
- For Data Population, the data tracking database that is created should include table columns based on the fields from the form.
- The primary key must be the process instance ID.
Instructions
- On the Connecting to Server window, select
the Logon type and click OK.
The Data Population Configuration window appears. This windows allows you to select either a Basic or Advanced way of configuring the repository and setting up the mapping for data population.
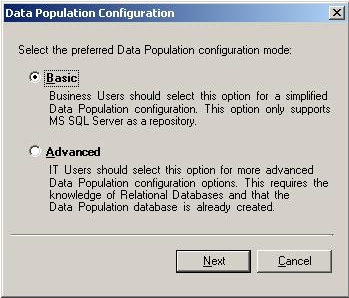
- Select one of the following:
- Basic - Suitable only for development environments where the data source resides on the same machine as the AgilePoint Envision client.
- Advanced - Suitable for environments where the data source resides on a separate machine from the AgilePoint Envision client.
If you selected the Basic option, the Data Service Configuration window appears.
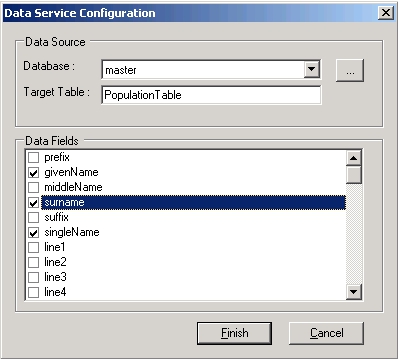
- Click the Ellipses button to populate the database list with all the databases on the server.
- (Optional) Change the Target Table name if desired.
- Select the Data Fields from the forms schema for which to populate data to the database.
- Click Finish.
If you selected the Advanced option, the Configuration Repository window appears.

- In the Repository field, select either Microsoft SQL Server or Oracle to write the data to a database, or SharePoint list to write the data to a SharePoint list.
- Do one of the following:
- If you have chose to write the data to a database:
- Click the Configure button to configure the database connection details.
- Click the Retrieve button to retrieve the database table names.
- (Optional) In the Runtime Database connection string field, enter the database connection string that will be used at runtime.
- Click OK.
- If you have chosen to write data to a SharePoint list:
- In the Site URL field, enter the SharePoint Site URL for the list and click the green arrow to sync with the list.
- In the List Name field, select the list(s) name(s) for which to populate data. Also select the Primary Key to be used for each list.
- (Optional) In the Runtime Server URL field, enter the SharePoint site URL that will be used at runtime.
- Click
OK. The Schema Mapper window appears.
Note: If the selected tables have more than one foreign key reference, an error message is displayed, also if the selection does not contain a master table that is referenced by a detail table, a warning message is displayed. The Repository dialog closes and opens the Schema mapper. If a selected table does not contain a primary key field, an error will be shown.

The left window pane shows the form's Schema, the right side shows the database structure.
- Map the fields accordingly from the form's schema on the left to the database fields (and all the attributes on the right). To map an element to the processId drag and drop as usual to the respective field, while mapping to a processed, the right element must be of type string, else it will give an error message.
- You will see the connection
lines appear as shown above. The connection lines may show different colors
based on the compatibility of the data types as follows:
- Green - The data type matches.
- Blue - The data type does not match, the system will handle the conversion.
- Red - The data type does not match, custom data conversion is required. In this case, click the Add button and add the custom mapping code as necessary to handle the data conversion.
Note: At any point of time, you can change the Repository Configuration by clicking the Repository… button to reopen the Configure Repository window. On successful configuration of the repository, the right tree view will be refreshed to load the modified Data Population schema, and restores the mappings that are still valid.Note: If the children of a recurring element are mapped, then compulsorily map the recurring elements also for proper result. If you do not map the recurring element, but map its children, and if the source XML contains multiple entries, the destination XML after transformation will contain only one element and hence it will create only one entry in the detail table. - After the mapping is complete, click OK to save the mapping and close. At runtime, the database or SharePoint List is populated with the values of the form fields.
