You can define custom attributes in your process by selecting them from a common reference point in a dialog box, rather than typing the exact name in the data binding field. This additional setup step declares your attributes in a common location in the process template, but it can save you time and effort if you want to use many custom attributes in your process.
- Declare your custom
attributes for use throughout the process template:
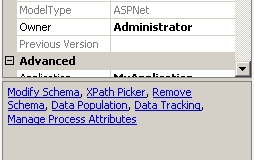
- In AgilePoint Envision, open a process template, and select the process template to display its properties in the right pane.
- Below the properties box, click the Manage Process Attributes link.
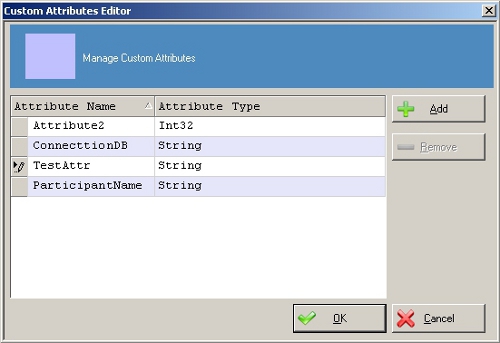
- In the Manage Custom Attributes window, click Add.
- In the Attribute Name column, enter the name of the attribute you want to create.
- In the Attribute Type column, select the data type for the attribute.
- When you have finished adding all attributes you want to create, click OK.
- Select the custom attributes
you want to use:
- Drag any AgileShape that uses data binding onto your process template – for example, the Participants property in a Manual activity.
- Select the shape you added. In the property where you want to use the custom attribute, click the appropriate field to open the schema binding dialog box. (From the previous example, for a Manual activity, in the Participants list, click Add Participant.)
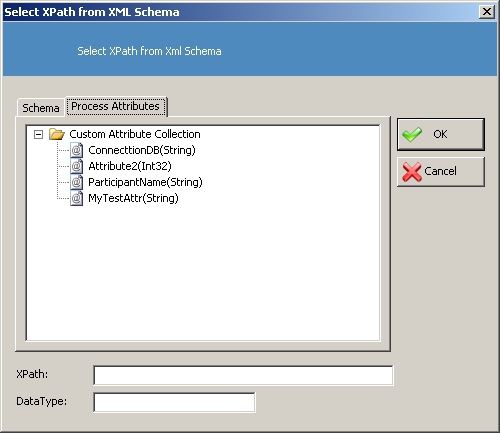
- In the Data Binding field, click the Ellipses (…) button.
- On the Select XPath from XML Schema dialog box, click the Process Attributes tab.
- In the Custom Attribute Collection list, select the attribute you want to use, and click OK.