System Configuration/Cache
The System Configuration > Cache page allows an administrator to manage users.
What is offered
Analytics Center offers two distinct caching solutions out of the box, a disk cache and a memory cache. By default, the disk cache is enabled for the application. These caching options are part of Analytics Center’s default resources, so you do not need to download or implement any additional items for these to be present.
Outside of the disk and memory caching options, there are two areas of Analytics Center that are cached: data and our system configuration. Both of these caches can be disabled or enabled at will, but are enabled by default.
How it is configured
The configuration options for your caches are location on the Settings > System Configuration > Cache page. On this page you will be able to determine the following options for both the data and system caches:
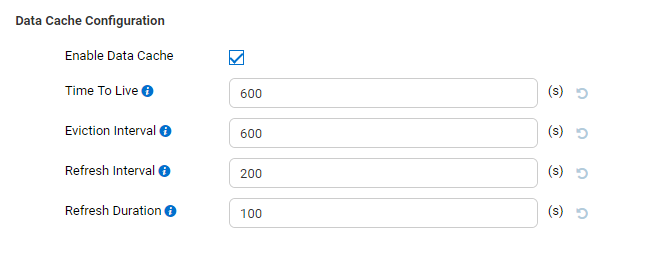
- Is the cached enabled?
This determines if you are using a cache for this area of the platform.
If the cache was enabled and you deselect this option, all cached values will be invalidated and removed.
- Time to Live
This is a time, in seconds, that dictates how long a particular cache is valid.
If this time passes, that cache is considered invalid and data will be pulled from the database and re-cached the next time that information is accessed.
- Eviction Interval
This is a time, in seconds, that dictates how often Analytics Center will go and clean out the invalid or expired cache items.
- Refresh Interval
This is a time, in seconds, that determines how frequently Analytics Center will go an automatically update any items in the cache.
Please note that this process can mean data is re-cached from your database, so there may be some workload considerations when setting this value.
- Refresh Duration
This is a time, in seconds, that dictates how long Analytics Center will let the automated refresh process operate.
If the time limit is met, Analytics Center stops updating the caches and they will remain invalid until a user manually updates them or the next automated refresh occurs.
A set of additional options within the configuration files, please see our Cache page.
Configuring the Disk Cache
When utilizing the disk cache solution, Analytics Center will store it’s information into two directories in the location you specify: SystemCache and DataCache. These directories can be modified in our configuration files to support the following directory types:
- Absolute Paths
D:\[YourFolderName]
If the folder doesn’t exist, the system will create a new one based on this path.
- Relative Path
[YourFolderName]
If the folder doesn’t exist, the system will create on in the application’s directory
- UNC Paths
\\123456.78.910\[YourFolderName]
Where you configure these paths and settings varies depending on if you are utilizing Analytics Center’s .NET or .NET Core resources.
- .NET Environment
These values will exist inside of the web.config file
The data cache path is set for the value: izenda.cache.diskcache.datacachedirectory
The system cache path is set for the value: izenda.cache.diskcache.systemcachedirectory
- .NET Core Environment
These vales will exist inside of the appsettings.json file
The data cache path is set for the value: izenda.cache.diskcache.datacachedirectory
The system cache path is set for the value: izenda.cache.diskcache.systemcachedirectory
Switching Between Memory and Disk Cache
To determine which caching solution you would like to use, simple comment out the appropriate lines in either your web.config file or your appsettings.json file. For example, if we wanted to leverage the disk cache over the mem cache, we would comment out the following:
//"izenda.cache.data.cachestore": "MemoryCacheStore",
//"izenda.cache.system.cachestore": "MemoryCacheStore"
"izenda.cache.data.cachestore": "ExternalStorageCacheStore",
"izenda.cache.system.cachestore": "ExternalStorageCacheStore"
Refreshing the Cache
Aside from the automated refresh that you can set, the data in the cache can be manually updated on certain pages of the application where you see a ‘Refresh’ button along the top. When selected, the system will re-query the database, refresh the cache, and present the updated results to the user.
The old ‘Update Results’ button has been renamed ‘Apply Filters’. When selected, this will prioritize pulling data from the cache. In the event the cache is invalid, Analytics Center will re-query the database and then update the cache accordingly.
Clearing the Cache
In order to manually clear the cache we have created the following endpoint:
POST /api/SystemSetting/ClearCacheSample Payload:
[
    {
      "ClearCacheType": 1
    }
]
Sample Response:
[
    {
      "success": true,
      "messages": null,
      "data": null
    }
]
- The possible values for ClearCacheType are as follows:
“0” means System Cache
“1” means Data Cache
“2” means Both System and Data Cache